State of the TTP as of July 17th, 2006
This section was originally started in February of 2006 in response to what was at the time the biggest OFP session we'd ever had. It featured increased teamwork and coordination, and while it didn't go off without problems, it was a good learning experience for both the ShackTac and Goon groups. The session inspired me to create a page dedicated to the tactics, techniques, and procedures we would use in future coordinated sessions such as it, and would hopefully lay the groundwork for us to move on to ever more challenging and coordinated scenarios.
Months later with the Wargames League mod and the rapid growth of Shack Tactical we've begun to see knowledge and familiarity with the TTP page come more into play in our average sessions. The players most familiar with it tend to be the most beneficial to the group, the best leaders, and are also aware of a wealth of tactical, communication, and leadership knowledge presented within. All in all the TTP grows ever more relevant and critical the more our group evolves, and it's of the utmost importance that all new players familiarize themselves with it at the first available opportunity.
Wargames League has also inspired me to put more time and effort into expanding the TTP to try to cover as much as possible. It's a perpetual work-in-progress, and I try dilligently to keep track of all of the changes made to it so that people will have an idea of what has changed since their last visit.
If you ever want to see a particular topic covered in this, please feel free to let me know.
Keep in mind that this is required reading for everyone who plays with Shack Tactical. Check it every few weeks to see what has changed. The tactics and weaponry sections in particular are relevant to every player.
-dslyecxi
Rewritten on July 30th, 2006 to reflect the realities of how our organization and structure has turned out in WGL.
Due to the nature of OFP's multiplayer gameplay (and more specifically, Wargames League) and the inherent realism of the experience, it's important that we have a well-thought-out command structure in place to allow for us to carry out missions to the best of our collective abilities.
To that end, we've established and evolved a command structure and system that works very nicely for our purposes. The command structure is broken down as follows.
| Optimal Platoon Breakdown| Role |
/ Quantity |
Platoon Commander |
1x |
|
Squad Leaders |
3x |
|
Fireteam Leaders |
6x |
|
Grunts |
30x |
|
Platoon Commander
The Platoon Commander, or PltCo, is the highest level of authority in-game. The PltCo is responsible for directing any squads under his command, as well as coordinating airmobile troop movements and air support/resupply with the AirO.
The PltCo can choose to have an Assistant Squad Leader take charge of his group to command it while he deals with the "big picture" (meaning, the PltCo does not have to take the head spot in a group). PltCo's deal with the higher-level strategic situation, whereas Squad Leaders are more concerned with the immediate tactical situation. Depending on the complexity of the mission, this may or may not be desirable.
Squad Leader
The Squad Leader, or SL, is in command of one of the squads in-game. Squad Leaders are responsible for executing the orders from the Platoon Commander. SL's coordinate the tactical movement of their squads in accordance with the Platoon Commander's intent, assign crew-served weapons teams and direct their employment, and lead said squads in combat. Squad Leaders also keep in contact with each other, and the Platoon Commander, to ensure that everyone has a good understanding of the current battlefield conditions.
The Squad Leader must insure that there is a designated person that is ready to step up as SL in the event that he is killed in action.
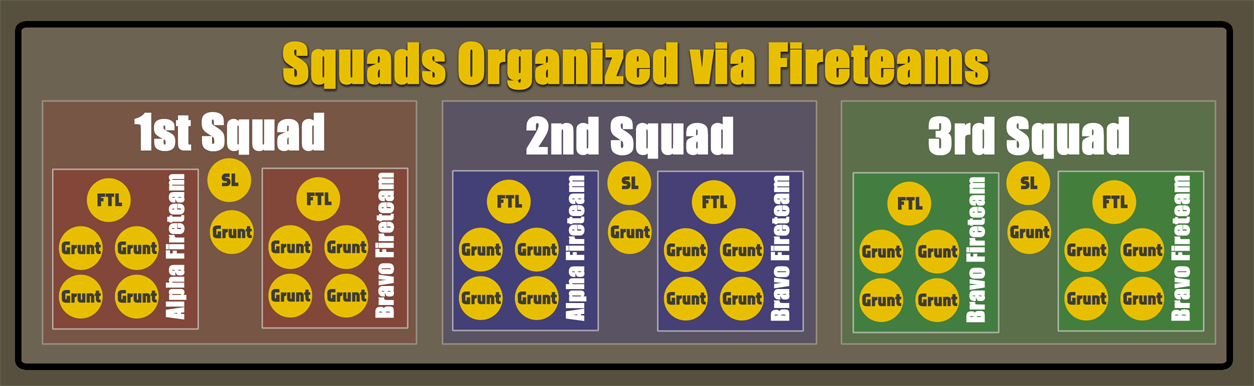
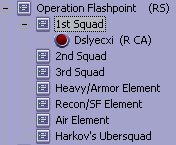
Fireteams and Fireteam Leaders
The ideal method of organization involves Fireteams and Fireteam Leaders (FTL). There are typically two fireteams in a squad, with a squad leader element that varies in size depending on how the mission is set up. The squad leader element typically will be either just the Squad Leader, or the Squad Leader + RTO, or some other similar small group.
Cornbeef's "Conventional Warfare" mission is an example of an ideal fireteam organizational setup, in which the squad leader element has the Squad Leader and RTO, and each fireteam consists of five people with group markers showing the locations of the HQ, 1st, and 2nd Fireteam.
This is the preferred method for Wargames League missions, as it allows for more in-depth command and control on a squad level.
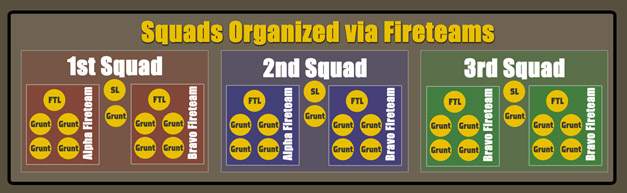
When it comes to the in-game group tracking markers, this is what they should ideally translate into. Brevity is critical when creating group markers, but you don't have to worry about that if you're not a mission maker.
| Element |
Map Marker Label | |
Pronounce it as... |
1st Squad, Alpha Fireteam |
1A |
Alpha One |
|
1st Squad, Bravo Fireteam |
1B |
Bravo One |
|
1st Squad, Squad Leader |
1SL |
Lead One |
|
|
The alternate way to run fireteams in missions that aren't set up like Cornbeef's "Conventional Warfare" (meaning that there are not seperate groups for each fireteam, with group markers) is as follows. The squad leader assigns team members to a given color (Red and Blue work fine) by selecting a group of players with the F-keys and doing Team -> Assign -> Color. It will then give a "2, 3, 4 is TEAM GREEN" (or similar) message in text. This requires that players know their number, which can be found in the "Group" tab of the clipboard or when saying a message in the Command or Team text channel.
When set up via the color-system, a Squad Leader refers to his fireteams by their colors, i.e. "Green team" or "Red team".
When set up the optimal way, a Squad Leader refers to his fireteams by their phonetic alphabet designations, i.e. "Alpha" or "Bravo". Cross-squad coordination requires the usage of the squad designation as well as the fireteam designation, i.e. "Alpha One", "Bravo One", etc.
Grunts
Everyone who isn't in a leadership position is a grunt. Grunts simply follow the orders of their Group and Squad Leaders. Grunts can be any kind of unit - armor crewmen, pilots, or just plain old infantry.
Air Officer
The Air Officer, or AirO, is in charge of coordinating air assets to support the platoon. This includes tasking out the various support aircraft and executing close air support requests. The AirO is the Squad Leader/Channel Commander of the "Air Element" channel, and deals strictly with the air forces. AirO's are only needed when there's a dedicated CAS element available in the mission, and are typically most needed when it's fixed-wing assets that are being used. AirO's are very rare to see in-game, but anyone interested in the role should be familiar with the responsibilities of it.
Our OFP channel is broken down into several sub-channels for the purposes of making the in-game voice communication as clutter-free as possible given the tools we have to work with. The updated ShackTac keybinds (updated December 13th) are essential for anyone who plans to play.
If you intend to take a leadership role, you MUST have a microphone. No exceptions.
The Updated ShackTac keybinds
| Channel | Bind |
| Main Channel - ST/ Armed Assault / Primary |
Alt + Numpad 0 |
| Secondary Channel - ST/ Armed Assault / Secondary |
Alt + Numpad . |
| Squad One |
Alt + Numpad 1 |
| Squad Two |
Alt + Numpad 2 |
| Squad Three |
Alt + Numpad 3 |
| Squad Four |
Alt + Numpad 4 |
| Command Element |
Alt + Numpad 5 |
| Air Element |
Alt + Numpad 7 |
| Armor Element |
Alt + Numpad 8 |
| Harkov's Ubersquad |
Alt + Numpad 9 |
Whisper to Channel Commander
in Channel Family |
H |
| Toggle Channel Commander |
Right ALT + Right CTRL + Insert |
| Volume Up 10% |
Alt + = |
| Volume Down 10% |
Alt + - |
Keep in mind that the ALT listed is the LEFT ALT, right ALT will not work.
Whisper to Channel Commander in Channel Family - Or "The Commander Channel"
When it comes to coordinating, ShackTac uses a TS2 feature known as "whispering" to keep the different leadership elements in contact with each other. If you plan to assume a leadership role, you need to go into the Self menu and select "Channel Commander". Once you've become a Channel Commander, the green dot by your name will turn red to signify the change. Channel Commanders can use their "Whisper to Channel Commander in Channel Family" bind to talk to all Channel Commanders at once, regardless of what sub-channel they're in.
Utilizing OFP's Built-in Command Options - Simple things to make life easier for everyone
Everyone should be familiar with OFP's radio and interface options from having played the singleplayer content. "Radio options" for the purpose of this section are the options that you get when selecting squad members - there are 10 different sections, listed as follows: Move, Target, Engage, Mount, Status, Action, Combat Mode, Formation, Team, and Reply. "Interface options" are the context-sensitive cursor actions that can be used by group leaders, such as designating targets (select soldier, right click on an enemy), assigning waypoints (select soldier, click on visible position you want them to move to), and assigning sectors of fire or observation (select soldier, alt-click in direction of observation).
Both the radio and interface options should be used whenever an appropriate situation can be found for them. I'll list the different roles, and ways that the built-in command options can be utilized by them.
- Platoon Commander - Due to not always being a Group Leader, the PltCo often has the same radio options as a Grunt (listed below). The PltCo relies on voice chat and map interaction to accomplish his mission, and thus does not require the radio options to be used for anything.
- Squad Leaders and Assistant Squad Leaders- SL/ASL's can use "Move" commands (best utilized by selecting a team member and clicking on the map where they need to go) to give waypoints to subordinate soldiers. They can also utilize the "Mount" command to organize the loading of troops into vehicles. Other options, like Combat Mode, Formation, and Engage, can be used to set group postures and ROE's.
- Grunts - Grunts primarily use the Status menu to report that they're low on ammo or wounded. Grunts also can use the right-click "Reveal" option to spot enemy units and automatically relay their type, direction, and distance to their group leader.
- Air Officers - AirO's can use move commands (since they show an on-screen waypoint) to mark CAS targets, landing zones, or other places of interest for the aircraft under their command.
Text Chat - Using the different channels to maximum effect
OFP has five different text chat channels. Channels can be switch via , and . when not typing, or the up and down arrows if the chat box is already open. The channels are Global, Side, Group, Vehicle, and Direct (names changed to Command & Team in WGL). When text is sent, it'll appear only to the channel selected - Global is white in color and goes to all, Side is light blue and goes to everyone on a given side (West, East, Resistance), Group is green and shows up for everyone in your current group, and Vehicle is yellow and shows up only for people in the vehicle you're in. Direct chat shows up in the center-bottom of the screen without a speaker's name attached to it, and is generally useless for our purposes. However, there are some situations where this can be useful. Experiment with it and you may find a use for it.
If you're a Squad Leader, Assistant Squad Leader, or Air Officer, you should have your chat channel set to Side during missions. If you're a grunt, you should set it to either Group or Vehicle, depending on whether you're a vehicle crewman or not. Infantry should be on Group, while armor crewmen should be on Vehicle. If everyone is using the proper text chat channels, noone will have to question the relevance of any given text on-screen - if it shows up as a green, they know it's someone in their group. Yellow, it's a crewmember, blue, it's a command figure. Simple and effective.
Death & Comms - Dead men tell no tales
Once killed, you are no longer able to speak to any living players. If you want to chat, you're going to have to go back to the main channel to speak with any other ghosts you might find there. Ghost text chat should be kept to an absolute minimum, as it interferes with the living players' coordination. If you must chat, you need to go to the root voice channel (alt-numpad0) and speak there.
We use the map entirely for planning and coordination purposes. "Scribbling" on the map or trying to add humorous little markers is not tolerated, so don't waste your time doing it.
Below are some guidelines for making the most of the map. Heed these and things will go more smoothly for everyone.
- All map marker text should be written as succinctly as possible using abreviations and acronymns. For instance, "tnk" is tank, "aa" is anti-aircraft, "inf" or "ei" is infantry. Squad One becomes "sq1", waypoint becomes "wp", and so on and so forth.
- All ShackTac landing zones (LZ) are named after birds. The format for marking one on the map is: LZ Birdname (with the below-pictured map marker). The reason for using only bird names for LZ's is to prevent confusion by having an established naming convention.
- Your chat channel dictates who can see the markers you're putting on the map. Thus, if we're all running things the way we should be, grunts will place map markers that only their own group can see (due to them being on the Group Channel when in-mission), whereas the leadership element (consisting of the Platoon Commander, Squad Leaders, Assistant Squad Leaders, and Air Officer) will place markers that everyone in the Platoon will be able to see. When adversarial is being played, make certain that you do not have your radio set to "Global" or your map markers will be visible to the enemy team.
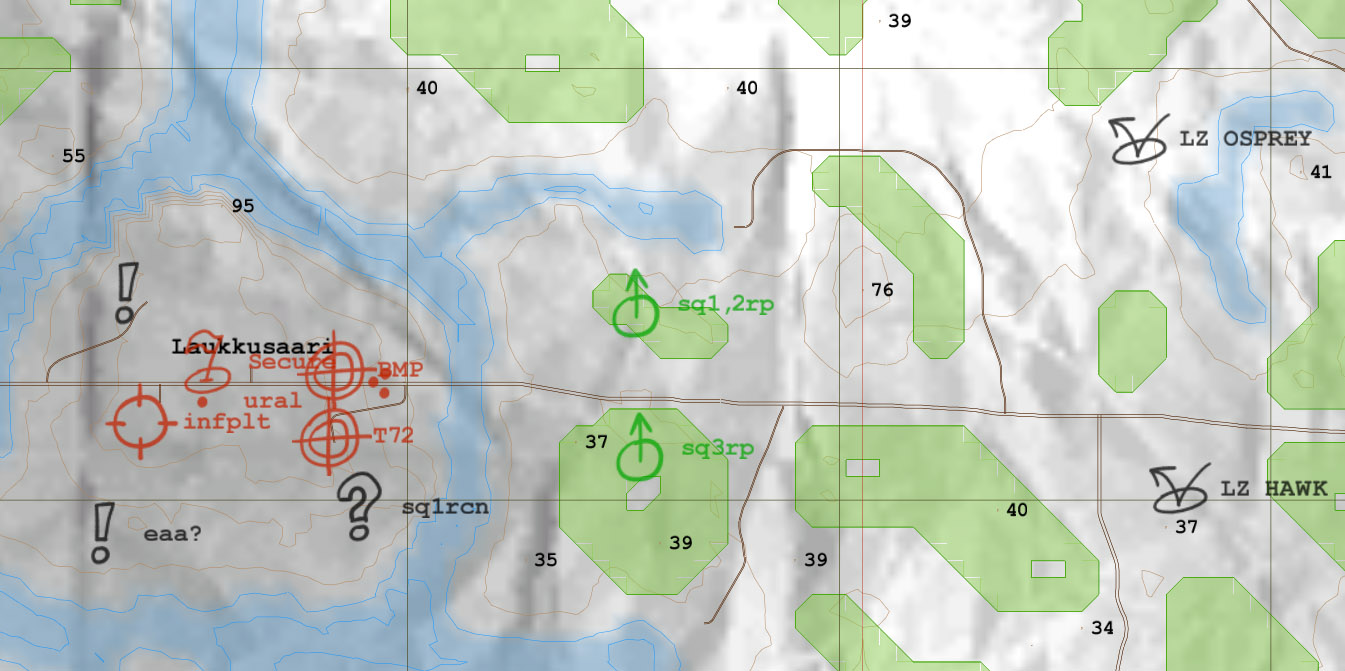
- Try to use the logical symbols when adding map markers, as time and the situation dictate. See the picture below for sample markups.
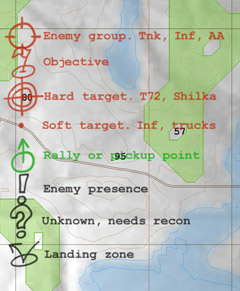
Sample map markup. Click it for an example of what an in-game scene might be marked up as.
I'd suggest that anyone who intends to take a leadership role have a notepad and pen handy during our sessions. At the start of each mission, jot down the composition of the team - the groups in each squad, the SL's/ASL's for each squad, the AirO, and so on. This way you aren't forced to memorize everyone's name, you can just glance over at your notes whenever necessary.
Pre-mission SOP
When at the slot select screen, take your role as group leader of whatever unit you want to lead. Pre-planned missions typically have the command element and squad compositions planned out in advance, so this should be a pretty quick thing.
Once at the Briefing screen, the Command Brief will occur. This is when the command staff goes into the main channel (Alt+Numpad0) to reiterate what the mission plan is and clear up any last-minute command questions amongst themselves. Ensure that, as a SL, ASL, or AirO, your grunts know that you're heading out of the channel for the Command Brief, and that'll you be back as soon as it's done.
After the Command Brief has concluded, head back to your element's channel. I would suggest that everyone start off with a group "Roll call", this is a good way to combine a mic check, ready-check, and voice familiarization routine into one thing. Go to your "Group" section of the in-game briefing book and read off the names from 2nd group member to last. "So and so". "Here." "So and so". "Here", etc etc.
Once you've done the roll call, if you have the option to reassign weapons for your group, ask if anyone wants a custom assignment. Do this the same way as the roll call - say a name, listen to what they want, assign it, and move on to the next guy. You should probably write down your different group members, their number, and any special weapons if applicable - ie sniper rifles, AT-weapons, AA, whatever - during or after this step.
After that, move on to your group briefing. You don't need to tell your group every tiny little detail of the operation, just ensure that they know the main points - what objectives you'll be responsible for, how you'll be getting around the battlefield, what they should expect to encounter, what the Rules of Engagement (ROE) are. Be concise, but not to the point of leaving out anything important. Give them a chance to ask questions as well. Ensure that you assign crew-served weapon teams.
Once everyone's ready, proceed into the mission and prepare to take names and kick ass (not necessarily in that order).
What is Pre-Planning?
Pre-planning is usually done to ensure that at the very least the Squad Leaders have a good idea of what is expected of them over the course of the missions. This helps to lower the amount of cross-squad communication needed, as the basic mission plan is known by the command element and thus brevity can be maintained in cross-squad comms.
For instance, instead of the PltCo having to tell 1st Squad to "Head to the woods NE of such-and-such town", then telling 2nd Squad to "Secure such-and-such town", then telling 3rd Squad to do something else entirely, with the pre-planning the PltCo might only have to tell the Squad Leaders to make their way to their initial waypoints and all the SL's will know where that is and what they should do once at it.
Leadership - Self-Preservation
Leaders are of far more value to the platoon alive than they are dead. Simple but true. As Squad Leaders in particular, it's important that you not get yourself killed in the first moments of combat. To this end, here are a few basic guidelines to keep in mind when leading.
First, you should avoid using anti-tank weaponry whenever feasible. Leave the AT work to the soldiers under your command - it's a very high-risk job, and in the interest of preserving the leaders' lives, it's better to task it down to subordinates.
Second, you should always try to lead from the front, but you should also let your soldiers do the bulk of the fighting whenever possible. You should be concerned with the squad-level tactical picture, not trying to kill every single enemy soldier you see.
Other leadership considerations
- Ammo Bearers - Squad leaders can turn their team members into ammo bearers by giving them extra rounds for RPGs and MGs. Even if a squad member isn't carrying one of those weapons, a commander can give him the ammo for it, which the member can then drop for others to pick up.
An RPG grenadier may only be able to carry a few rounds by himself, but by using squad mates, you can effectively double or triple that capacity. This is especially useful for weapons like the Javelin, Carl Gustaf and the AT4, that are incredibly powerful but only one round can be carried at a time. Much better to have a team member lug around a second AT round than try to scavenge a different weapon off of a corpse.
- Point man - Although it's oftentimes not necessary, there will be occassions where having a designated point man for an element will be advisable. If travelling in a convoy, for instance, you're best off having one vehicle designated as the lead, with a single soldier in it. That way, if the lead vehicle comes under fire the rest of the convoy will be alerted and at worst only a single life and vehicle will be lost initially.
- Crew-served weapon placement - When possible, give guidance to your crew-served teams on where they should deploy their weapons. Try to guide the rest of your element into setting up their positions to support those of the crew-served team.
- Overwatch - When two groups are moving together in a high-risk environment (movement to contact, for instance), it's advisable to use a leapfrog "bounding overwatch" method. The first group will move while the second one provides overwatch, then the first group will halt and provide cover while the second one moves up to and past them, at which point the second one will do the overwatch. Rinse and repeat until the objective has been reached.
- Casualties and Consolidation - There will be times where, despite all effort to avoid it, multiple teams will take heavy casualties for one reason or another. When this occurs, the SL's of the depleted squads need to get in contact with the PltCo and each other to organize a merging of units. This typically occurs with two squads merging to form one, as individual groups within a squad are already grouped together and thus wouldn't benefit from "merging", since for leadership purposes they in effect already are merged.
- Alternating the assault element - Whenever possible, the assault element should be rotated out after each objective. This helps to prevent any one element from being ground down after successive combat actions. If 1st Squad acts as an assault element for objective 1, and 2nd and 3rd Squad are the support elements, then 1st Squad will act as support for the next objective and either 2nd or 3rd will be assault.
- Armor support - Particularly in urban areas it is of vital importance for the infantry and armor to work together. The lighter the armor, the more important this becomes. If necessary, designate specific team members to tag along with the armor and cover them from RPG's and the like.
- Artillery and Air Support - Whenever artillery or CAS is being called in, ensure that all units within 500 meters of the planned target are aware of the incoming fire and have ceased movement towards the strike point. Most friendly fire incidents can be avoided by ensuring that nearby units know that CAS or arty is inbound, and ceasing forward movement until the strikes have completed.
- "Danger Close" strikes - Any CAS or arty strike that lands within 200 meters of friendly forces will be considered to be a "Danger Close" situation. Extreme care will be exercised by the CAS when doing "Danger Close" runs, and artillery FO's are expected to be extra cautious when calling and adjusting "Danger Close" fire. As a leader, ensure that you let the AirO know the position of your men when a strike is being set up. Marking the map with friendly positions is also advisable any time CAS or arty is being employed.
Individual soldier proficiency is a key factor to whether or not we're able to accomplish any given OFP mission. To that end, it's important that all players take the time to learn the weapons that they'd like to employ in ShackTac sessions. If you want to be an anti-tank guy, you need to know how to target and lead the various different AT weapons... same for any other special role, like snipers or medics. If you aren't proficient with something, don't take it - leave it for someone who will be more effective with it.
The easiest way to gain proficiency in OFP is to simply play through the various singleplayer missions and campaigns in the game. Just playing through Cold War Crisis and Resistance will give you a solid basic skillset that will be able to keep you alive longer than otherwise when things start to heat up in MP.
There are a few things in OFP that aren't immediately obvious tactics-wise to most people, so I'll take some time here to write up a few of the lesser-known or less-utilized techniques that will serve you well in the heat of virtual combat.
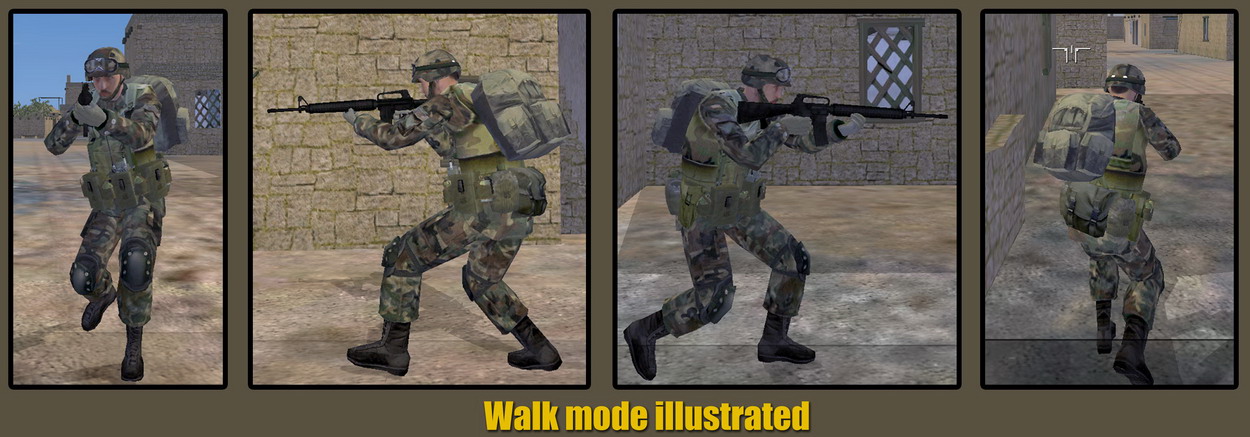
Walk Mode - Slow is smooth, smooth is fast
Everyone should have their "Walk" key bound to something readily accessible - I personally use C. "Walk" mode is a toggle-function, not a hold-down like Sprinting. When activated, you'll move at a slower rate, and will keep your weapon in a ready position even when not looking down the ironsights. This mode is extremely useful for urban operations, CQB, or anything where you need to move smoothly and slowly through an area while retaining the ability to rapidly bring your weapon to bear on a threat.
Try it once and I guarantee you'll wonder how you ever played OFP without it.

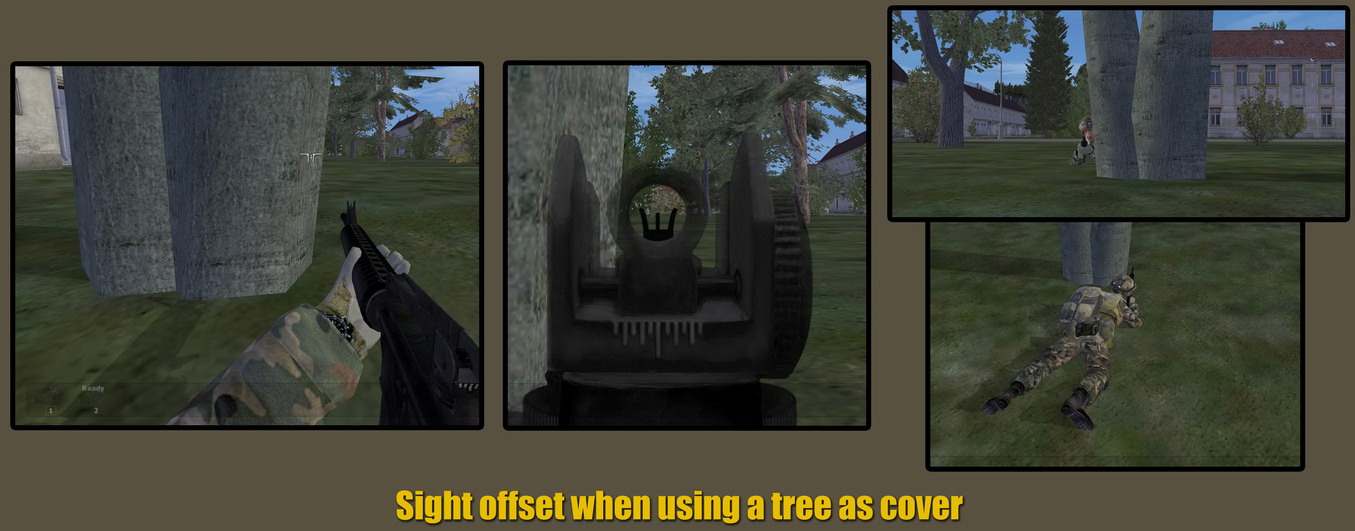
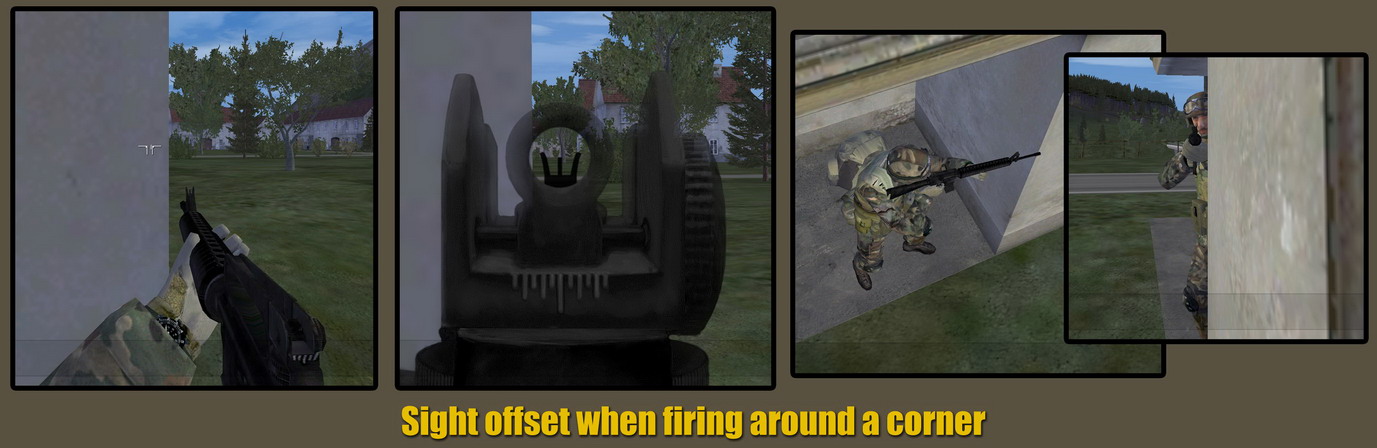
Sight Displacement - And how it affects your choice of shooting positions
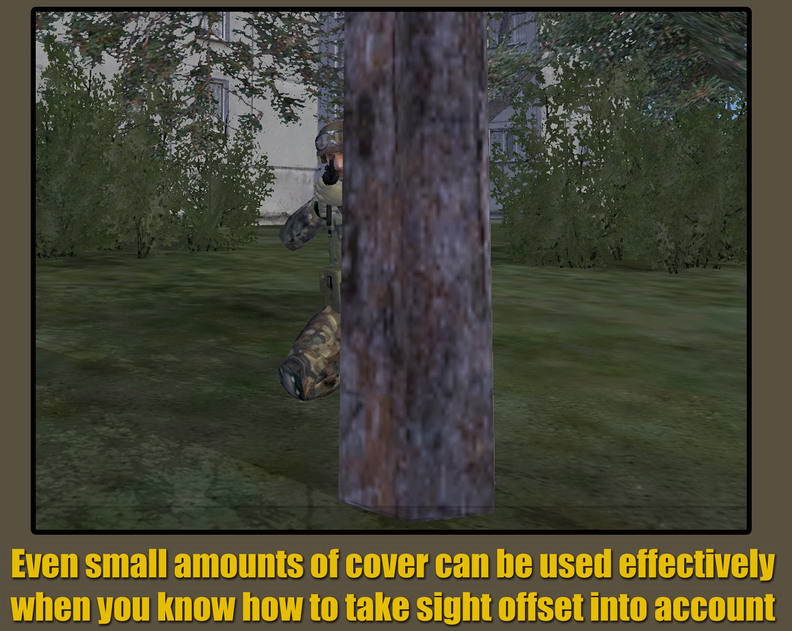
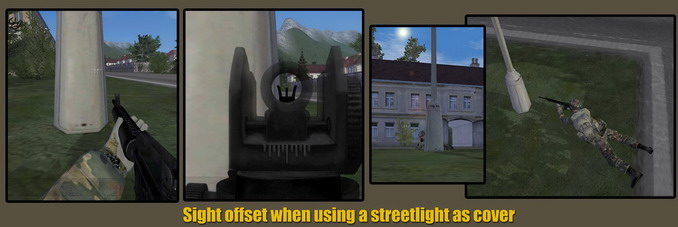
Although it's not immediately obvious in OFP, the view you get in ironsight mode is offset down and to the right of the non-IS view. This is because your character moves his head down to the weapon when it comes time to look through the sights, causing a slight displacement that can be used effectively to your advantage as long as you're aware of it. Once you know about this, you can "tuck in" much tighter to cover and concealment. Since we cannot switch to left-handed shooting in OFP (maybe in the sequel?), this is most useful when firing around the right side of cover.
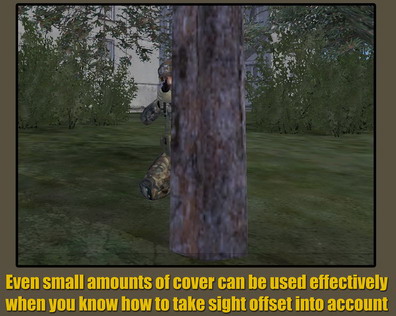
This section has been rewritten to better illustrate how the sight offset looks from first and third person. In the following illustrations, the left frame shows the view you get in non-ironsight mode. Note that the cursor is placed on the right edge of the cover being used. The second frame (from left-to-right) shows what happens when you go into ironsight view. Note that the view wasn't moved between frame one and two - that's what the sight offset looks like. Frames three and four simply show what it looks like from third person. Note how even small pieces of cover like thin trees and streetlights can end up protecting you from a good deal of fire if you 'tuck in' to them properly and utilize your knowledge of the sight offset.


Sight Basics - Proper sight picture, offset aiming, etc
It is important that every soldier master the basic rifleman skills, and to that end, be sure that you understand how to compensate for bullet drop at long range, and that you know what a proper sight picture is. When it comes to sight pictures, you want your front sight tip to cut the target in half, and you always, always, always want to aim center-mass. Center-mass 'holds' will allow you to reliably hit standing targets out to 300-400 meters. The smaller the target, the more likely that you'll have to apply offset aim techniques to get your rounds to hit. This is simply aiming over your target if you're shooting low - how much depends on how far away the target is. Leading a moving target is something that's going to take time and practice to get the hang of, but all effort invested in it will pay off in spades the first time you hit a distant, running target with your first shot.
Proper sight picture
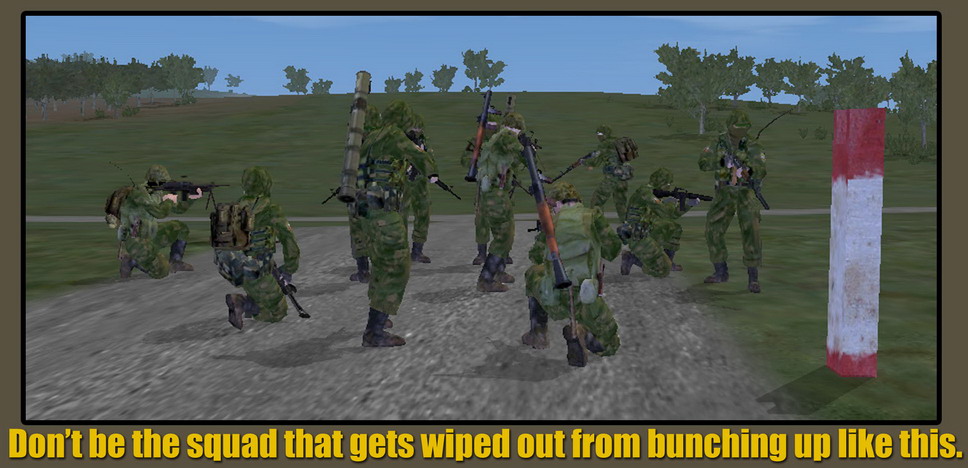
Keeping Good Interval - The key to avoiding massacres
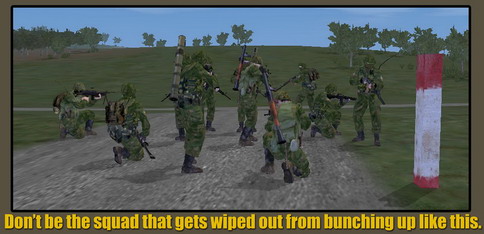
The natural tendancy of players is to group together, as if proximity equals security. In OFP, this is far from true - I can't count the number of times we've had two or three people killed in Shackbattles by a single enemy grenade, artillery round, or tank shell. This can be prevented with minimal effort - it's called keeping your interval, and all it requires is that people avoid bunching up, particularly when combat is ongoing or imminent.

The most sure-fire way to get a group of people killed by a single tank shell is for soldiers to bunch up around an anti-tank gunner. Typically, if a tank is hit by an AT weapon but not destroyed, it will very quickly return accurate fire on whoever shot the AT projectile at them - if other people are near the AT guy when this happens, the whole group will get blown to hell and back. So.. stay away from AT gunners when they're engaging armor!
Crew-served Weapon Teams - So you've volunteered to be part of a crew-served team. What now?
Crew-served weapons in OFP (FDF, WGL) are typically heavy machineguns, anti-tank missiles, or mortars (in ascending order of difficulty to employ). Two soldiers are assigned to them, one of them takes the gun or tube, and the second one takes the bipod. Ammo is split between the crew.
Most players can quickly pick up the basics on how to use the HMG's and AT crew-served weapons, but there are very few players in our group who know how to utilize mortars. If you'd like to become a mortarman, by all means, feel free to do so - the group would benefit from having more than a handful of people in it who know how to get results with the mortars - this is even more true for the Wargames League mortars, which take serious practice to become proficient with.
If you are part of a crew-served team, there are a few things you should keep in mind. First is that you're responsible for employing one of the most powerful infantry-carried weapons in the game - act accordingly. The weapon takes precedence over your normal individual soldier responsibilities. As part of a crew-served team, you'll be responsible for finding suitable deployment positions (or following the guidance of your Squad or Group Leader on where to deploy), getting the weapon set up in a speedy fashion, and putting effective fires on-target. Teams should also be prepared to rapidly move their weapon to a new position as the battle progresses.

Anti-tank missile team deployed for action
Stamina Conservation - Rush less, kill more
There is a tendency for players to sprint all over the place, regardless of the tactical situation. Inevitably this ends up getting people killed, since they tend to run into enemies after an extended sprint and thus cannot aim effectively due to the stamina penalties. Everyone should work on reserving their stamina for situations where it is desperately needed, such as an ambush, sniper fire, or any other time when getting the hell out of dodge takes priority over everything else. Jogging can be done indefinitely without penalty to the player, whereas sprinting starts off at a rapid rate, quickly builds up your breathing to the point where your aim is quite shaky, and gradually slows your sprinting speed over time. So, when given the choice, jog or walk whenever possible. Not only will you live longer, but it'll make it that much easier for us to maintain decent interval and coverage of each other while moving towards enemy contact.
Look independent of movement - One of those simple things that can prove useful
This is an easy one - in-game, your character can look around at any time independent of where you're heading. The easiest way to accomplish this is by holding down ALT and moving the mouse - you'll continue moving in the direction you were heading, and now your mouselook will control where you're looking instead of where you're heading. Alternatively you can use the numpad keys to look at set angles - 7 will look to your front-left, 4 to your left, and 1 to your rear-left, for instance.
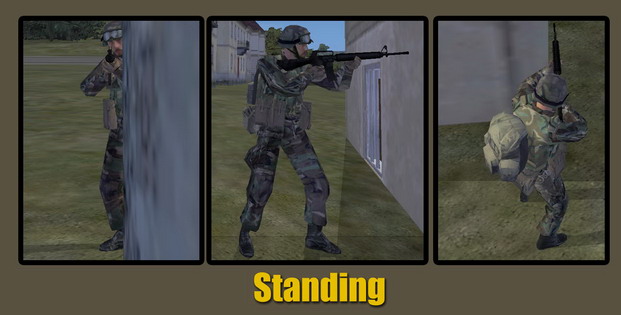
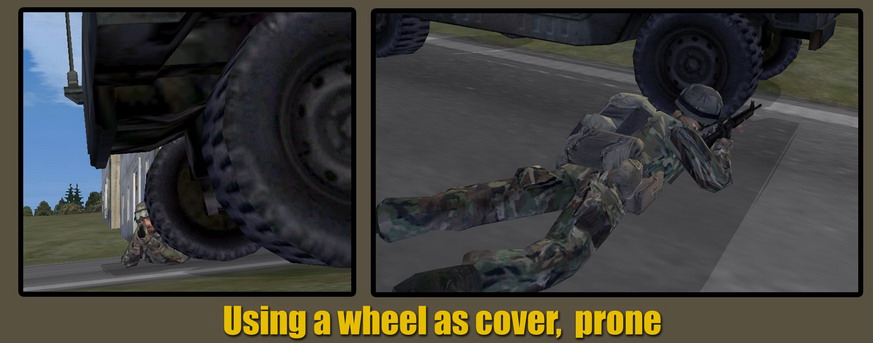
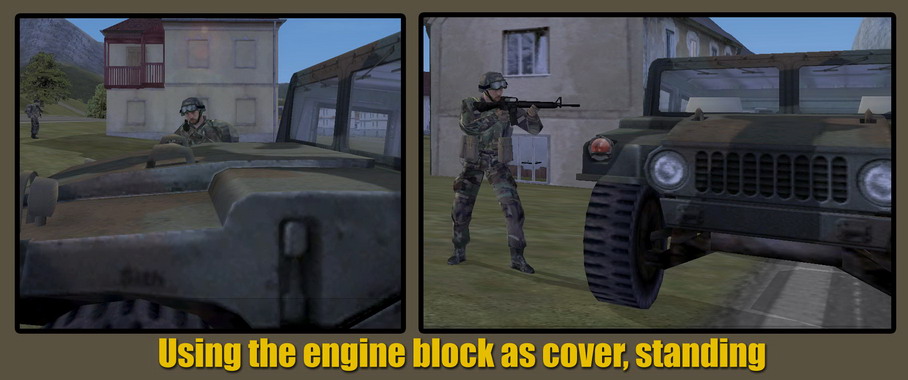
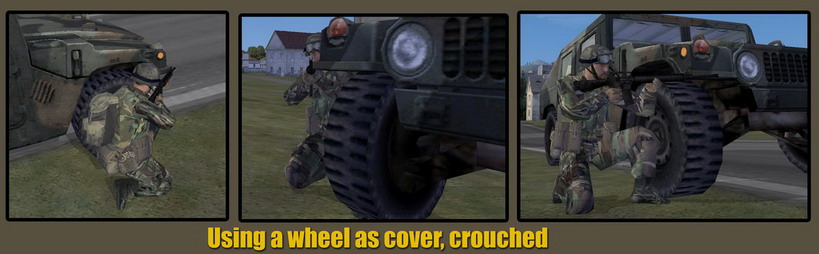
Movement, Stances, and Fighting Near Vehicles - Further illustration of the OFP movement model
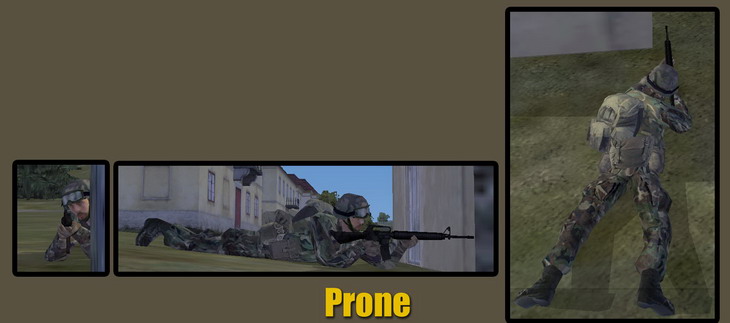
We start off with a look at the main stances and how you should tuck into cover when using them. The pictured example is the corner of a building, but these techniques can be used on any kind of cover or concealment. Note that the "sight offset" mentioned above comes into play when orienting yourself - you ideally want to be able to see around the cover in sighted mode, but have your vision partially obstructed by it in unsighted mode.


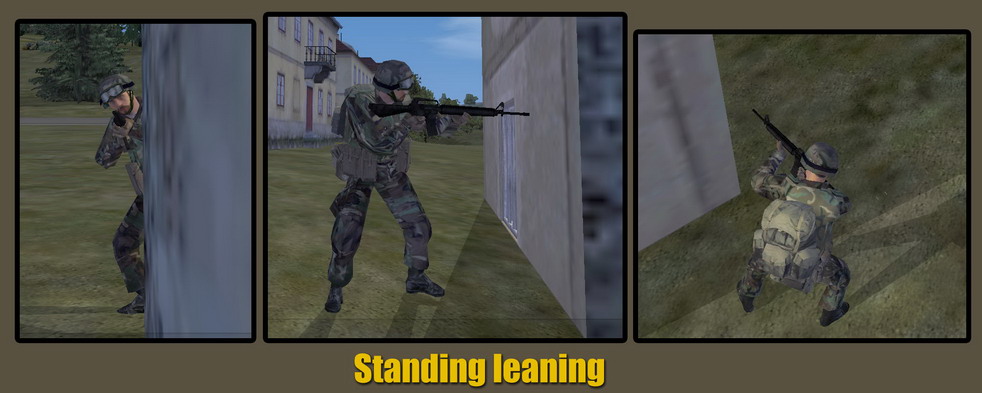
Next up we have the excellent leaning animations included in the Wargames League mod. This is even better than simply standing or crouching, as it exposes slightly less of your body to enemy fire. The main drawback is that your ironsight view ends up being tilted, and this can be a bit disorienting at first.


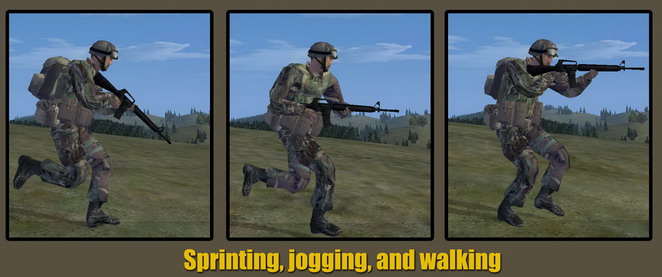
Here we see the way the player carries himself differently in each of the movement modes. Sprinting is muzzle-down, while jogging roughly points the weapon forward and walking has the weapon at a "ready" carry. As you read above in the "Walk Mode" section, walking should be used extensively when playing. It is by far the best mode to be in for MOUT and many other combat situations. An entire squad worth of human soldiers advancing with weapons at the ready in walk mode is a sight to behold.
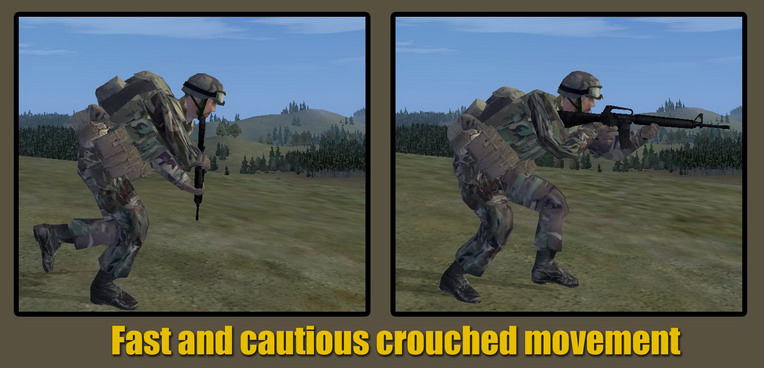
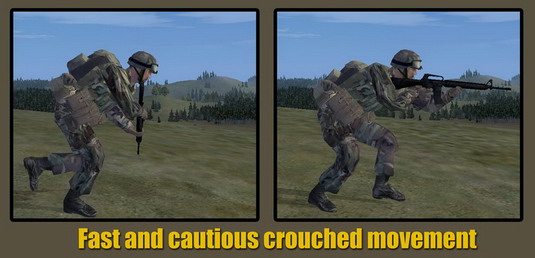
Wargames League adds a bit more fidelity to the OFP movement model by introducing crouched jogging and cautious crouch walking. Both of these give you a lower profile when moving, always a good thing when bullets are flying.
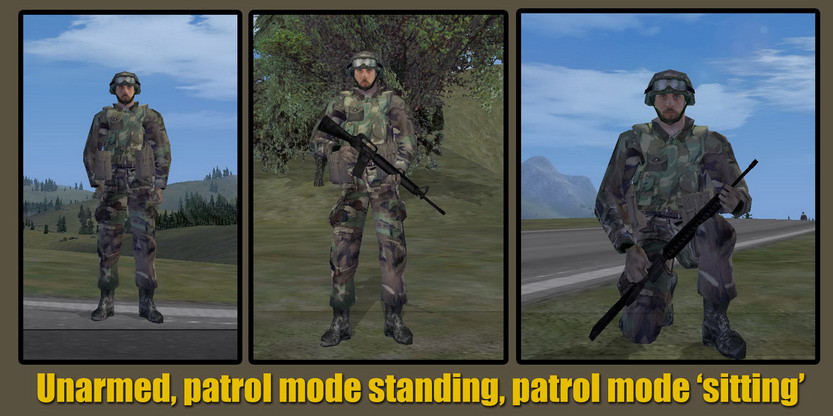
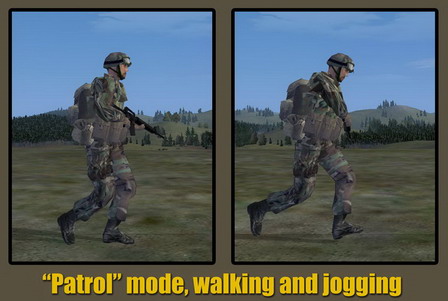
The WGL "Patrol" animations, activated by "slinging" your weapon, can be seen below. While not all that practical for combat situations, they are neat to see in action.

Here are some illustrations of the kinds of positions a player can take to maximize cover when forced to fight near a vehicle.


This section is very rough at the moment and should be considered as work-in-progress.
What is the role of EVERY vehicle on the battlefield? - The most important thing of all
The first thing you must remember when taking a vehicle role is that you ultimately are there to support the infantry. It is not your job to run around pell-mell trying to rack up an impressive kill count; instead, you should do everything you can to work with friendly forces so that you can best support the infantry. If you cannot comprehend this simple fact, you should not be manning a vehicle in our sessions.
Hull Down - Harder to hit, harder to kill
"Hull down" is the term used to describe when a vehicle (typically a tank) uses the terrain in such a way that only the gun/turret is visible to enemy forces. This provides the enemy with a smaller target, protects the more vulnerable parts of the vehicle from enemy fire, and allows the vehicle to fire more or less unhindered. The illustration below shows an M1A2 tank in a hull-down position behind a small rise. From this location, the tank had perfect visibility of a major enemy avenue of approach and had a clear line of fire down that approach without having to expose anything more than the turret to enemy return fire.
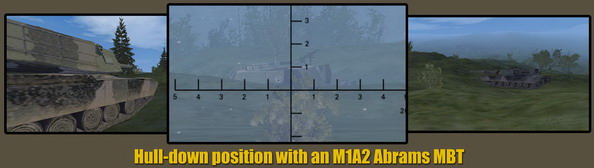
Hull down positions can be used by any vehicles that have weapon systems atop them - even a HMMWV with a TOW can benefit from a hull-down position, though not nearly so much as a tank might.
In the best-case scenario, a tank can utilize a hull-down position when firing, and then retreat back below the cover (i.e. down the slope that provides the 'hull-down' possibility in the first place) to total protection during the reload before popping back into a hull-down position for the next shot.
Remember that a hull-down position is relative to the location and distance from the enemy. The greater the distance of the engagement, the more likely you can get into a hull down position even in a small elevation decrease.
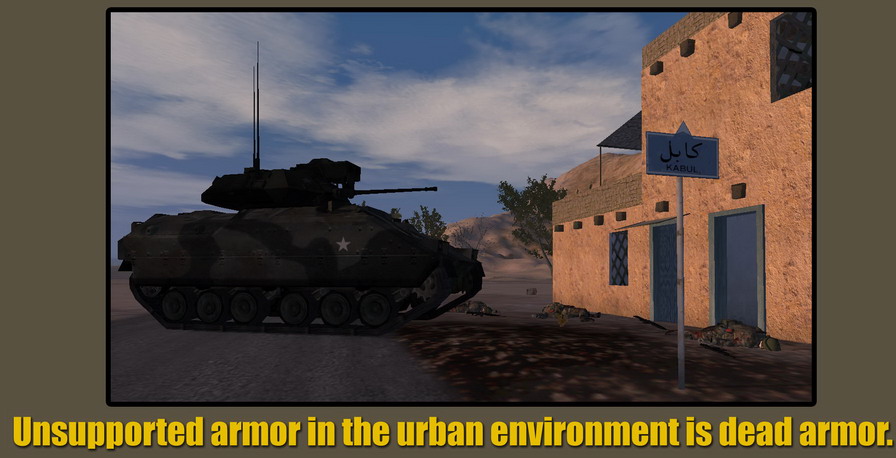
MOUT/Urban Operations - Special considerations for ground vehicles in the MOUT environment
The only way for any vehicle to survive in a MOUT environment is via the coordinated support of friendly infantry forces.
Period.
The abundance of hard cover and good concealment in the urban environment, along with highly canalized movement routes, allows for anti-tank teams and mines/improvised explosive devices to be employed with a very high level of effectiveness. Vehicles that move into a MOUT environment without support can expect to live minutes if they're lucky.
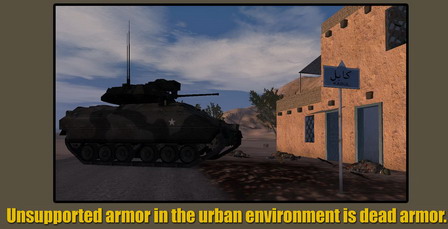
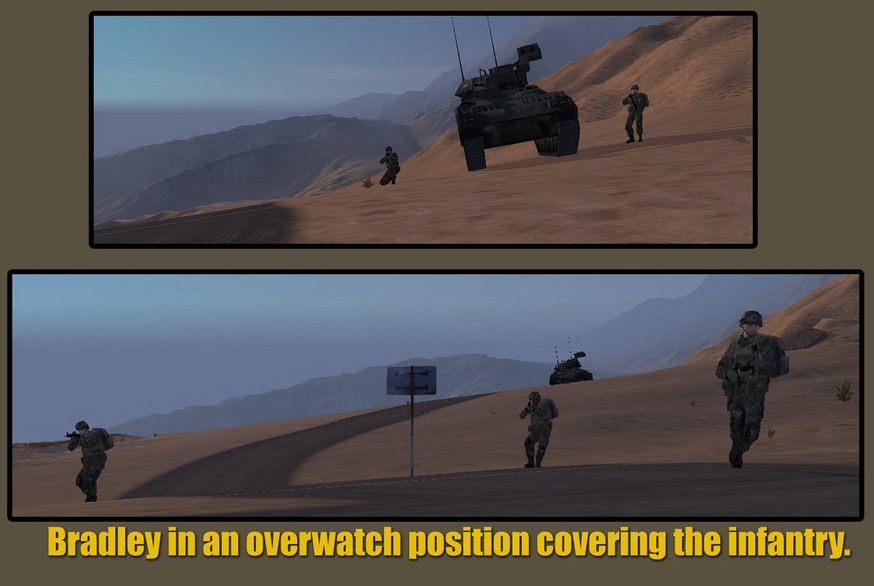
When it comes to supporting infantry in a MOUT environment, particularly in Flashpoint, vehicles are used best by staying at a standoff distance and providing support by fire. Moving directly into the urban environment is usually an unnecessary risk and intelligent enemy forces, particularly human-controlled ones, will quickly tear apart your armor unless you have absolutely top-notch infantry supporting it.
Any areas that are suspected of harboring enemy forces should be "softened up" via high-explosive munitions before the infantry are sent in for the urban work. Tank HEAT/HE rounds and light armor 25/30mm cannons work well for this, as do the Mk-19 40mm grenades. Suspected "problem buildings" can be hammered well in advance of any friendly infantry approaching them.

When it is absolutely necessary, vehicles can be brought into the urban environment so long as 360-degree security is provided by the infantry elements. The vehicle should focus fires to the front, with the infantry covering the flanks/rear and also providing close support to the front. Infantry should stay clear of the vehicle and should never cluster behind it due to the distinct possibility of said vehicle needing to rapidly reverse out of the area in the event that a serious threat forces it to move.
Breaching walls - How to conduct a wall breach for the infantry
Breaching a wall is a good way to surprise defending enemy forces and give your infantry a fighting chance. Typical enemy defenses focus on natural "choke points" such as a central entry to a compound that is otherwise walled off. Breaching a wall in an unexpected place and attacking through the breach is an excellent way to catch the enemy off guard and destroy them before they can shift to defend the breach point.
The process for breaching with any armored vehicle is simple. First you must assess the situation and decide on where the breach should be. Be on the lookout for mines, satchel charges, IED's, or any other devices that might be in place to protect against the possibility of a breach.
Once the breach point is decided on and deemed safe enough to breach, the vehicle proceeds towards the obstacle at full-speed and smashes a hole in it. After making the hole, the vehicle should as standard procedure immediately go into full reverse and clear the way for the infantry. The infantry then proceed in from either side of the breach and assault through it while the armor provides cover. If the area the infantry will be proceeding into is barren of cover or likely observed by enemy forces, the armor vehicle should pop a smoke screen prior to backing up.
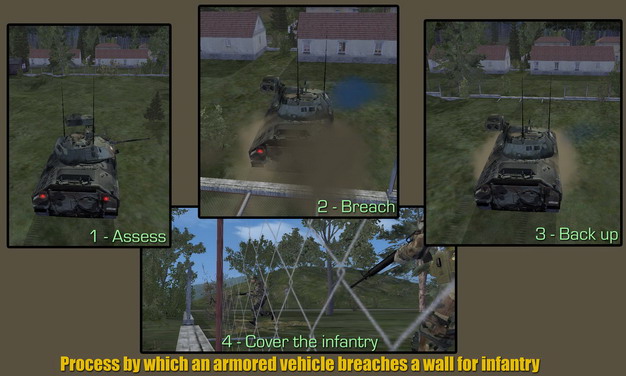
The reasoning behind having the breach vehicle withdraw after creating the breach versus charging into the unknown is simply that it increases the survivability of said vehicle. While a tank might be able to drive through the breach point, plant itself on the other side, and obliterate everything that opposes it, lighter infantry fighting vehicles will end up being disabled or outright destroyed by things like AT-4's, RPG's, and other light anti-tank weapons. It's a safer bet to simply have the infantry secure the area before bringing light armor in.
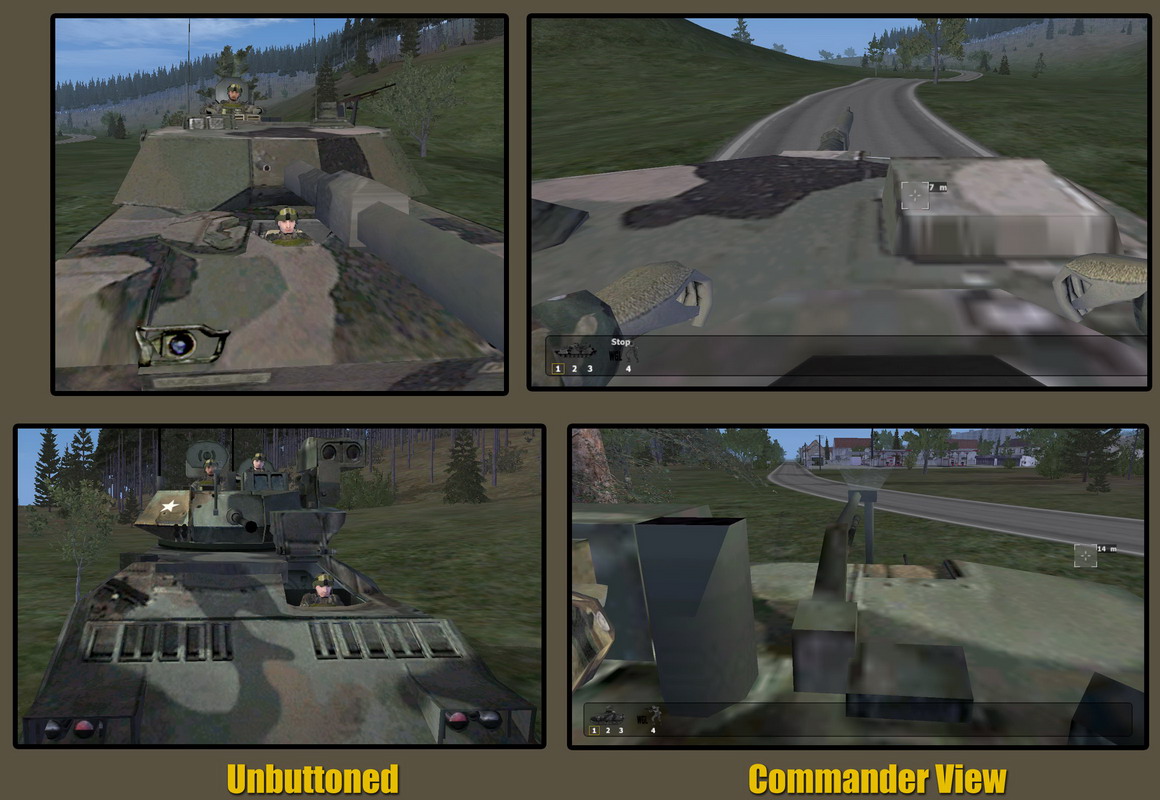
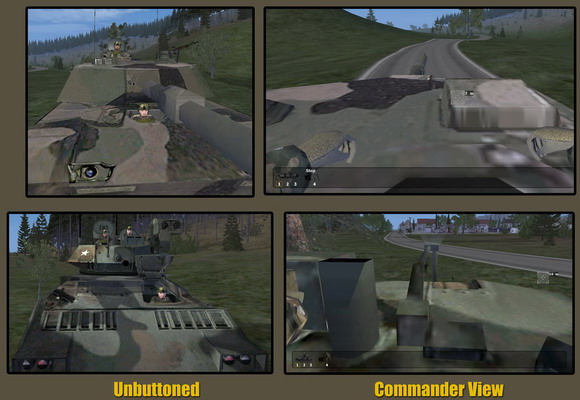
Unbuttoning - Increasing situational awareness
Unbuttoning is possible in most armored vehicles from the driver or commander position. It simply involves opening and standing in the hatch. This is very useful for keeping a high level of situational awareness and should be used whenever the situation allows for it. The main drawback is that any unbuttoned crewmembers are vulnerable to enemy fire. However, if you exercise good judgement and only unbutton when it's safe to do so, you should be fine and will definitely benefit from the increase in SA.
Note that on many armored vehicles that if the driver is turned out (as opposed to the commander), the gunner will be unable to rotate the turret. This is to prevent the turret from crushing the driver during rotation. So, whenever you're in combat, ensure that the driver knows he needs to button up and stay buttoned up.
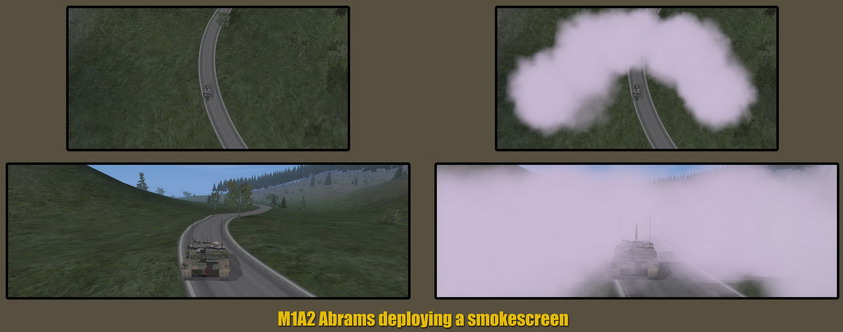
Smokescreens - Protect vehicles, infantry, whatever
Most armored vehicles have the capability to pop a very large smokescreen on short notice. This can be very useful and should not be neglected by armor crews. If you take enemy fire from an unknown position, a hasty smokescreen and rapid relocation to a new position can save your vehicle. Popping smokescreens to support infantry movement or confuse the enemy as to infantry intentions is also a useful tactic.
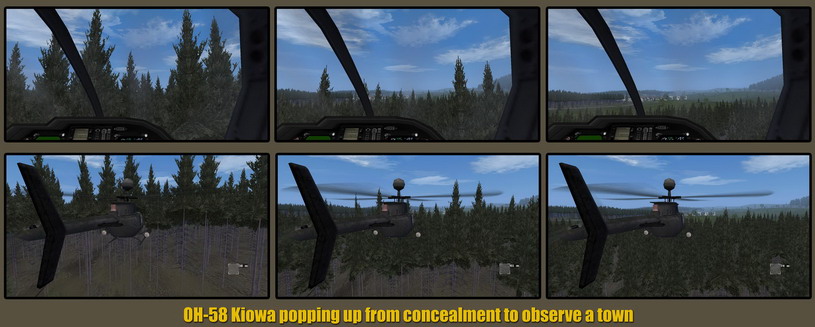
General Helicopters - Masking with terrain features, popping up to attack, low & fast, and so on
The key to helicopter survivability is to use the terrain to maximum advantage. Hills, valleys, forests, buildings - there are countless terrain features that can be used to mask a helicopter from enemy fire and observation. Helicopter crews should stay low and fast, moving from one covered position to another to avoid enemy anti-aircraft artillery and MANPAD or SAM units. When it comes time to engage the enemy or scout out areas, the helicopter should pop up briefly, scan the area or employ weapons against the enemy, and then drop back down behind a terrain feature so that enemy gunners have little time to acquire, lock, and fire upon them.
High-altitude and low-speed flight should be avoided by helo crews at every possible opportunity. To fly slow or high is to invite destruction. If you are not proficient enough with the helos to fly at low altitude and good speed, you shouldn't be flying them. Practice, practice, practice until you are capable of flying correctly.
Keep in mind that helicopters are highly susceptible to enemy air defense assets, and are by no means to be thought of as invincible flying machines of death and destruction. Keeping a helicopter alive in a hot environment, particularly a player-vs-player one, requires a great deal of skill, patience, and coordination between the crew members. Rambo helicopters will find themselves shot down in short order almost every single time. People who fly helicopters like they're jets will likewise find themselves being quickly shot down. Helo tactics and jet tactics are two entirely different beasts.
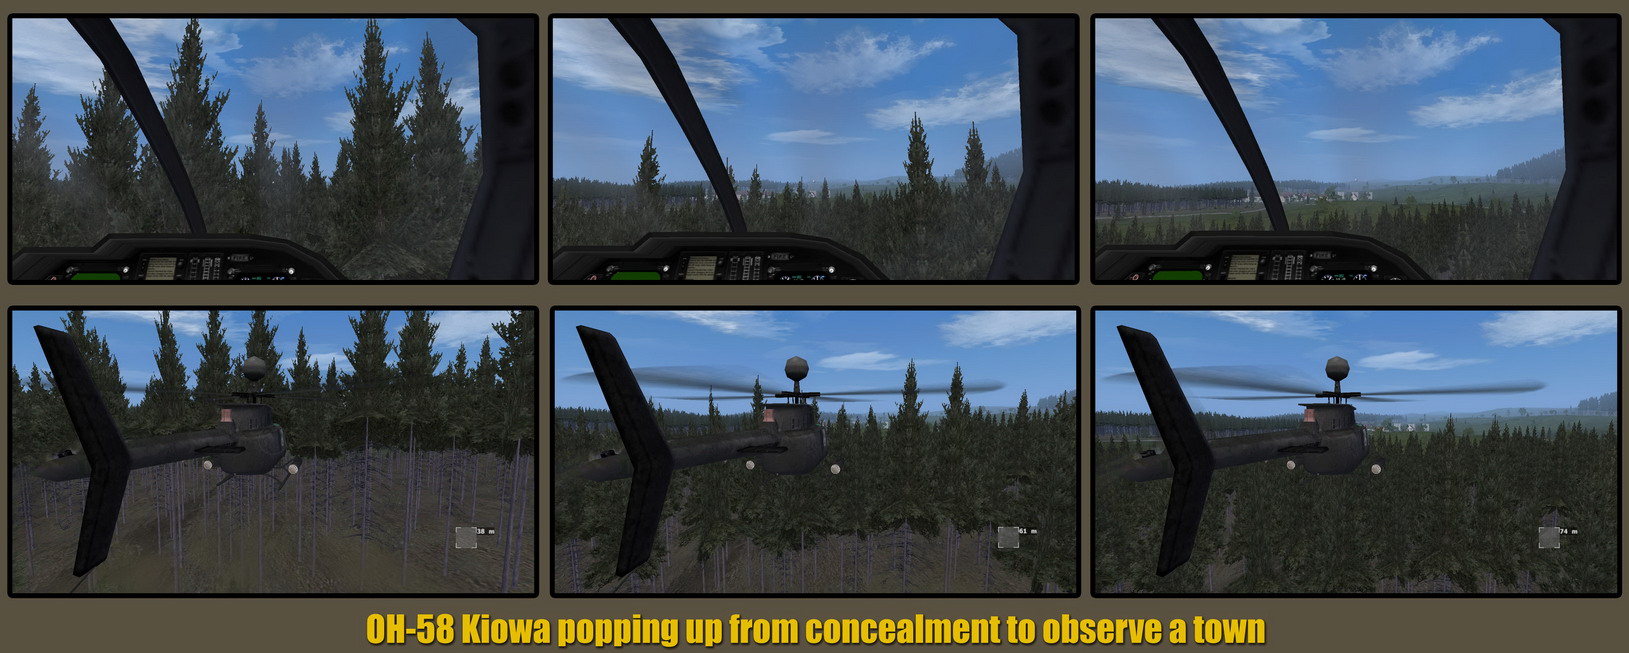
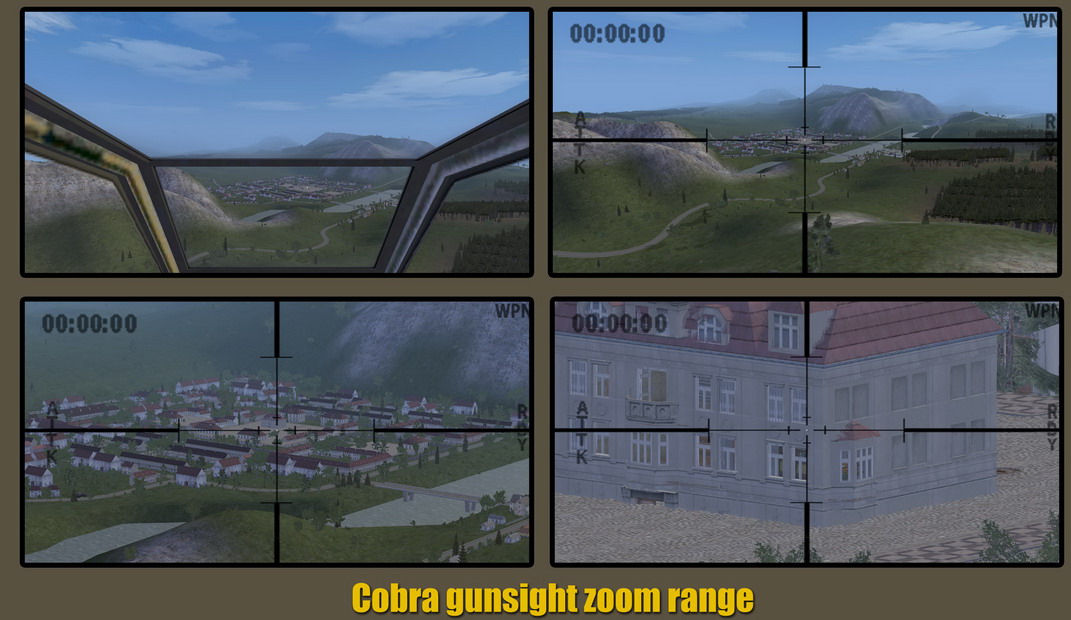
The Wargames League mod gives the attack helicopters a very high level of zoom with their gun cameras. Because of this, it's possible for a helicopter to hover outside the effective range of enemy small-arms and engage enemy assets with cannon fire. This also allows for thorough reconnaisance to be conducted from any helo that has such optics (to include Kiowas, which can hover behind an obstruction with only their mast-mounted dome showing and view the battlefield from it).

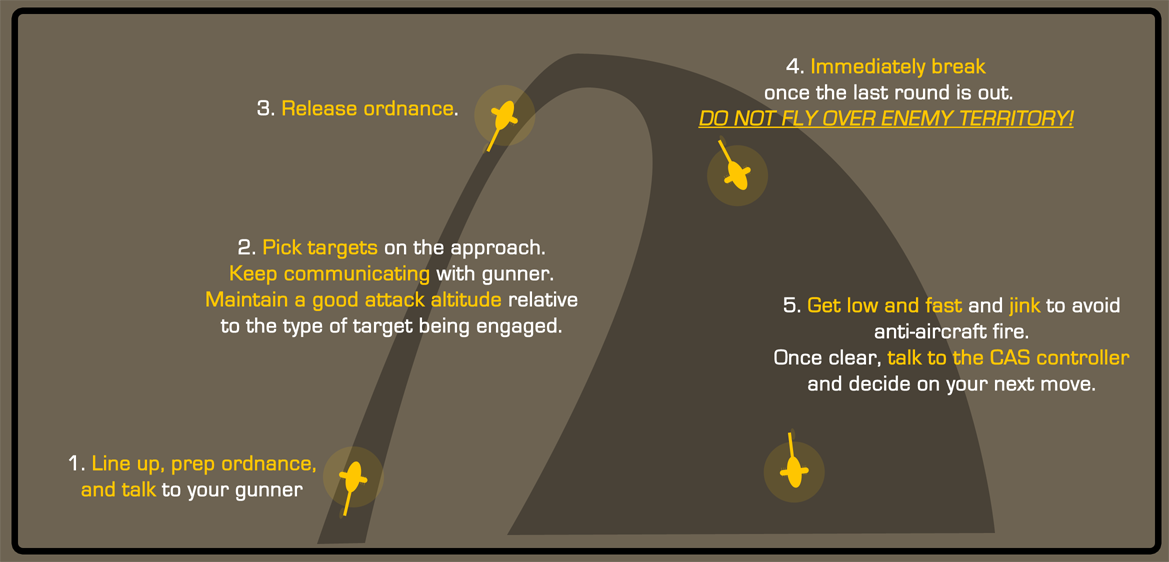
Helicopter attack run - Used primarily for FFAR's, but also applies to cannon fire in some situations
The following diagram illustrates the basic procedure used when conducting an attack run with Folding-Fin Aerial Rockets (FFAR's). Solid pilot/gunner coordination is required in such a manuever, as the pilot is the one "aiming" the weapon whereas the gunner ends up firing.

Keep in mind that the helo should never fly directly over enemy territory when possible. Urban environments in particular can easily conceal any manner of air defense assets, and the Wargames League helos can be brought down by a single anti-aircraft missile if it induces an engine failure.
This section will cover some of the lessons we've been learning in OFP. Some lessons are tactics-based, some are role-based, some are communications-based.
Leaders - Voice comm is required
Don't even think about being in a leadership position if you aren't capable of or willing to coordinate over Teamspeak. People without the ability to use voice comm should never be in any sort of leadership position, simple as that. This should go without saying, but there have been a few recent incidents where players without voice comm decided it would be wise to be a leader. Leaders must have voice comm capability. This was stated earlier in the TTP but it apparently needs repeating.
Voice Comm - Less chatter, more mission focus
If you aren't engaged in mission-specific conversation over voice comm, you shouldn't be talking. This is of particular importance when the server playercount is high. There are a number of empty channels available if you'd like to converse with other players while dead; do not be the one flood the critical voice channels with non-game talk during a mission. This too was stated earlier in the TTP and apparently needs repeating.
Role Choice - Don't know how to do it? Don't pick it!
This should be simple. If you are unfamiliar with a given role, do not select it. There are plenty of people in our group who know how to use a wide variety of equipment, vehicles, and are familiar with the different roles available. If you want to learn about a given weapon or role, ask about it in the forum. Do not decide that a 25+ player session is a good time for you to learn how to fly a helicopter. You do NOT want to be the guy that crashed a Chinook full of human players and forced us to restart the mission. Likewise, you don't want to be the anti-tank guy who wasted his one critical rocket because he was unfamiliar with how to aim the weapon.
If you aren't proficient with the other roles, just pick a basic rifleman. Riflemen have a distinct place in Flashpoint, you really don't need some sexy high-speed low-drag uberweapon to have a good time or be effective.
Rules of Engagement - When to/when not to shoot
All players need to recognize that the ultimate shoot/don't shoot authority lies in their immediate superior. This is typically a Group or Squad Leader. The initial shots of a battle or ambush should occur only after the Group or Squad Leader gives the OK. The only exception to this is if the enemy has begun deliberately engaging your unit - at that point the situation is considered to be hot and all weapons can be brought to bear on the enemy without requiring prior authorization from the leadership element.
Another problem occurs when trigger-happy players begin firing on the enemy before the rest of the platoon has situated itself for the fight. This will often result in a high initial casualty rate as enemy counter-fire will catch unprepared friendly soldiers out in the open or otherwise in a vulnerable state.
Do not be the one to ruin an ambush or get your teammates killed by firing before you're supposed to. Remember, if the enemy doesn't see us, we still have time to improve our fields of fire/cover and concealment before we decide to engage them. The more we prepare for a firefight, the less we'll bleed during it.
Situational Awareness - Stay alert! Pay attention!
Nothing will get you (or your squad) killed quicker than poor situational awareness. It's every player's responsibility to stay situationally aware. Watch the front, flanks, and rear at all times, and pay attention to where enemy fire is coming from.
Due to the speed of sound being modelled in Flashpoint, you will hear the THUMP of a bullet impacting or the WHOOSH of it flying past before you'll hear the muzzle blast from the rifle. These sounds can be used to determine the source of fire after only a few shots - the more proficient the soldier, the less shots it will take before he's zeroed in on their source. Once the direction of enemy fire has been determined it should be relayed to all appropriate friendly elements.
Also remember to not get "tunnel vision" during a firefight. Stay alert, and scan the area for enemy forces that may be moving up on the flank or rear of your element. More than a few squads have been wiped out by enemy units slipping onto the flank unnoticed until it was too late.
Counter-Sniper - How to deal with an active sniper threat
There have been more than a few instances in past games where a group of players has been killed by a single sniper due to not being on top of the situation.
If a friendly soldier is shot beside you, the first thing you should be thinking about is "Where did that shot come from?". If you know, immediately move to put some sort of hard cover (preferably) or put some good concealment between you and the enemy sniper. If you don't know, make an educated guess and find cover or concealment, then assess the situation. Relay the position of enemy snipers or sharpshooters to other friendly forces to help to minimize casualties. Marking their position on the map is a good way to give friendly units an idea of where they should expect to find the shooter.
Remember that you are part of a team, and that that team can help extricate you from situations that you cannot get out of yourself. Do not try to out-snipe a sniper with a simple battle rifle - instead, get your teammates moving so that they can suppress and/or kill the sniper while you stay in cover or concealment.
Remember also that concealment can be artificially created via smoke grenades - if you have them, that is. Also remember that erratic movement will have a dramatic effect on the ability for a long-distance shooter to hit you. If you absolutely must move, make your movement as erratic as you can while still trying to get to a new, safer position as quickly as possible.
Vehicles - Support the infantry
All vehicles should be employed in a fashion which provides the greatest level of support to the on-the-ground infantry elements. No vehicles, be they armor or air, should be driving/flying around in a Rambo-like fashion trying to pad their kill count. Helo support should stay close to the infantry and provide direct on-call fire support. Armor elements should focus on protecting the infantry from vehicle threats and all manner of dismounted infantry.
When we play combined-arms missions, the key word there is COMBINED. All forces should be working together to acheive a common goal, there should be no Rambo'ing units on the battlefield.
Medics - Healers, NOT fighters
In the Wargames League mod in particular it is of the utmost importance that squad medics do not unneccessarily endanger themselves. When possible the medics should refrain from firing (it tends to draw counter-fire) and instead move up and down the line tending to the wounded. The loss of a medic in any WGL scenario is a massive blow to a squad's ability to take care of itself. If you cannot exercise the self-control necessary to be a medic, simply do not play as one.
When it comes to tending the wounded, all reasonable efforts should be made to tend to them in a position that offers cover from enemy fire, since both the wounded party and the medic will be vulnerable during the bandaging/healing process.
Radiomen - Wargames League RTO's
For Wargames League missions that have Group- or Unit-tracking enabled, it's critical that the radio is carried by one member in each group at all times. The radio's possession is what makes the group- and unit-markers update. Without it, the leadership element has a much more difficult time figuring out the disposition of friendly forces. Units that do not carry their radio are at an increased risk of fratricide via air- or artillery-support.
David Adam's Goon Rule Additions
The following is quoting from Goon David Adam. It's good advice, and if the shoe fits, wear it.
The average SA forum member has the attention span of a fruit fly. They cannot stit still for more than 20 seconds without something happening or they get all antsy and start doing stupid shit. Here are some guidelines to help everyone have a good time:
- Keep your mouth shut - If you don't have anything to say that is relevant to the current situation in the game, then don't say it. Nobody wants to hear about what you did in Everquest the other day, or what they were serving in the high school cafeteria. If feel the intense need to talk about yourself for hours on end, go to another channel in team speak and do it. It's hard enough to hear whats going on already, even without you yammering on about some TV show that you saw.
- LISTEN - If you are not comfortable with listening and following instructions, then you are playing the wrong game. Every squad has a leader and its their job to decide what to do and instruct/inform all the people under them. If the leader tells you to stick close and you run off into the woods by yourself, you are going to get killed, don't be that guy. Conversely, if you are not comfortable with giving people instructions and managing a group of soldiers FOR THE LOVE OF GOD DON'T BE A SQUAD LEADER. Let someone else who knows how to do it be the squad leader.
- Fill squads from the top down - Every squad at the mission setup screen needs a HUMAN leader. Most of the time the AI does not have waypoints so the other 8 - 11 people in the squad will just be standing around if they do not have someone giving them orders. I know you want that ultra awesome machinegun so you picked "AUTOMATIC RIFLEMAN" but here's a tip: when you are the squad leader, you can swap gear with anyone else in your squad. At the Briefing screen (with the map) click the "GEAR" tab on the binder and use the left/right arrows by your name to page through the squad's gear. If you click on someone's gun and hit "NONE", it will remove their gun and put it in the weapon pool. You can do the same with your own gear and trade with any of the other squad members
- Reading is good - At the briefing screen, read the ENTIRE briefing and look at the map to see where you start and where you have to go. Only the worst missions won't have at least somewhat of a briefing. Don't be the guy who spends 10 minutes at the briefing talking about that life-changing anime you saw last night and then when we actually start, you ask "SO WHAT ARE WE DOING".
- Be Patient - Not everything is going to happen instantly. Sometimes you will have to lie in wait for a few minutes in an ambush or while trying not to be seen. We try not to play missions where you spend 20 minutes driving a humvee before ever even seeing an enemy, but sometimes it happens. A well planned ambush that wipes out the enemy in about 10 seconds is extremely rewarding
This is a continuation of the lessons we've been learning in Flashpoint. This is a WIP throughout the month and will be added to as the month progresses.
Leaders - Tasking people by name
If you're acting as a squad leader, platoon commander, or even fireteam leader, remember that to effectively get things done you must frequently direct your group members by name to do things. Asking for "someone" to do a specific task is unreliable, whereas saying "So-and-so, do blah blah" will get it done more often than not.
Radio - Contact reports
When reporting enemy contacts, make sure to do it in a logical fashion. If your team is actively moving towards a known waypoint, you can use front/left/right/rear as direction indicators. If in a stationary position or in a prolonged firefight, using compass directions tends to work better. Noone should use "clock" bearings. Make sure you include as much relevant information as possible while being as brief as possible. For instance, you might say something like "Contact front, enemy infantry, two hundred meters!". If enemy contacts are near a landmark of some sort, you can throw that into your report as well. For instance: "Contact left, enemy in the treeline, three hundred meters!". The idea is to pass the most amount of information in the fewest words possible so that people can rapidly react to the info.
Radio - Immediate Radio Silence
The best method to get everyone to temporarily cease talking on TS is to say "Break, break, break!" into the channel. Upon hearing that, everyone quiets down so that the speaker can more clearly hear something in the distance, or so that he can say something important that needs to be heard by everything, or whatever. The speaker should indicate when the radio silence is over verbally so that everyone else can resume whatever they were saying prior to the break.
Grenades - How to know when to say "Frag Out!" versus "Grenade!"
The usage of the words "Grenade" and the phrase "Frag out" depend on which way the grenade is going. If you spot an enemy grenade flying towards friendly forces, say "Grenade!". If you're throwing a grenade at the enemy, say "Frag out!". Do not mix the two. Grenade is incoming, "frag out!" is outgoing.
Death - Dead men tell no tales
Now that we're actually seriously abiding by the "Dead men tell no tales" rule, we've found that doing so adds a ton to the immersion and overall experience. So, as a reminder, if you're dead, go back into the main TS channel if you must chat with someone. If you want to stay in the squad channel to listen to the surviving teammates, feel free, but DO NOT talk.
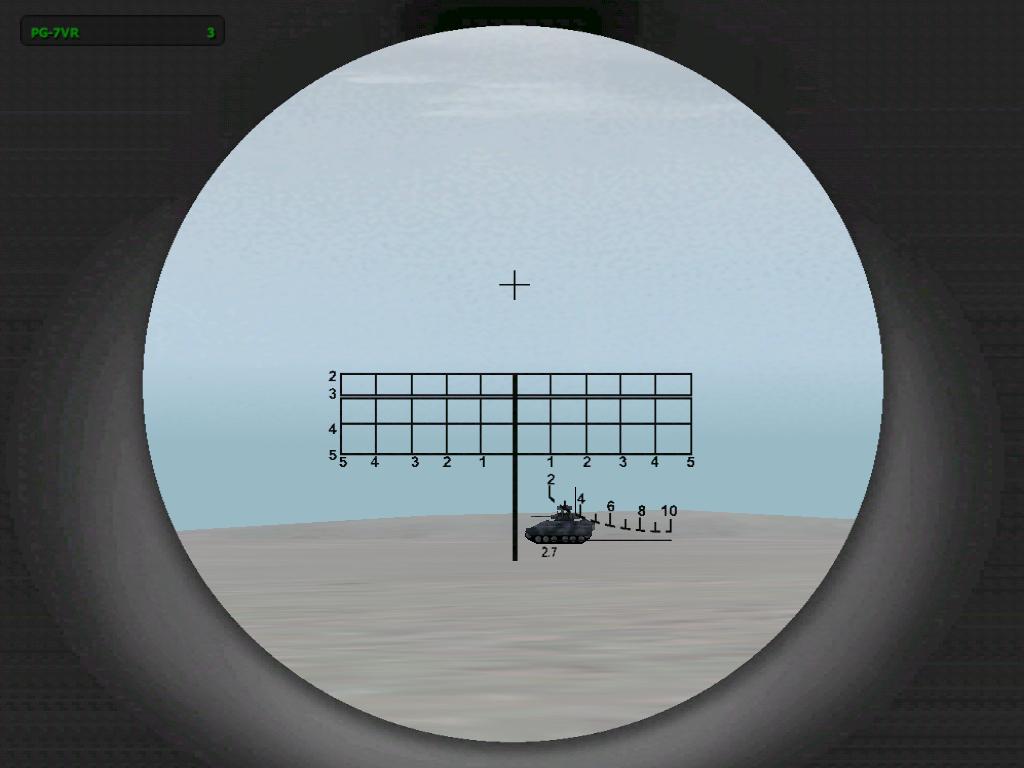
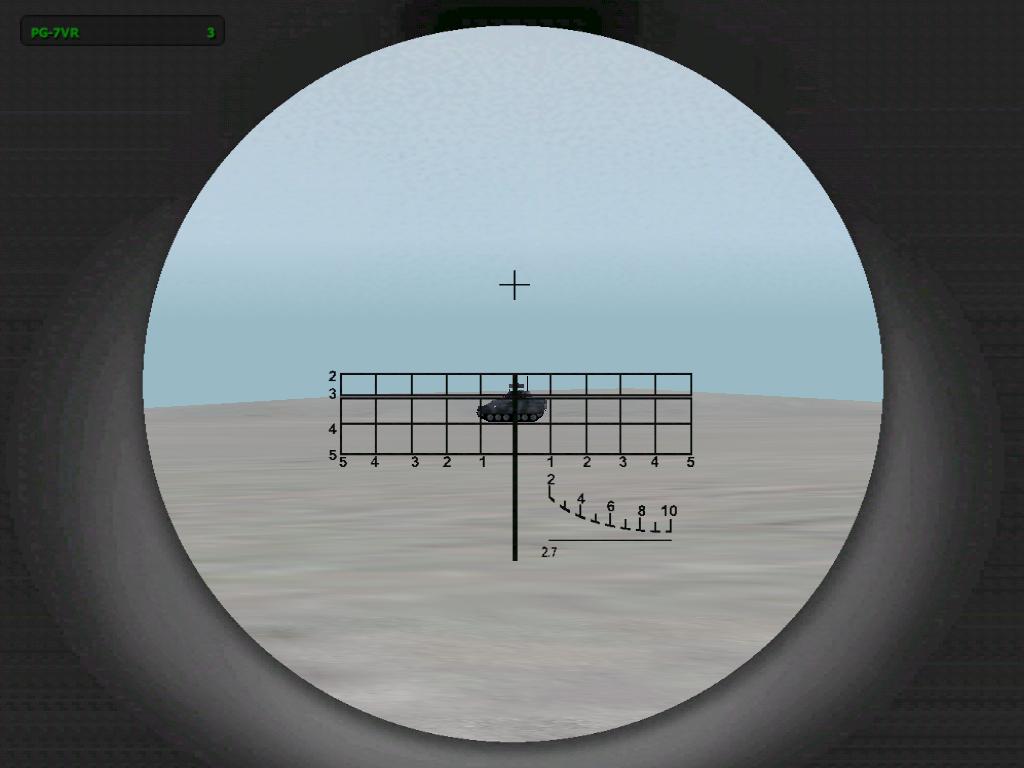
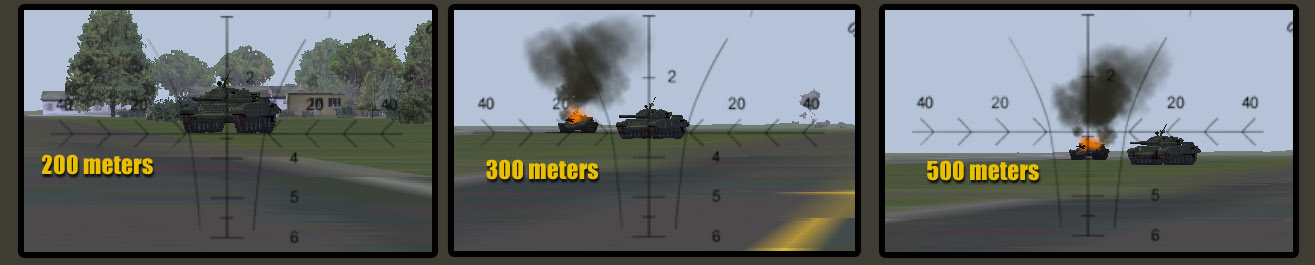
RPG-7 (Russian)
The RPG-7's sight has a rangefinding capability built into the reticule. The scale in the lower-right is for finding the range to the target (with 2.7m being the average height of a tank). Place the treads on the bottom line and whereever the top of the turret touches is the range (in meters). This target is about 300 meters away.

The thick double line on the reticle is the mark for 300 meters. Place the crosshairs on the turret of the tank and you're ready to fire. Don't worry about the lateral range markings, as those are to adjust for crosswinds which don't have an effect on RPGs in OFP like they do in reality. Maybe in Armed Assault or OFP2..

RPG-7 Warheads
From left to right we have the PG-7VL HEAT, the TBG-7 Thermobaric, and the PG-7VR Tandem Warhead.

The TBG-7 can be used on large groups of infantry and light vehicles like APCs and IFVs. If you use it against a tank, it probably won't destroy it, but it will damage it enough to force the crew to bail.
The PG-7VL HEAT is an all-purpose round.
The PG-7VR Tandem Warhead round should be saved for tanks-only - it'll knock out most anything in a single hit.
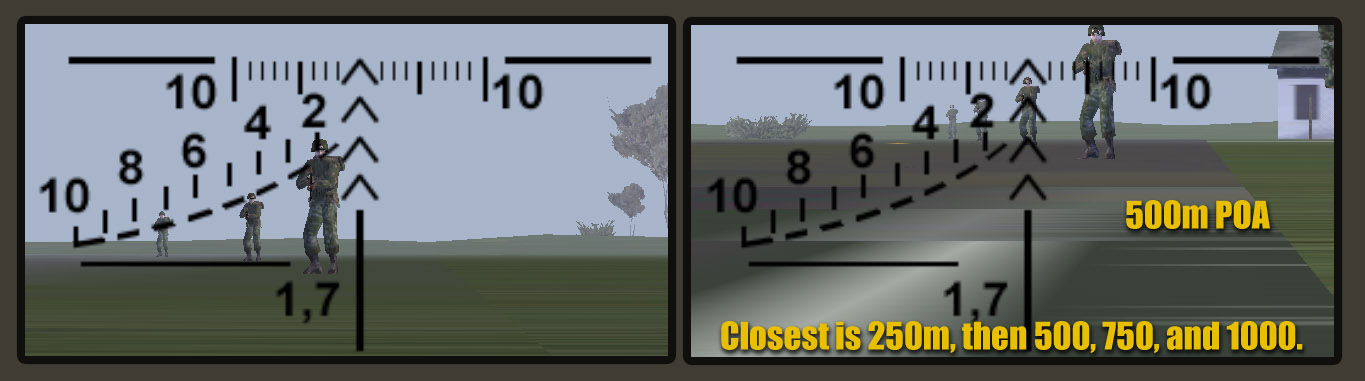
SVD Dragunov (Russian)
The SVD Dragunov sniper rifle has a range-finding reticule and calibrated bullet-drop chevrons. The range-finder appears to be slightly off (that, or I'm reading it wrong), but it's still useful despite that.
Click on the screenshot below for an example of what I mean. On the left half, the middle soldier (under the 4 on the range finder) is 512 meters away, yet he shows up as being around 430 or so meters based on the reticule. The closest soldier appears to be well under 150 meters away, yet in actuality he was 250. The guy on the far left is 750 meters away, yet appears to be much less than that. Basically, the range finder is workable but not terribly precise if you're using the top of their head as their height.
The workaround is to call off their range based on their size from the bottom of their boots to their shoulders. Using that method, you can see that the ranges are much more precise when the head is discounted from the measurement.
The bullet-drop chevrons are calibrated so that the first one is zeroed at 250m, then the second one at 500, third at 750, and the last is good for 1000m (though the rifle really isn't made for that.. let alone 750m).
The right half of the illustration depicts the sight picture you would want when making a 500 meter shot on a soldier. Always aim center-of-mass for the best chance of scoring a killing shot.
81mm Mortar (FDF)
The player-manned 81mm crew-served mortar available in FDF is actually extremely easy to target and use. The complexity comes in when you add spotting and prediction into the mix, but the mechanics of aiming and adjusting fire are really rather simple in comparison.
To aim the mortar, go into sighted mode and align the vertical range list such that the range of your target is on the horizon. For practice purposes, this works best with a clear, level area with direct line-of-sight to your target. The process of aiming involves getting a level horizon reference and dialing in the proper range, then aligning the vertical aiming reference with your target. The "getting a level horizon reference" gets a bit more complicated in hilly or rugged areas due to the absence of aiming stakes, but the theory is rather simple and thus can be practiced in different types of terrain until you're getting good, consistant results. Adding a human spotter would probably make indirect, non-LOS fire a distinct and relatively easily achieved possibility.

The picture above shows a 250 meter shot on a Ural truck. Note that the 250 meter horizontal range line is even with the horizon. Note also that the time-of-flight for the 81mm mortar shells is approximately 18 seconds when your target is at the same altitude as you.
APILAS (FDF)
The 112 RsKes APILAS is a heavy anti-tank single-shot rocket launcher. The APILAS can knock out most tanks with a single hit. The weapon comes with a reticule that tends to confuse new players, but it's a rather simple thing once you know how to work it.
First things first - ignore the tilted second reticule in the upper-right of the scope, that's used for some other firing configuration or firing position that doesn't come into play in OFP.
Moving right along, the APILAS reticule does not seem to match the rocket's ballistics precisely. The horizontal lines marked as 4, 5, and 6 (presumably hundreds of meters) are off. As you can see in the compilation screen, the point-of-aim for a 500 meter shot is the treads of your target resting on the 4 line, not 5 as you would expect. Aside from this, it's a simple sight to use. POA for a 200 meter shot is with the target's treads resting upon the main horizontal line. POA for a 300 meter shot is only a little bit higher, with the base of the target resting on the small hashmark just below the main horizontal line.
The APILAS sight also has markings along the main horizontal line to compensate for target movement - use them as a rough gauge, and if you need to make a shot on a moving target, don't expect to hit them with any reliable consistancy at any range over 200 meters unless you've been practicing those kinds of shots in advance.
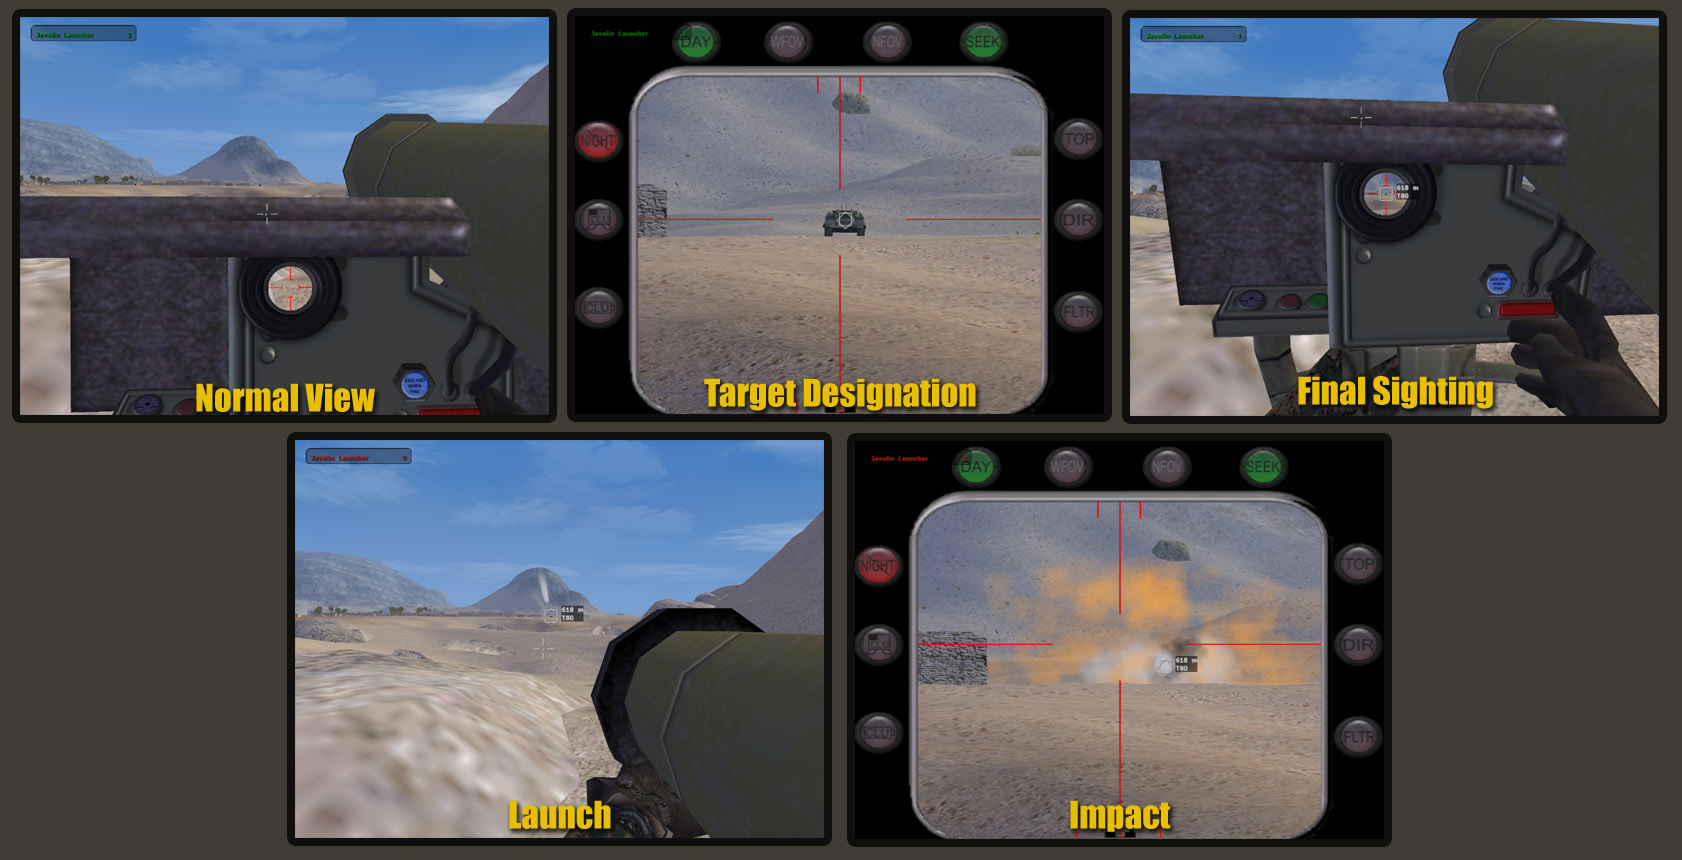
Javelin Anti-tank Missile (USMC)
The Javelin is a soft-launch, high-attack-profile anti-tank missile that's capable of wrecking things in a major way. Who exactly it's wrecking, friend or foe, depends on whether you know how to use it.
To acquire a target for the Javelin, hit your sight key ('v' is the default) to bring up the targeting system. You can zoom in and out on this screen. Right-click on a target to designate it.
Due to the soft-launch capability of the Javelin, you must elevate the weapon system before firing. To do so, get out of the sighted mode and center your target in the red reticule visible on the weapon's control unit (as pictured). If your target is locked and you see it centered in this reticule, fire... the missile will launch, the motor will kick in, and it'll fly a high profile before nosing down to slam into the vulnerable top of whatever you aimed it at.
Updated this slightly for WGL 5.1
Due to WGL being so dramatically different from most other OFP mods we play, I've decided to add some info about it to this page. Expect to see gunnery guides for some weapons, a mortar writeup, and some more info about the mod that should help people get up to speed with it.
WGL's map grids are different from default OFP. Instead of being 128 meters on a side for small grids and 1.28 kilometers for big grids, it's now a more proper 100 meters on a side/1 kilometer on a side.
Ranges
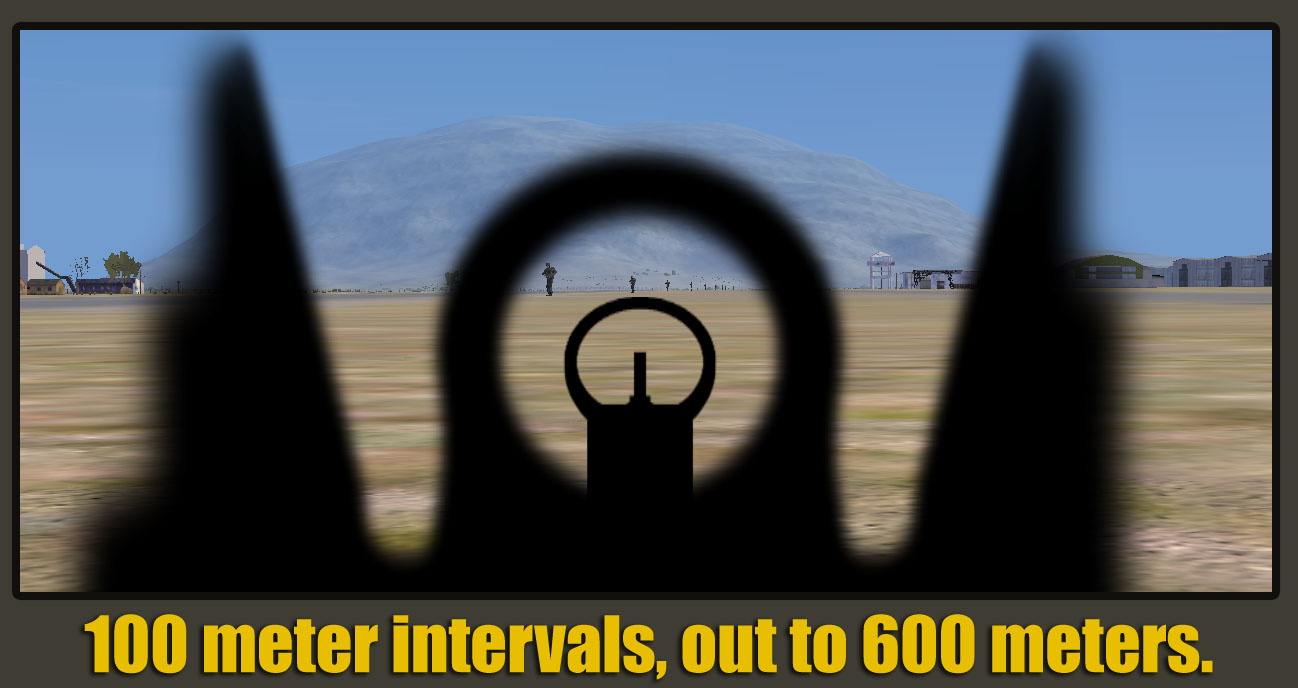
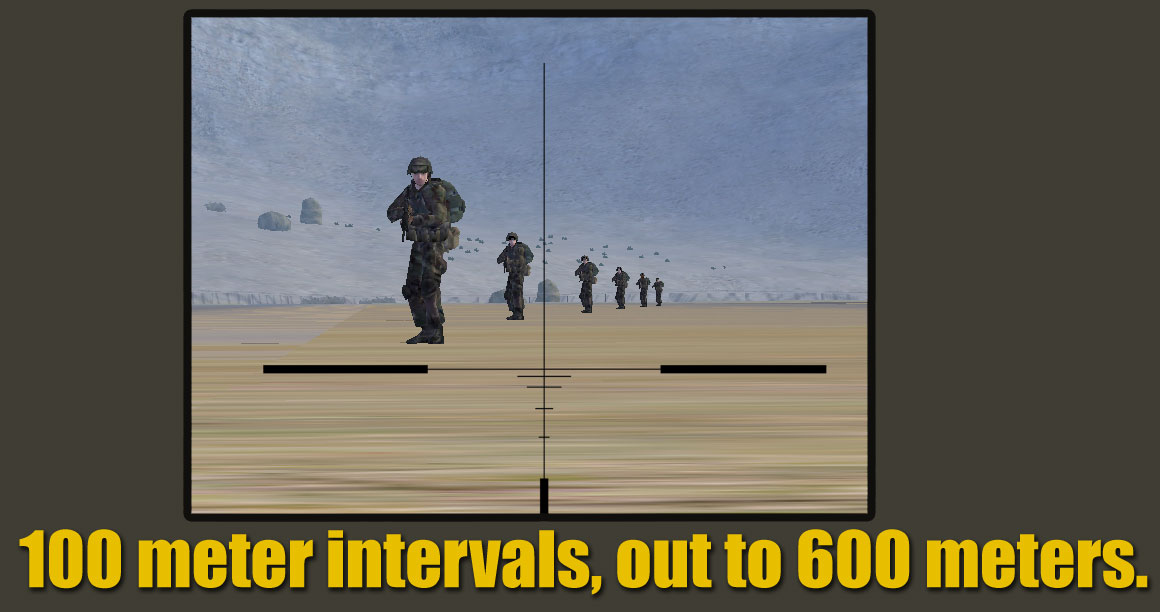
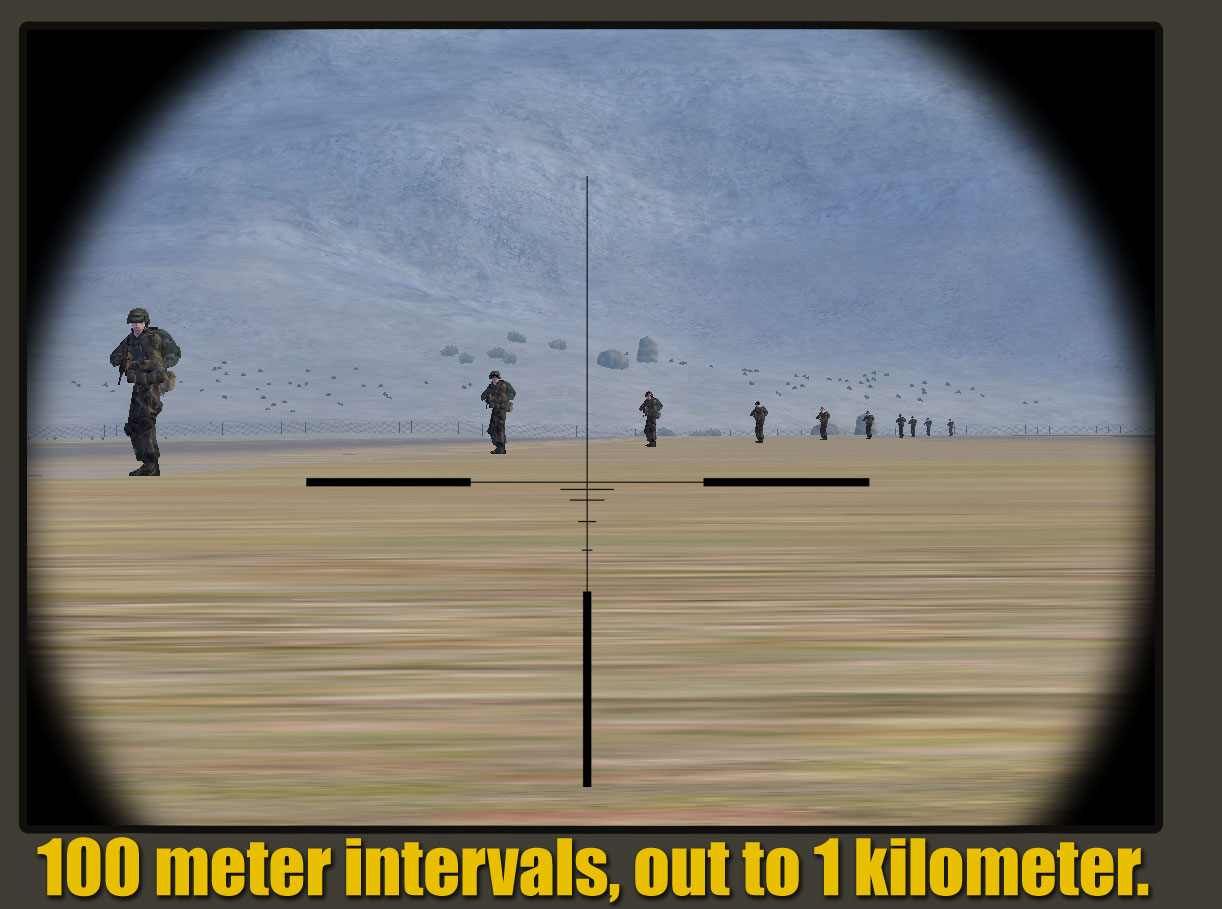
WGL changes the default field of view, the scoped field of view, and ironsight field of view, as well as taking away the non-ironsight zoom capability. Because of this, objects typically appear smaller than they would in normal Flashpoint. For reference, here are KD (known-distance) shots of soldiers at various distances seen via different means. The soldiers are spaced 100 meters apart, starting 100 meters from the viewpoint.

M-249 ironsights.
ACOG, furthest enemy is 600 meters away.

ACOG, furthest enemy is 1000 meters away.

M24 scope, furthest enemy is 600 meters away.
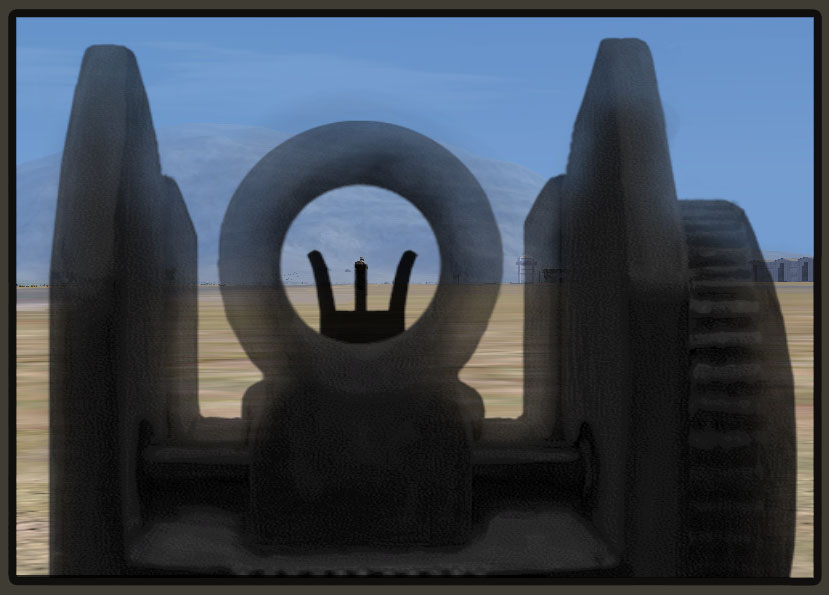
Ironsights
WGL is a bit harsh with the ironsight zoom - with an M-16A2 in reality, an average person will be as wide as the front sight tip at a range of 300 meters. In WGL, as you can see in this screenshot, it's more like 100 meters. Precise shooting of an ironsighted weapon in WGL is best done at ranges well under 300 meters. Massed fire or machinegun fire should be used extensively at longer ranges, along with fire & movement techniques.
Advanced Combat Optical Gunsight (ACOG)
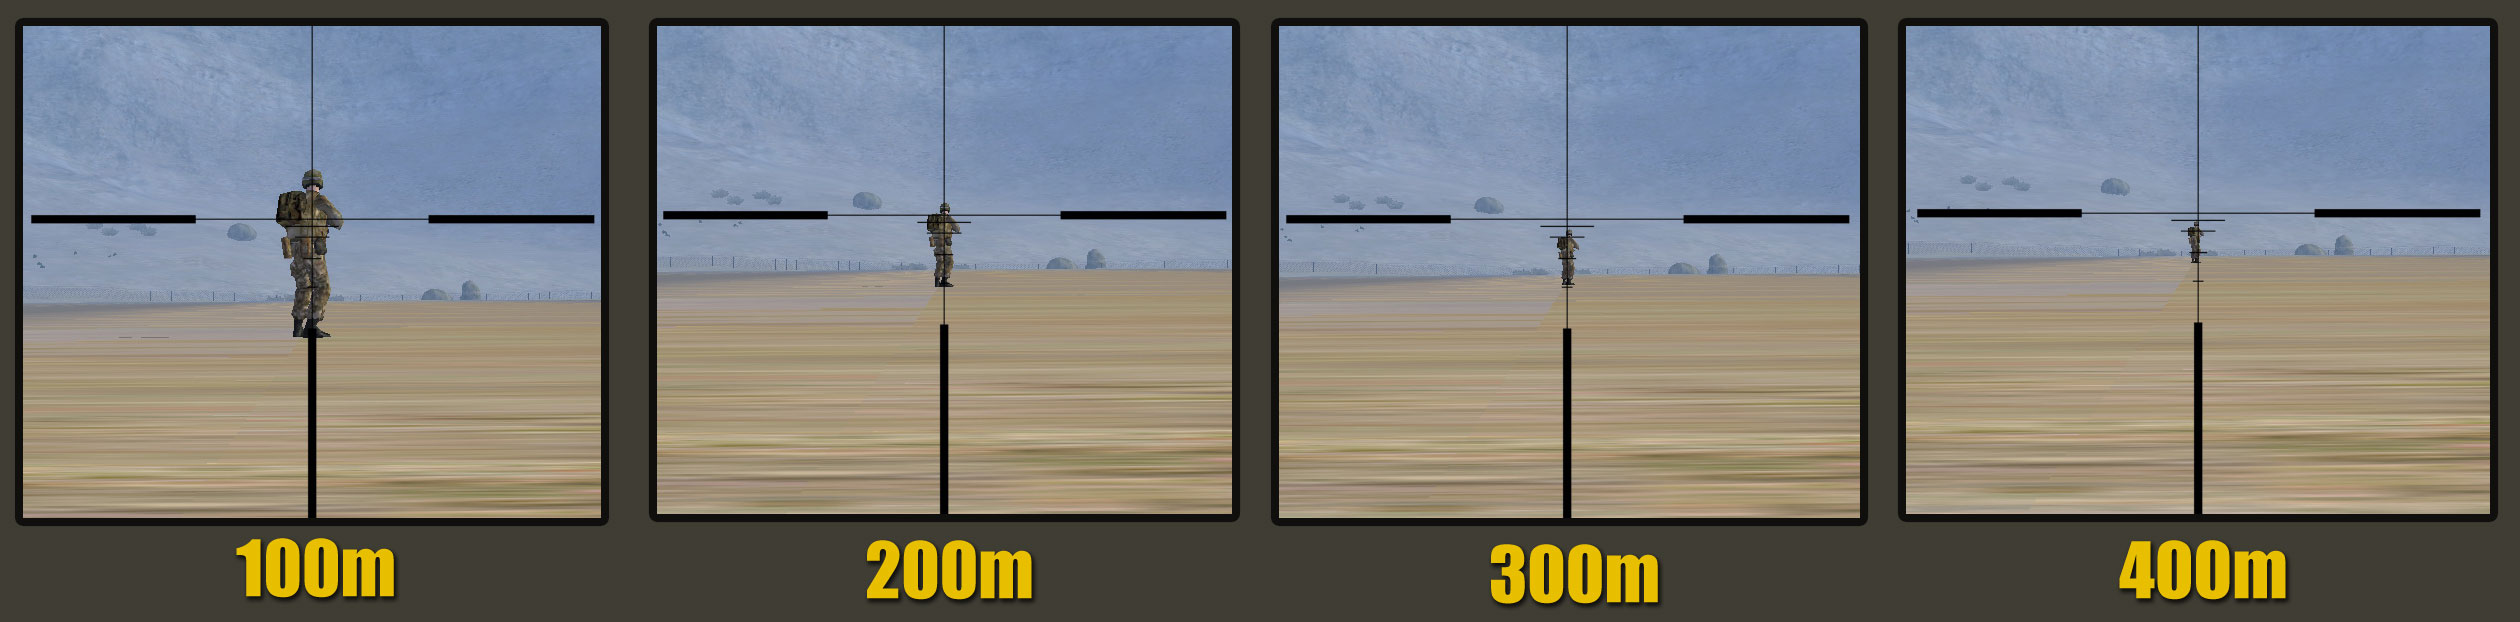
While the BDC in this ACOG isn't perfectly accurate, it does server nicely as a basic reference. The ACOG's magnification makes it easy to get good hits on standing targets at 300 meters, while prone ones are more easily engaged at 200 meters or less. The maximum effective range for precise fire is probably somewhere around 400-500 meters against standing targets. Due to the increased sight waver in WGL, shooting at more distant targets is much more difficult than default OFP.
The following graphic shows the point-of-aim to get a hit at ranges from 100 to 400 meters. These are not 100% precise, but it should give you a good idea of what kind of sight picture is required. Each aiming example shown here resulted in a torso hit.
ACOG points-of-aim for 100-400 meter shots.
Mortar Gunnery
It's easier than you think.
Phase One - Setting up the mortar
- Deploy the base, or have an AI teammate deploy it via the action menu (6, then "Deploy base").
- Mount the tube to the base, or have an AI teammate do so via the action menu (6, then "Mount tube to base").
- Mortar ammo will be on the ground at this point. Pick it up.
- To load the mortar, select "Reload HE" from your action menu, THEN choose "Load HE". (or WP when appropriate)
Phase Two - Sighting
- Open the mortar dialog via the "Fire Control" option in the action menu.

- Click the "G" button to start your gun plot. Once you've clicked it, it will tell you to mark your mortar's position on the map. Open the map and click where your mortar is. You must strive to be as precise as possible at this point, as any deviation will result in your initial accuracy being degraded.

- Click on the "T" to plot a target. You'll have to click on the map afterwards to designate the target position. The azimuth and range numbers that show up at this point are meaningless.

- The G-T number is the Gun-Target azimuth. Input it into the "Azimuth" box after clearing the number already there.

- Range shows the range from the gun to the target. The closest two ranges, in 100 meter increments, will show up in the ballistic table to the right. You can either calculate out the precise elevation or guesstimate it. The "Elevation" needs to be input into the "Elevation" box beside the Azimuth one. Add or subtract elevation as necessary for the range that's listed. The more precise you are, the more accurate your initial rounds will be.

Note that the number to the right of the GT/RANGE part on the left side of the dialog is the elevation differential. The math to account for this is very simple: If the elevation is a negative numbers (target is below the mortar), subtract the number of vertical meters of difference from the horizontal distance. If it's a positive number, add the number. Simple enough. The bigger the difference is, the more important it is to input it.
TOF is the time-of-flight of the rounds.
IMPORTANT! Any time you change the azimuth or range settings, you MUST click the "Target" button to realign the mortar.
When everything is properly input and the mortar is aligned to the target and loaded, click "Fire". A round will fire, and 20-30 or so seconds later it'll impact.
Phase Three - Corrections, Reloading, and Round Effects
- When making corrections, simply change the azimuth and range settings to compensate for the observed impact. Make bold adjustments at first, and whittle your way down to finer adjustments afterwards.
- To load the mortar yourself, select "Reload HE" from your action menu, THEN choose "Load HE".
To have an AI teammate load the mortar, select them, then hit 6 for the action menu, select "Reload __mm HE Mortar", then select them/hit 6 again and select "Load HE Mortar". The AI doesn't have to be very close to the mortar to accomplish a reload.
- As to the effects of the rounds, HE is general usage. It'll blow up things nicely. WP is good versus infantry and less so versus armor, but it can destroy light armor over a period of exposure to it.
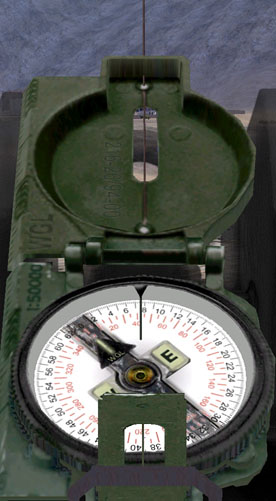
- Also note that the WGL compass is graduated in both MILS and degrees. The outer ring with black text is MILS, in increments of 100.

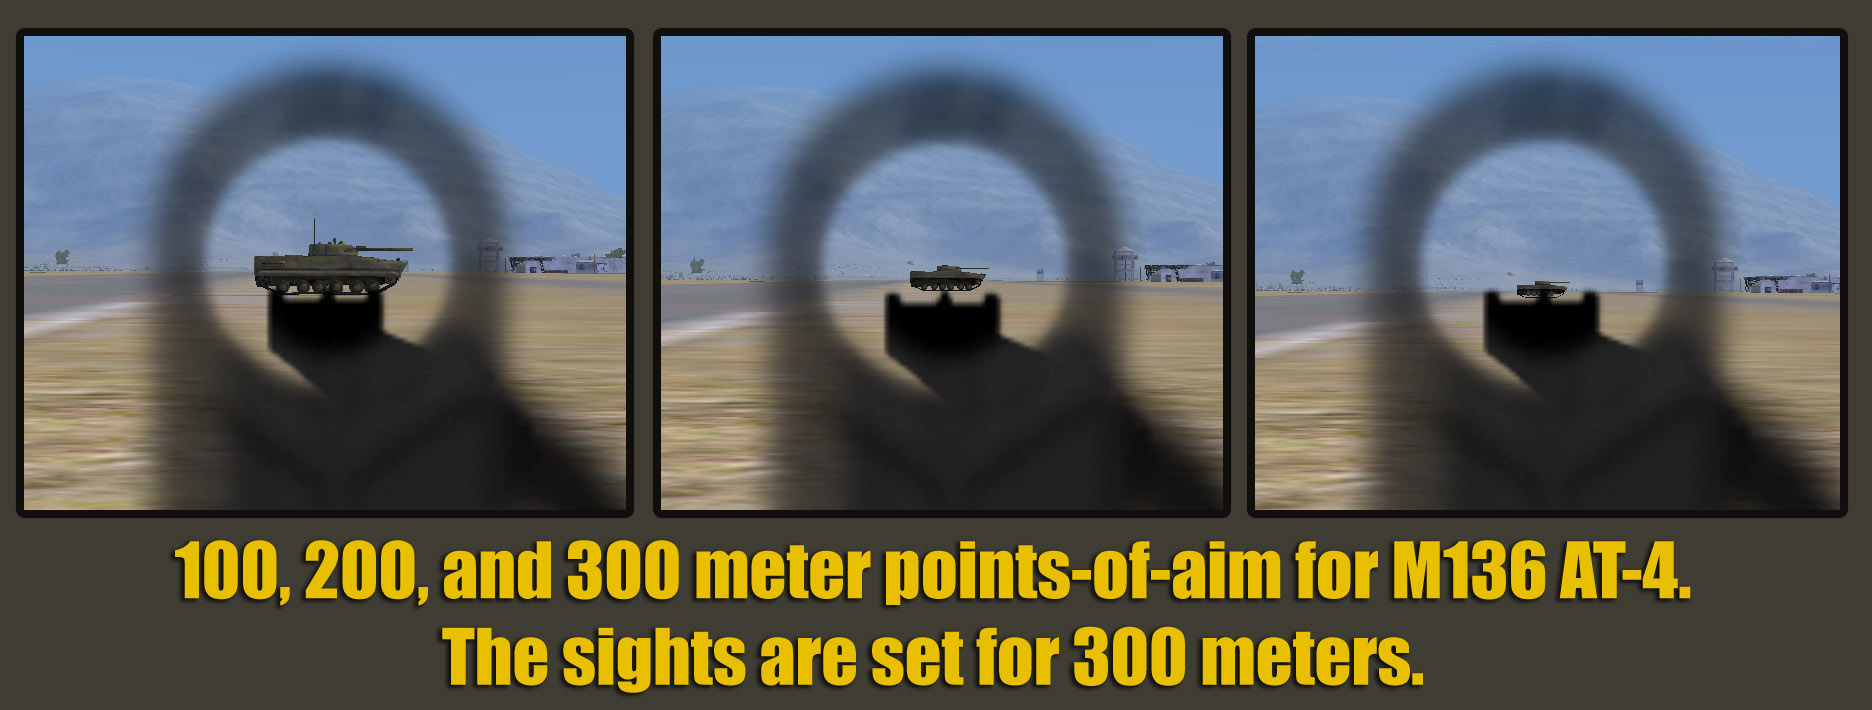
M136 AT-4
The AT-4 in WGL is zeroed for 300 meters, so if you use the standard OFP sight picture when firing one at a vehicle 100 meters away you're likely to shoot right over it. Use the depicted sight pictures for good hits at ranges from 100-300 meters.

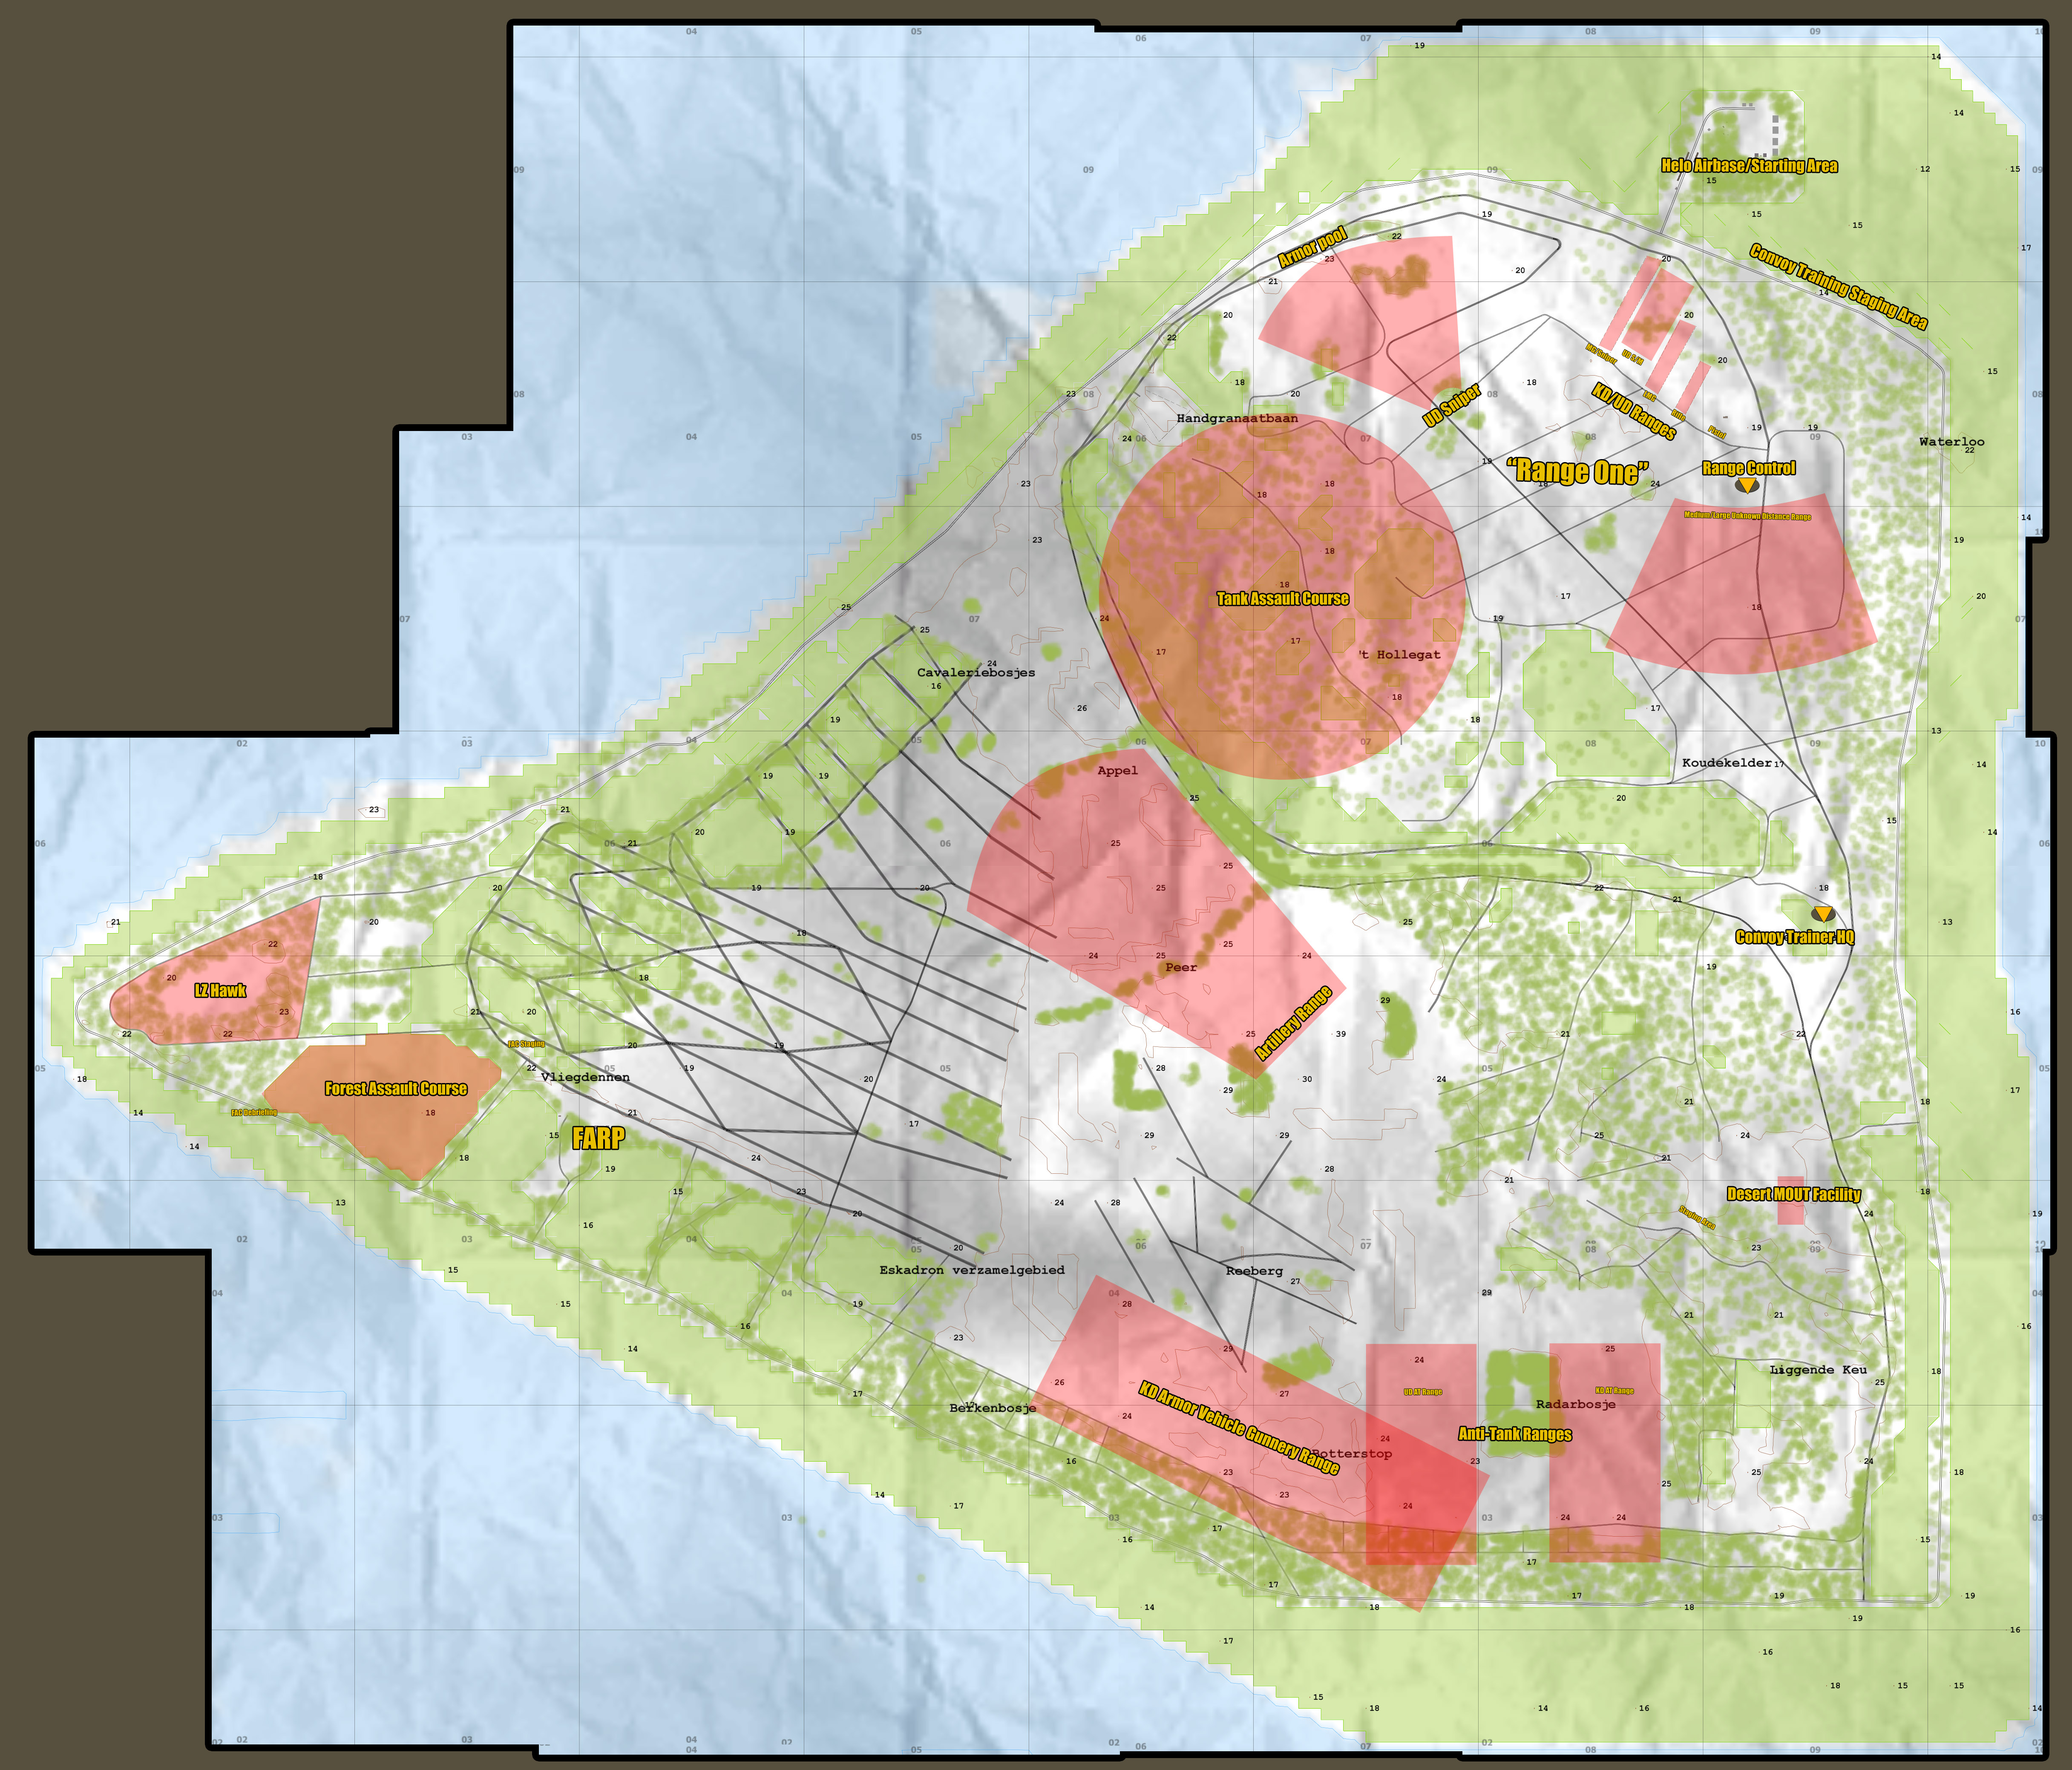
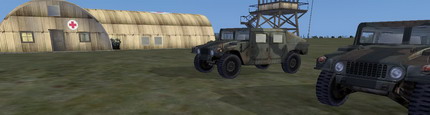
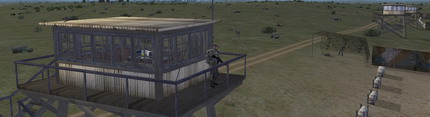
Facilities Overview
The Shack Tactical Training Grounds mission was created by kevb0 with the assistance of myself and Syixxs (ideas, brainstorming, bugtesting). The Shack Tactical Training Grounds are meant to give players of all skill levels a chance to become proficient with a variety of weapons and vehicles, while also providing the option for higher-level skills such as convoy operations, MOUT combat, patrols, heliborne operations, and armor/infantry coordination to be practiced in a live-fire but non-hostile environment.
Instructors will be used to teach the more advanced courses (such as convoy training, MOUT, artillery, spotting, etc) in special training sessions, while players can at any other time load up this mission on the ShackTac server to train as individuals or in groups in the various facilities scattered throughout the area.
Any trainee who is seriously injured or is designated as a casualty during the course of training will find themself back at Range Control after a short delay.
I've created a large composite map of the training grounds for familiarization and instructor planning purposes. Note also that the "impact areas" of each range are shaded in red. These are to be avoided when live-fire training is being conducted.

"Range One" - Known- and Unknown-Distances
"Range One" is the area in which most of the known- and unknown-distances small arms ranges are located. It is comprised of the pistol, rifle, light machinegun, sniper, and heavy machinegun KD ranges, as well as several UD ranges including one for snipers/spotters.
Pistol range
The pistol range is for basic proficiency with the M9 pistol. The targets at the range are placed 7m, 15m, 25m, and 50m from the firing line.
Rifle range
The rifle range is for basic proficiency with the M-16A2 rifle. The targets are ranged from 25m to 200m, and can be reset by going to the range tower and selecting "Raise/Lower Targets". Each target takes three hits to knock down.
Light Machinegun range
The light machinegun range is for basic proficiency with the M-249 Squad Automatic Weapon. The targets are ranged from 50m to 300m, and can be reset by going to the tower and selecting "Raise/Lower Targets".
Crew-served Machinegun and Sniper Range
The crew-served machinegun and sniper range is for basic proficiency with the Browning M2 .50 Caliber HMG, M82 .50 Special Applications Scoped Rifle, and the M40 sniper rifle. The targets are ranged from 75m to 500m. The Targets can be reset by going to the tower and hitting "Raise/Lower Targets"
Unknown Distance Rifle Ranges
The Short and Medium-range "UD" ranges are for weapon familiarization against targets appearing randomly at distances from 20 to 300 meters. Instructors are able to control the pop-up/drop-down behavior of the targets from the range towers.
The Medium/Long-range "UD" range is for weapon familiarization against targets appearing randomly at distances from 300 to 1100 meters. Instructors are able to control the pop-up/drop-down behavior of the targets from the range tower.
Sniper Unknown Distance Range
The sniper "UD" range is meant to teach sniper/spotter teams how to work together to scan, identify, target, and engage silhouette targets at unknown distances. A good eye and solid sniper team communication is just as critical as solid shooting skills at this range. Targets can be individually raised by the instructor manning the range tower.
Anti-Tank Ranges - KD and UD
The anti-tank ranges serve to teach trainees the fundamentals of employing a variety of AT weapon systems against dummy targets. The LAW, AT-4, Carl Gustav, and TOW missile system can be tested at these ranges. The KD range has targets at known intervals (100m seperations, with two targets per distance to show frontal and flank shots), while the UD range requires trainees to guage the proper distance and use the correct hold-over to get a hit.
Combat Assault Courses
There are two primary assault courses available for training. Both should be run through with an instructor present so that feedback can be given on the techniques applied during them. Both courses have staging areas where participants can acquire weapons and receive a briefing prior to moving into the assault.
Desert MOUT Facility
The Desert MOUT Facility is an area where urban and close-quarters tactics can be taught to trainees in a live-fire but non-hostile environment. Silhouette targets are placed randomly through the area and the trainees must move through and engage the targets while practicing proper urban movement and fighting techniques.
Forest Assault Course
The Forest Assault Course is a live-fire but non-hostile environment that is used to teach trainees the basic elements of combat in wooded environments.
Artillery Range - Spotting, Controlling, and Commanding
The artillery range is meant to teach trainees the process by which they can control, command, and spot for artillery assets. Both player-controlled and player-commanded assets are available, from 60- and 81mm mortars (player-controlled) to the Chain of Command Unified Artillery's 105mm and 155mm howitzers (player-commanded). Trainees should be familiar with the mortar gunnery process listed in the Tactics, Training, and Procedures page (see: mortars) before attempting to use the 60- and 81mm mortar systems.
Laser designators are also available for use with the Apache gunships and their Hellfire missiles.

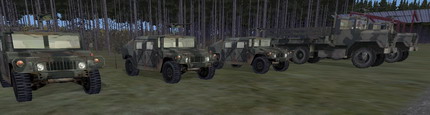
Convoy Staging Area
The Convoy Staging area is where trainees form up to be trained on convoy operations by a set of instructors. Convoy training should only be done under the supervision of instructors who can provide the valuable feedback on what is being done properly/improperly over the course of it. Convoy trainees should expect to trained in subjects such as: Proper interval, action on contact, fighting through a kill zone, locating and/or reacting to IED's/mines, action on a disabled vehicle, and so on and so forth.
The FARP - Helos
The Forward
Arming and Refueling Point, FARP, is where you will find the attack helicopters staged. Cobras, Apaches, and Kiowas are available for trainees who want to practice their attack helo skills. Pilot/gunner, air-to-ground, and air-to-air coordination can be taught with the vehicles available at the FARP. Apache pilots can also practice how to use their Hellfire missiles against player-designated targets, be they 'lased' via infantry-carried laser designators of the Kiowa's laser designator. Stand-off Apache attack techniques can be developed and perfected in safety throughout the training area.
Tank Assault Course
The tank assault course is where trainees can practice coordinated tank operation with a driver/gunner/commander working in tandem. The course runs through a wooded environment and has a variety of armored and infantry targets scattered throughout it. Tank/infantry coordination can also be worked on in it.
Air Assault Operations
The air assault possibilities are limited only by instructor imagination. While there are dedicated facilities to teach proper helo exiting techniques (for instance, LZ Alpha), the possibility exists to do all manner of air-assault-related training all over the island. The Desert MOUT Facility, for instance, has enough ground near it that a squad could be airlifted to it, then assault the course on foot.
The specific skill sets and team behaviors that the air assault training is meant to address are as follows:
- Rapid boarding of the helicopters based on squad assignments
- LZ choice, coordination such that all aircraft reach their LZ's simultaneously when desired. Nap-of-Earth flight to LZ's when necessary.
- Fast and smooth helo touchdowns as close to the LZ mark as possible
- Rapid debarkation from the helos upon reaching the LZ
- Defense of the LZ upon debarkation until the helo has successfully left the area
- Teaching pilots and infantry on how to do hover debarkations. Meaning, the helos never actually touch down but instead move low and slow so that infantry can jump off without injury.
Other Training Possibilities
The capability exists for all manner of squad-related movement, coordination, and combat tactics to be practiced in the training environment. Force-on-force training is also available, led by instructors.
Squads can practice patrolling, setting up ambushes, contact drills/battle drills, security on halts and during movement, and movement techniques like bounding overwatch, amongst other things. Instructor supervision and command allows for some very educational force-on-force scenarios to be set up between trainee squads,y too.
Future?
Future training possibilities are up for discussion at this time. If any member of ShackTac would like to see a specific topic covered in future training sessions (with facilities created specifically for it if necessary), they need only bring it up on the forum and give the instructors an idea of what they'd like to see.
Thanks to David Adam for the RPG-7 and Javelin info/base images, as well as the ammo bearer idea.
Thanks also go out to the ShackTac guys and the Goons who provided valuable feedback on this.
As of June 12th revisions are being kept track of for this page.
- September 17th - Tweaked some text for WGL 5.1
- July 30th - Organization section was rewritten.
- July 23rd - Added the new ShackTac Training Ground writeup.
- July 17th - Added a new revised intro, cut the vehicle section into ground/air sections. Adding new content as time permits.
- July 16th - New CSS, new look to the page. I think it looks pretty spiffy now. A few graphics will be missing briefly while I update them for the new colors.
- July 15th - Removed a lot of FDF images and replaced them with better WGL5 composites. Rewrote the "Sight Displacement" section. Adding air vehicle stuff next, probably today, along with more ground vehicle sections. Update: New vehicle stuff added.
- July 14th - Started working on the new Vehicle section. Also added new graphics to the Tactics section.
- July 12th - Added a new section to the Tactics section with some nice new screens.
- July 11th - Added July lessons-learned.
- July 8th - Working on adding new sections today. More info later.
- June 24th - Added David Adam's advice to the "Lessons Learned" section. You can find it here.
- June 18th - Added a "Lessons Learned" section. Minor text edits in other sections.
- June 14th - New header, slight text edits in some places.
- June 12th - Added some WGL5 info, credit goes to Caret and the WGL5 manual for the basis of the mortar gunnery guide. Added a table of contents and this revision tracker.

Dedicated to those who have died so that we may live.
Bohemia Interactive Studios, OFP credits