
| Page 1 The Basics |
Page 2 Organization & Communication |
Page 3 Standard Roles & Group Tactics |
Page 4 Advanced Roles, Group Tactics, & Vehicle Tips |
|||||
|---|---|---|---|---|---|---|---|---|
Intro to the ShackTac ArmA TTP
Dedication Recommend Mods
Controls
The Environment
Intro to ShackTac as a Basic Rifleman
Situational Awareness
Wounds & What to Do
Shooting
How Not To Get Shot
|
Intro to the ShackTac Platoon Organization & Leadership - Fireteam, Squad, and Platoon-Level
The Importance of Individual Initiative Communication & Command
Contact Reports
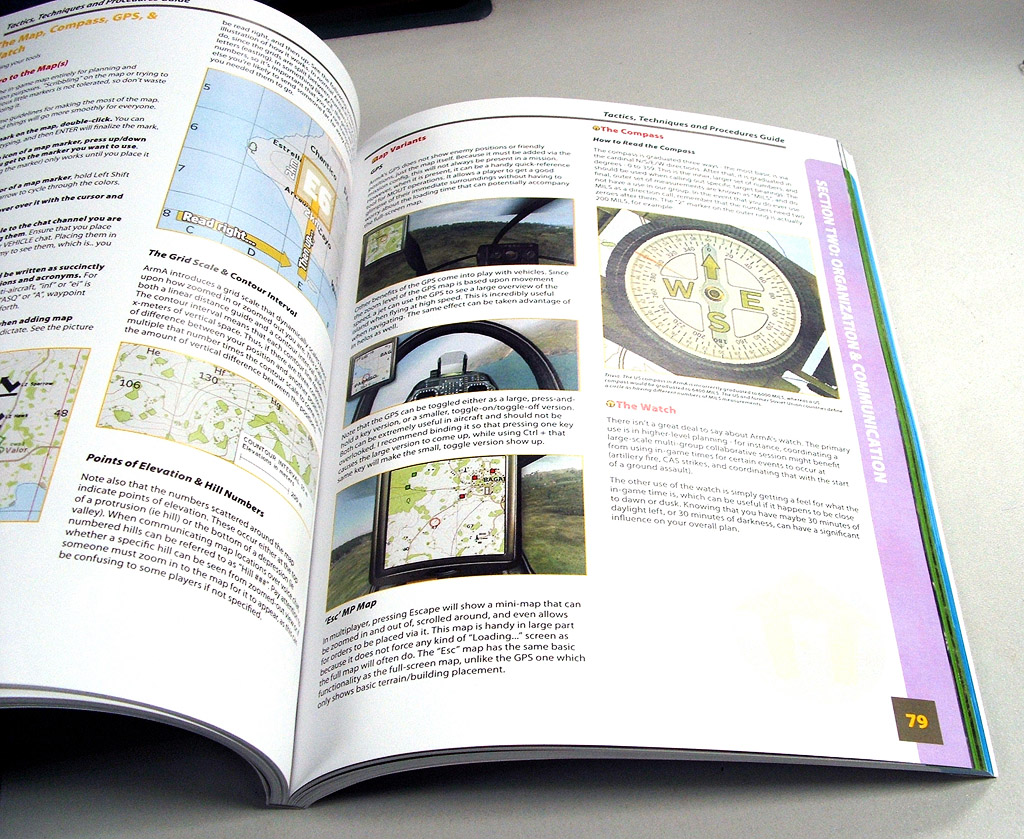
The Map, Compass, GPS, & Watch
|
Roles
Formations
Movement Techniques
Group Tactics
Battle Drills
|
Platoon-level Special Roles
Close Air Support
Artillery Support
Advanced Group Tactics
Ground Vehicle Tips & Tactics
Aircraft Tips & Tactics
In Closing...
Credits
Revision Tracker |
|||||
While you can still access this guide, it has now been replaced by a new guide oriented around ArmA2. Click on the banner to head over to it, or find it at http://ttp2.dslyecxi.com
The phenomenal Advanced Combat Environment mod is now available for ArmA1! You can find more information in this forum post on the BIS forums. Enjoy!
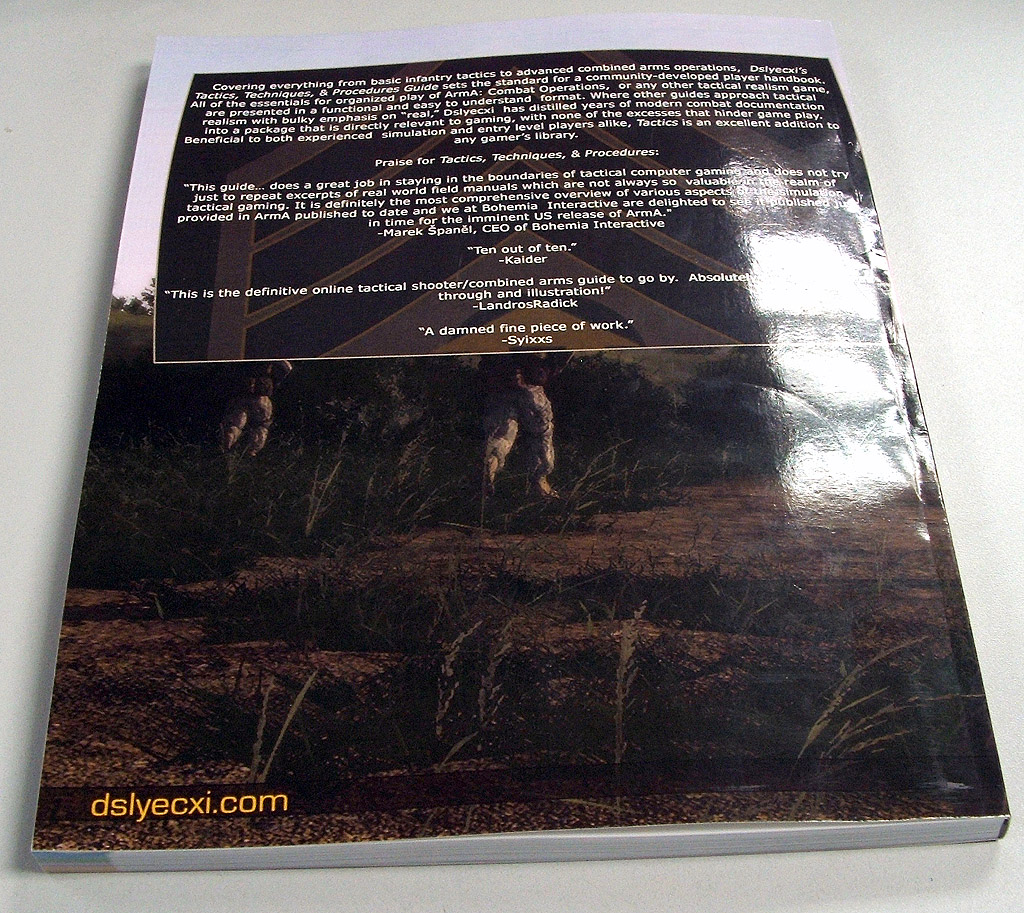
The ShackTac ArmA Tactics, Techniques, and Procedures Guide is now available in print. This is a full-color, 168 page, perfect-bound 8.5x11" book designed by ShackTac'er Mofo8. He did a fantastic job, too!
Enjoy. :D

I'd like to take a few moments here to explain how this guide came to be, who will benefit from it, what my intent in making it was, and various other relevant things. First, as a bit of an attention-getter, here's a preview trailer I created in April for ArmA: Combat Operations.
Next up, a few words from Marek Španěl, CEO of Bohemia Interactive, about this guide. This article made the rounds at Bohemia Interactive prior to its release, and I was fortunate enough to get a few words from the head man himself regarding it.
"In our debut PC title Operation Flashpoint and now after a few years in ArmA, we tried to deliver a complex tactical experience, and this guide provides the best summary and advice how to play it in such manner and not only as just another first person shooter. We focused very much on many aspects of simulation that may not be obvious instantly and it's great to see this explanatory and informative resource. This guide also does great job in staying in the boundaries of tactical computer gaming and does not try just to repeat excerpts of real world field manuals which are not always so valuable in the realm of tactical gaming. It is definitelly the most comprehensive overview of various aspects of the simulation provided in ArmA published to date and we at Bohemia Interactive are delighted to see it published just in time for the imminent US release of ArmA."
Marek Španěl, CEO of Bohemia Interactive
My intent in writing this was to provide a comprehensive tactical virtual warfighting guide that would both serve as doctrine for the Shack Tactical group as well as act as a general tactical resource for other groups to learn from and adapt as they see fit. While this was written with Armed Assault (aka "ArmA: Combat Operations" in the US) in mind, many elements are relevant and applicable to other tactical games.
Weighing in at over 60,000 words, there is no question that this is a large guide. I understand that it may not be feasible to go through the whole thing in one sitting, so if necessary, bookmark it and go through it at your leisure. I spent a good amount of time linking up the document to ensure that smooth navigation is possible from index to section, and I hope that it helps to make it easier to find topics both on your initial and subsequent viewings of this.
My primary goal for this guide was to develop material that was relevant to Shack Tactical's style of realistic combat simulation, things that we could apply in our day-to-day gaming, without introducing elements that were extraneous "tactical fluff" that had no relevance to gaming.
One common pitfall I have noticed in other "tactical guides" for realistic games is that many people tend to recite military publications and field manuals verbatim without trying to separate the wheat from the chaff. There are a great many things that can be learned from such field manuals, but at the same time, the fidelity of our simulations is nowhere near high enough to make it all relevant. Even when something is relevant, it typically must be modified and adapted for use in even a highly realistic combat simulation. I believe that recognizing this and working with it as the most basic guideline is essential to producing useful tactical material.


With that being said, military field manuals and publications can be very interesting reads for people who are into this kind of realism. With this in mind, I have provided download links for many of the most applicable field manuals. These are entirely optional, but if you are curious on how the real military does things, or want to know more about a specific subject, I encourage you to download them and check them out.
Another thing that must be kept in mind is that the kind of missions most commonly found in games like ArmA, in the real world, require a massive amount of planning and preparation by well-trained professional military personnel well before the first shot is ever fired. The goal of groups like mine is to be able to play to the best of our ability without requiring such huge time-sinks in the pre-mission planning - basically, we want to get the best results we can without having to spend hours in advance planning out each operation. Planning is great, but we strive to keep the initial planning short and sweet - minutes at most - and further develop our plans as we carry out the mission. As the saying goes, "No plan survives first contact".
For those of you reading this who are not familiar with my group, Shack Tactical, and would like a bit of information about us and how this document is tied to us, read on.
Shack Tactical is a gaming group I run that focused on Operation Flashpoint in the past and is focusing on Armed Assault in the present and future.
The basic guiding principle is that we are interested in developing and maintaining a mature yet fun group that has a common interest in realistic tactical combat simulation. I'm sure that many people reading this are familiar with some of our "After Action Reports" and have seen videos of our sessions. If you have not and are interested, you can find the AARs on my articles page, and the videos on my Google Video account.

Our most valuable experiences in Operation Flashpoint came about because of an excellent mod called "Wargames League". This was our mod-of-choice once we discovered it, as it allowed for a great many tactical possibilities that were not really possible in other mods, or the base game. It was able to do something truly incredible - not only did it increase the overall level of realism and intensity, but it managed to do so while still being a hell of a lot of fun.
Firefights lasted longer and were more intense, the wounding mechanisms were enhanced (with things like bleeding and bandaging being introduced), the AI fought more intelligently without resorting to pin-point sniper-like accuracy... all in all it was an accumulation of hundreds of tweaks, fixes, and features that ended up being more than the sum of it's parts. It redefined how we played the game.
At the time of this writing, ShackTac has played the Wargames League mod for just shy of one year. Over that year, we've evolved quite a bit. All of it has been based upon experience in the game. I have tried hard to avoid introducing elements that are not truly necessary, or would over-complicate things and cause a negative impact on the overall enjoyment of what at the end of the day is ultimately a game.

We are not soldiers (though some of us, like myself, have served in the military in the past), and we do not pretend to be. We do, however, enjoy fighting as a cohesive, skilled, and tactically knowledgeable group of like-minded gamers.
This "TTP" (Tactics, Techniques, and Procedures) was created to help further our gaming experiences as well as introduce them to the general public, in the hope that it may have even a tiny positive impact on the overall tactical gaming community.
I hope that you all enjoy the material that is presented within this guide. Many ShackTac members contributed valuable input to it, and as I said, it would not have been possible without the experiences of the group as a whole this past year.
I also hope also that everyone who reads this gives the Advanced Combat Environment mod for Armed Assault a shot when it comes out. "ACE" is the successor to "Wargames League", and I anticipate that it will redefine combat in ArmA the same way that WGL did in OFP.

Before we move into the meat of the TTP, here are a few notes to close off the intro.
If you enjoy this guide, please take a moment to Digg it via this link. 
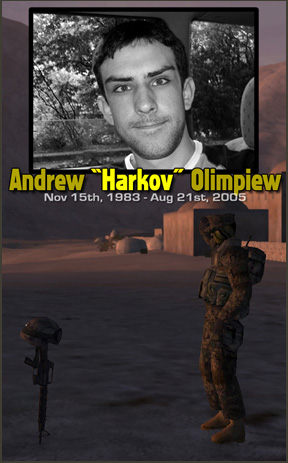
This guide is dedicated in memory of Andrew "Harkov" Olimpiew. Harkov was a notable member of the Shacknews.com community who died in August of 2005. He was a great person to play with in all manner of games, or chat with on the Shack forums, and was looking forward to playing with the (as-yet-unnamed) Shack OFP group just prior to his death. The loss we as a community felt at his passing was immense, and I still find myself wondering what might have been if only he hadn't died when he did.
As I said, this guide is dedicated in his memory. I'd rather he was still around to join us in ArmA, but this will have to do instead.
Harkov, you are not forgotten.
Armed Assault, like Operation Flashpoint, shines brightest when combined with quality user-made content, and when played with good groups of like-minded players. In this section I've listed a few of the mods I'm most looking forward to, with a bit of information about each, as well as some information about TacticalGamer.com for those of you interested in finding a mature group of people to play with in ArmA (and other games, for that matter).

Advanced Combat Environment () is a mod in progress for Armed Assault that is being done by the core crew that was responsible for the excellent Wargames League (WGL) mod for Operation Flashpoint (OFP). This will undoubtably become the primary mod that Shack Tactical uses in the future - the level of enjoyable realism present in WGL was second-to-none and redefined how we played, and ACE appears set to take this even further.
There are many exciting teamwork- and gameplay-enhancing features planned for ACE, and as I said above, I highly encourage all ArmA players to check it out upon release and follow the development of it. It should be the mod-of-choice for any groups interested in increasing their realism, teamwork, and gameplay at the same time.
Here is what Phaeden, one of the core ACE developers, has to say about the mod:
ACE is a full conversion modification for Armed Assault. The overarching philosophy of ACE is to provide its users with a combat simulation that is both realistic and enjoyable. Our primary mission is to create a wide variety of real world weapons, vehicles, equipment, and tactics so that those playing the ACE mod will be able to better simulate combined arms combat on a modern battlefield. ACE is designed from the bottom up with the goal of encouraging its users to employ real world tactics and strategy (fighting as a team) in order to accomplish realistic military objectives. We strive to create hyper-realism without losing sight that the mod must be playable by the "advanced" user. Our focus is not only on creating coding and scripting which highlights realism but on creating realistic missions on which one may experience the full spectrum of virtual combat.
For the record, this guide is very much oriented towards the WGL/ACE style of gameplay. ShackTac's evolution has been heavily influenced by WGL, and we would not be where we are now - and this guide would not have been written - if not for what WGL gave us in OFP. I expect even better from ACE in ArmA.
December 24th, 2008: ACE Is out! Check the top of the page, or the root of my site, for more info & links.
The Chain of Command mod group is involved with creating realistic mods that make it possible to have large-scale, authentic combat the likes of which would otherwise not occur in OFP or ArmA. Their Command Engine allows for massive forces to be easily controlled and ordered around the battlefield, while their Unified Artillery permits realistic artillery support to be used in support of the battles.
CoC is a top-notch mod team that produces high-quality work, and I highly recommend their work. A close eye should be paid to them in ArmA, both because of what we know they'll be releasing, but also because there will doubtlessly be new projects springing up from them and their past performance tells us that anything with the CoC behind it is going to be high-quality material well worth checking out.
The CoC Unified Artillery mod for OFP introduced full ballistically-modeled artillery and was the most fully-realized and authentic artillery that was ever created in OFP. It's no surprise that they were involved in the creation of an artillery system for the military version of OFP, known as "Virtual Battlespace 1".
CoC's Unified Artillery for Armed Assault is something I am looking forward to seeing, and I have no doubt that we'll be integrating it into our future missions wherever possible.
If you would like to read about the OFP version of CoC:UA, I wrote an article about it once upon a time that you can find here.
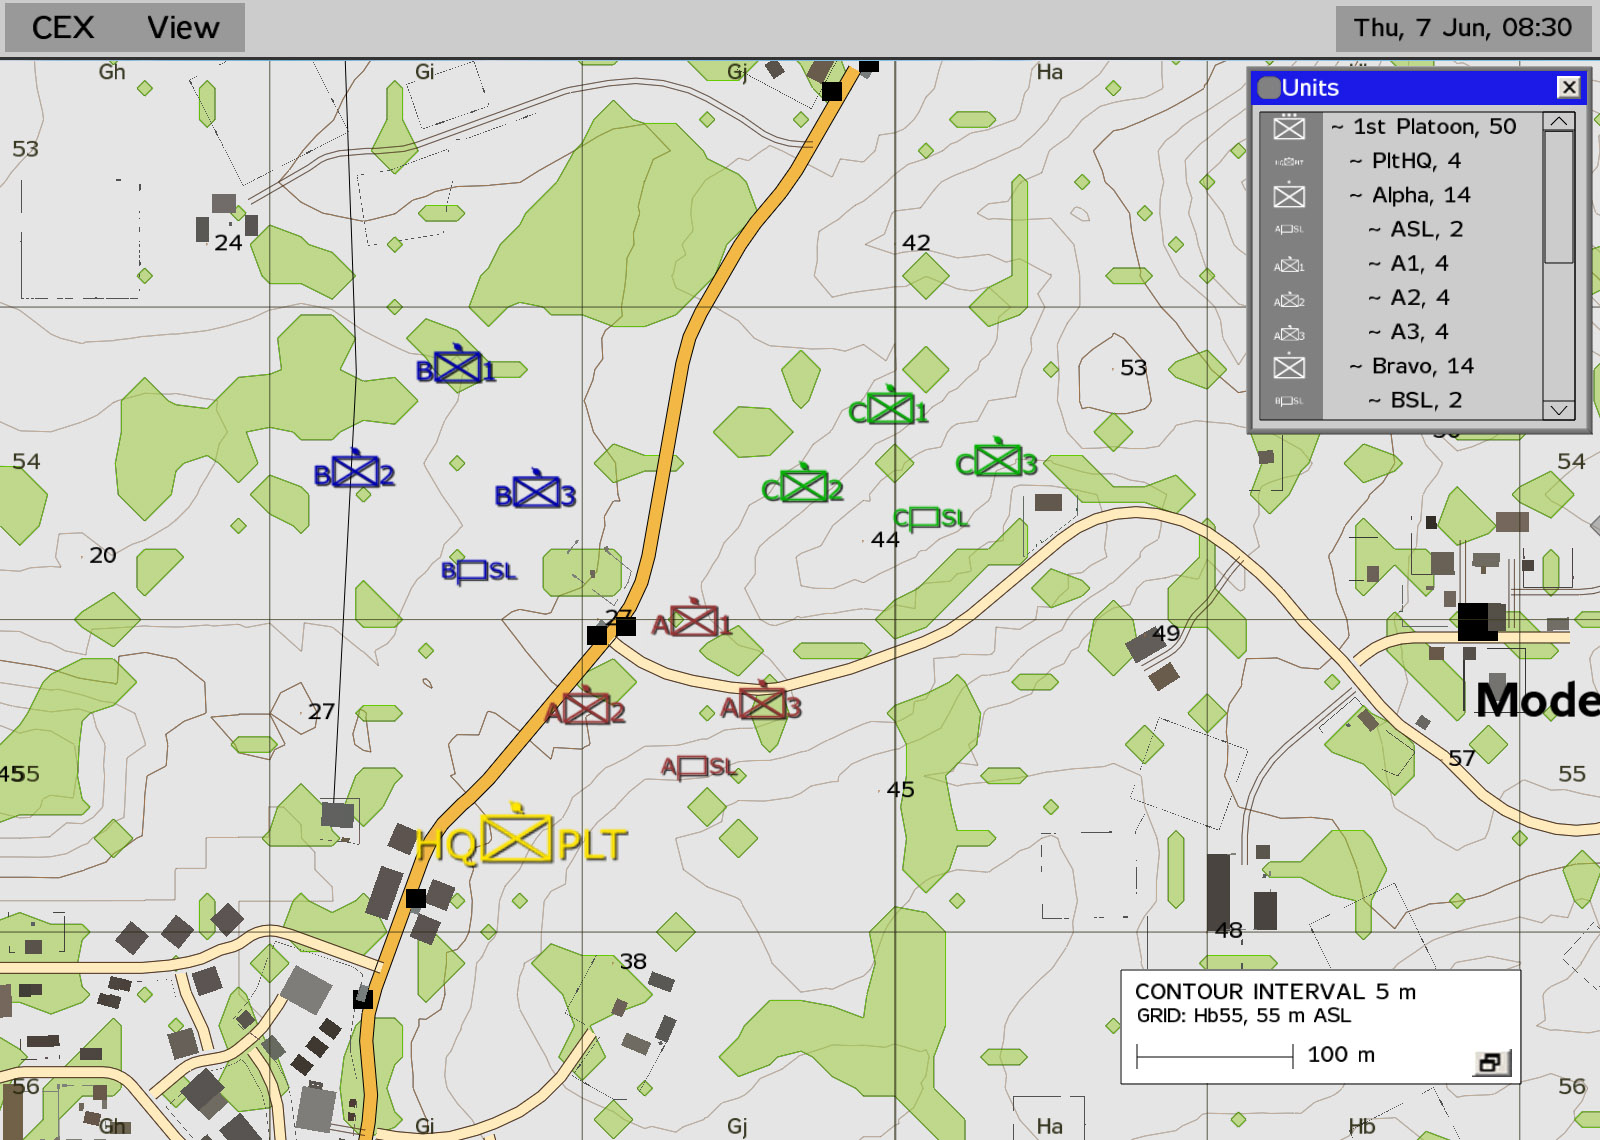
The Chain of Command's Command Engine for ArmA is a series of scripts that can be integrated into any mission to add a Command & Control (aka "C2") interface that functions much like your typical RTS interface. This can be used to pass move orders, set rules of engagement, and keep track of the situation as it develops. The CoC CE will be integrated into our future missions anywhere that it is appropriate, and it should do a great deal to make the job of the Platoon Commander easier. I will have a more in-depth writeup on how to best utilize it in the future, once ShackTac has had time to become familiar with it and the power it brings us.
Update, September 1st: The first public beta of CEX is available on the ArmA forum here.
It's reasonable to guess that the CoC team has more up their sleeve for ArmA. Only time will tell as to what it is, but there's one thing I'm confident of - whatever it may be, it will be useful for ShackTac's style of gameplay, it will be high-quality and extremely functional on release, and it'll live up to the standards set by their previous work.
The Chain of Command's site can be found here.
The Ballistic Addon Studios mods for OFP were some of the first I played with in a multiplayer environment. They have a special place in my OFP memories because of that, and I'm looking forward to seeing what they come up with for Armed Assault.
To that end, I asked Fer, of BAS2, to write a bit about BAS2 (the ArmA reassembling of the team) and BAS' history for this article. The following two sections, "About BAS" and "BAS f", are from him.
Ballistic Addon Studios (BAS) is one of the oldest and best-known OFP addon-making teams (it was never a 'mod' in the traditional sense). During the OFP era BAS set very high standards for addon quality and functionality, pioneering features such as fast-roping from helicopters and high-dispersion (HD) ammunition.
The majority of OFP addons produced by BAS represented US Special Forces (Deltas, Rangers, and specially-adapted SF versions of helicopters such as the Blackhawk, Pavehawk, Chinook and Littlebird). BAS also produced the popular 'Tonal' pack, a new island in an Indian Ocean setting with completely new units and weapons for all sides. Key community standards such as JAM also orginated from BAS. Shortly after the release of VBS1, BAS announced its withdrawl from OFP addon development.
Now reformed for ArmA, BAS (now known as BAS2) is set to reprise its role as a pioneering team. Since reforming, BAS2 has announed that it will not just focus on the development of addons, but will be equally concerned with supporting mission-making and other aspects of the community. Also on the cards is a re-make or sequel to 'Tonal'.
The first BAS2 project for ArmA, BAS f is a mission development framework aimed at newcomers to mission editing. The framework is an MP mission folder containing a library of scripts, functions and template files, plus an illustrated manual. These components are designed to provide the mission designer, after minimal additional configuration, with a selection of pre-tested features and functionality intended to improve the overall quality and re-playability of his/her mission.
The Ballistic Addon Studios site can be found here.
FDF for Operation Flashpoint was one of the most highly-polished and comprehensive mods to ever come out for the game. It had everything - entirely new units (and LOTS of them), new islands (and very, very high quality ones at that), new sounds, voices, gameplay tweaks, and more. It was a fantastic example of the kind of quality that the community was capable of producing, and it is one of the projects for ArmA I am most looking forward to seeing come out. These guys are worth watching - they've already put out a very solid sound pack for ArmA, and there's no doubt going to be a slew of quality addons coming from them in the future.
You can find the official FDF site here.
Tactical Gamer is a community based around mature, teamwork-oriented multiplayer gaming in a wide variety of games. They support pretty much everything, and are a community that I have enjoyed interacting with in various games in the past. Most recently I've played Battlefield 2's "Project Reality" mod extensively on their server, as well as Armed Assault. I mention them here because they strike me as a good place for people who are interested in the kind of teamwork and gameplay that this guide talks about to head for some gaming. Feel free to visit them in the future in ArmA. Click on the banner to visit their primary site - information about their ArmA server can be found in the forum section bearing that title.
The most intimidating initial thing you'll run into with ArmA is the sheer number of binds there are, along with the unavoidable fact that the ArmA keybind system leaves a bit to be desired at least as far as key organization goes.
ArmA sports quite a few binds that were not present in Flashpoint, and fortunately it has some neat ways to deal with the added keys - these are key combos, double-tap keys, and press-and-hold keys.
The biggest feature of the keybind system is that ArmA allows any keys to be tied together into a bind. For instance, you can have A+S do something, A+D do something else, double-tap A, or ctrl-doubletap-A do something else entirely, and so on. This is extremely useful due to the number of commands that are available in the game.
The mouse keys can also have different functions based on whether they're held down or not, with the caveat that this can cause a slight delay with the action due to the game having to detect that you're holding down the key versus just tapping it.
Double-tapping keys is another welcome feature that allows for two functions to share the same key, with one of them being activated by a 'normal' key press, and the other only occuring when the key is double-tapped.
Also, in ArmA, unlike OFP, the size of the "float zone" is configurable. The "float zone" is their term for freeaim, which is the amount of movement you get with your weapon before your view starts to move. You can now adjust how big you want the freeaim box to be, or if you even want it at all. Disabling it can be helpful to new players who've never played a freeaim game before.
There are some useful ways to combine logical functionality into your keybind system.
Due to the number of keys in ArmA, it may take a bit to figure out an ideal key setup. However, once you get to that point, I think that you'll be impressed by how much added functionality and ease-of-use exists thanks to the new key options.
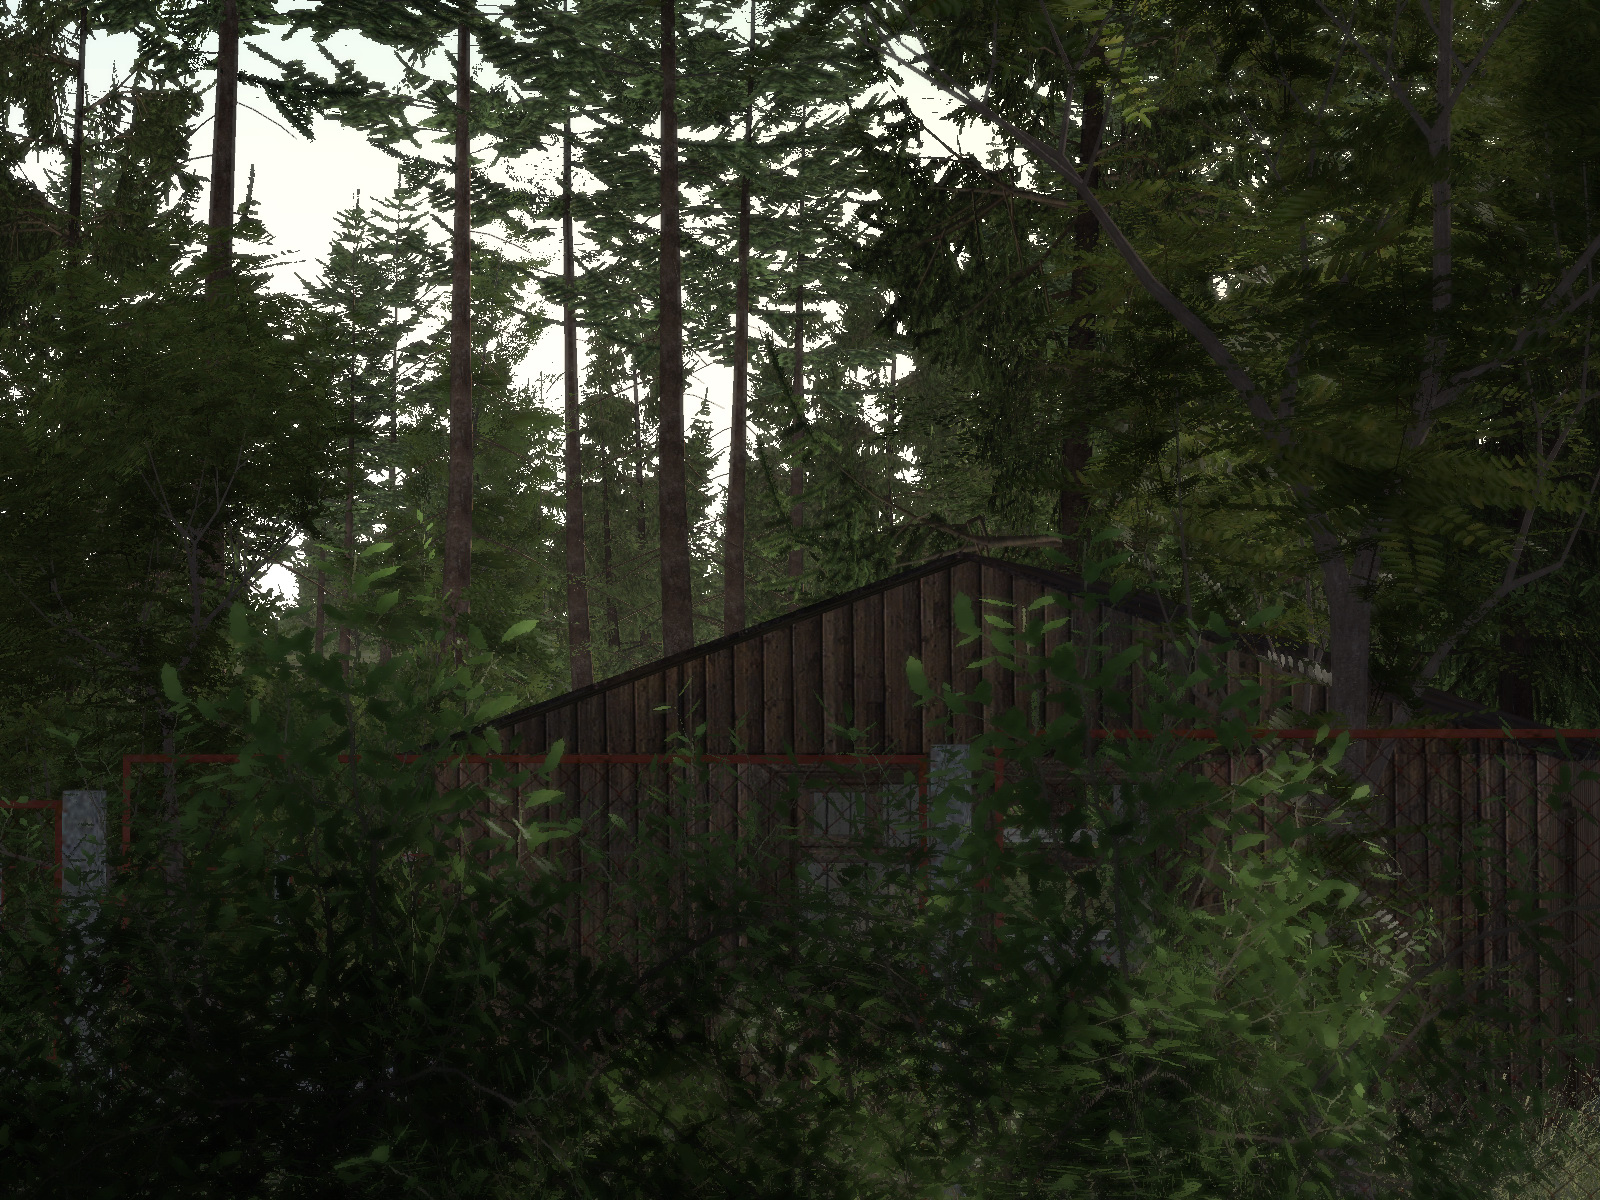
Let's take a look at the environment next, with an eye turned towards the things that are tactically significant concerning it.
ArmA's environment is modeled with a level of fidelity that many other games lack - you'll find a full day-night cycle complete with accurate shadowing, accurately modeled starscapes, moon phases, tides, varied foliage, insects, birds, wind, varied weather (wind, rain, lightning, storms), grass - all of it, and more, which comes together to form a virtual world that can exist in many varied states which can have dramatic influences on the tactical gameplay that occurs within it.
In no particular order, let's move on to some of the more prominent tactical aspects of the ArmA environment.
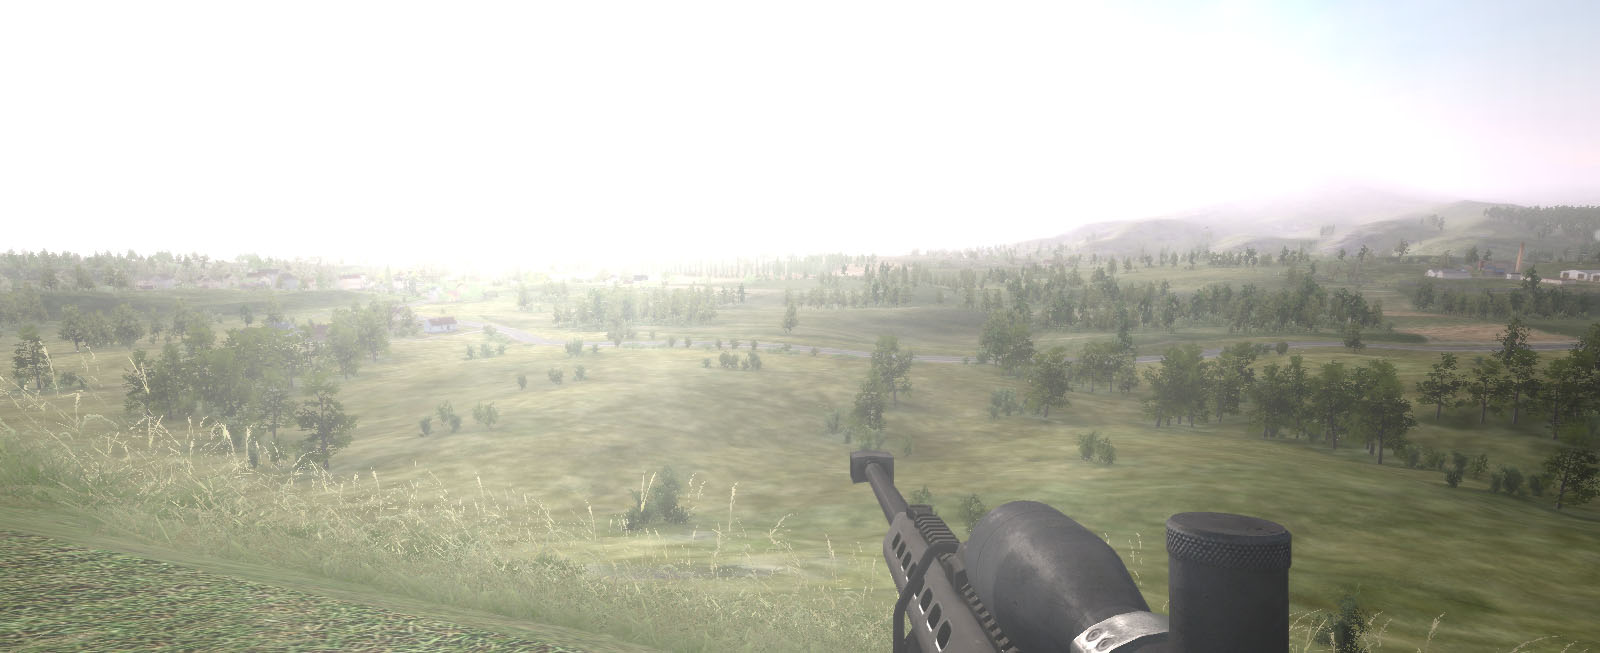
High Dynamic Range rendering (HDR) is used to good effect in ArmA. HDR helps to simulate the reaction of the human eye to bright light sources or dimly lit areas - for instance, your eyes will slowly adjust to a dark room once you enter it, and the light of a mid-day sun will temporarily blind you if you stare directly at it.
From a tactical standpoint, there are several key areas where HDR must be paid particular attention to.
One of the most obvious visual upgrades in ArmA comes in the form of grass, grass which becomes a major consideration in any area that sports it. The main things to remember about it are as follows.


Pretty much every single building, tree, fence, or other object that could conceivably be destroyed in reality can be destroyed in ArmA. Walls can be knocked down, trees can be overturned, and buildings can be reduced to rubble.
This is a major tactical element of MOUT (Military Operations in Urbanized Terrain) combat in particular, and all players should recognize the fact that being behind a wall, or in a house, does not necessarily make them safe.
It is entirely likely that future ArmA mods will introduce some form of dynamic building destruction.
ArmA sports several welcome improvements to the way night time visibility is modeled. The things that impact nighttime visibility are as follows.


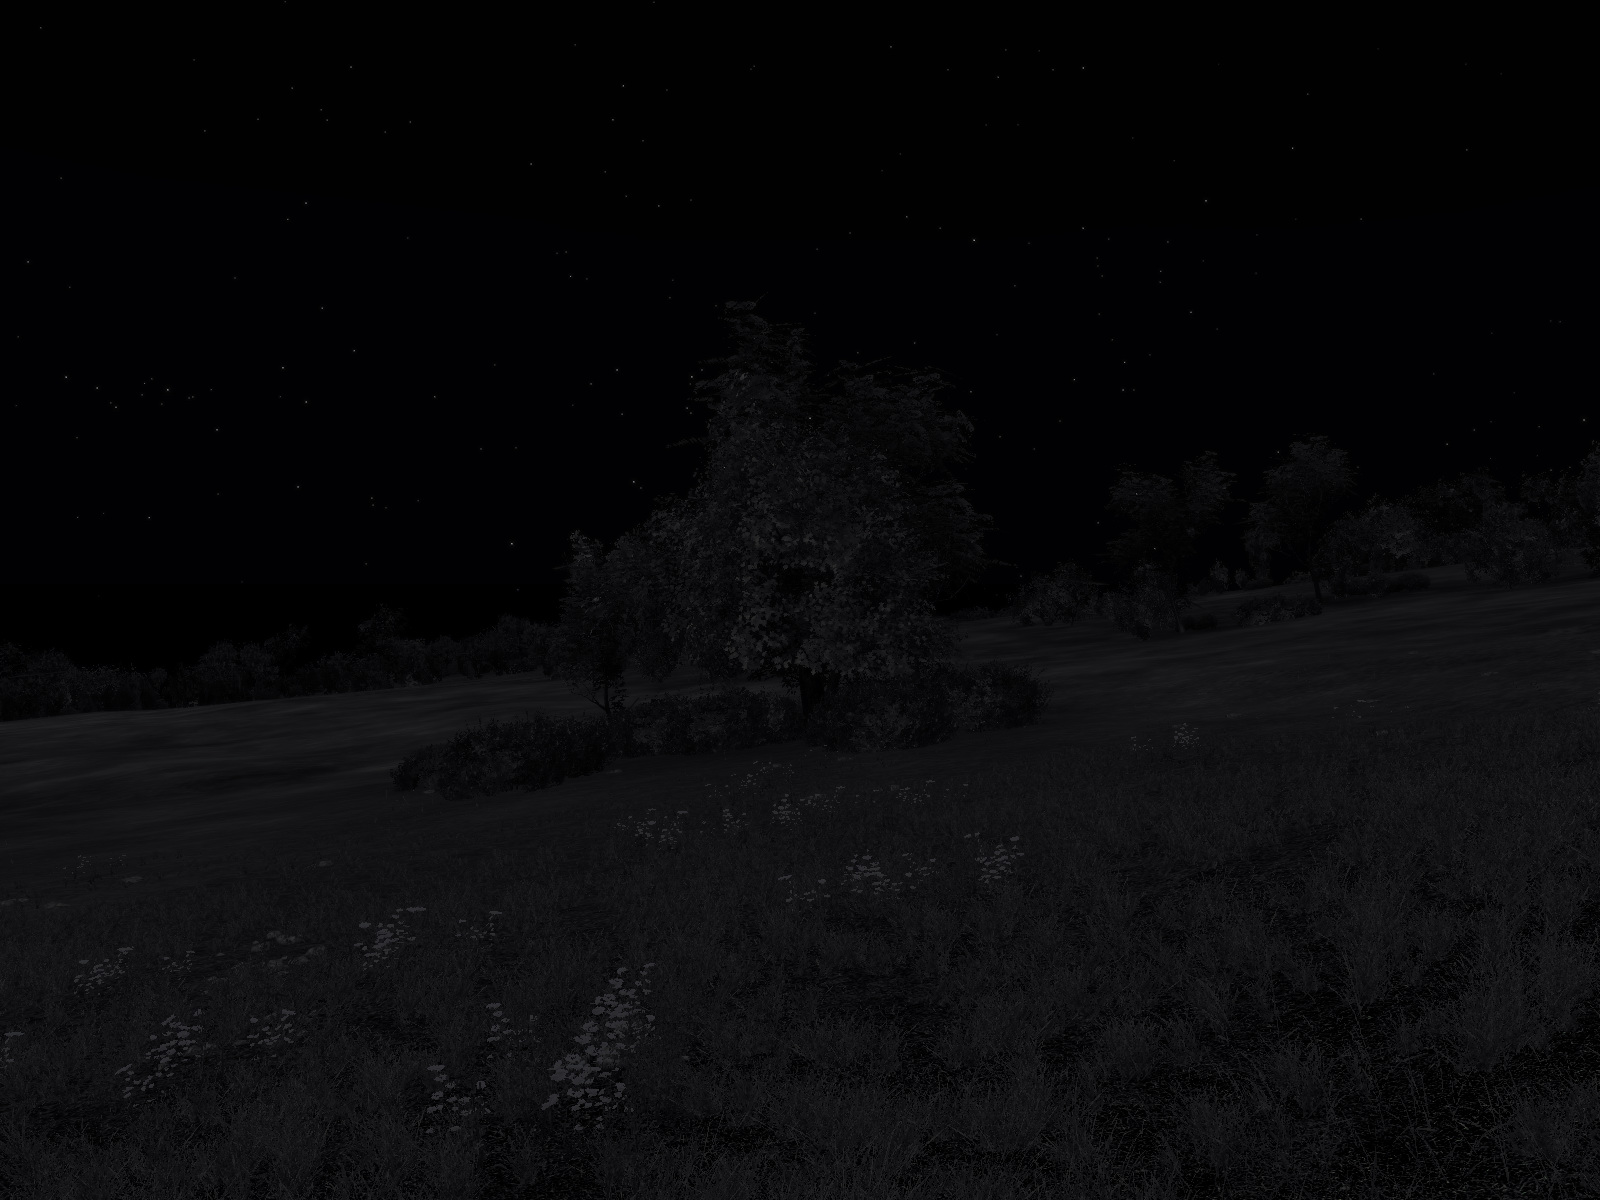
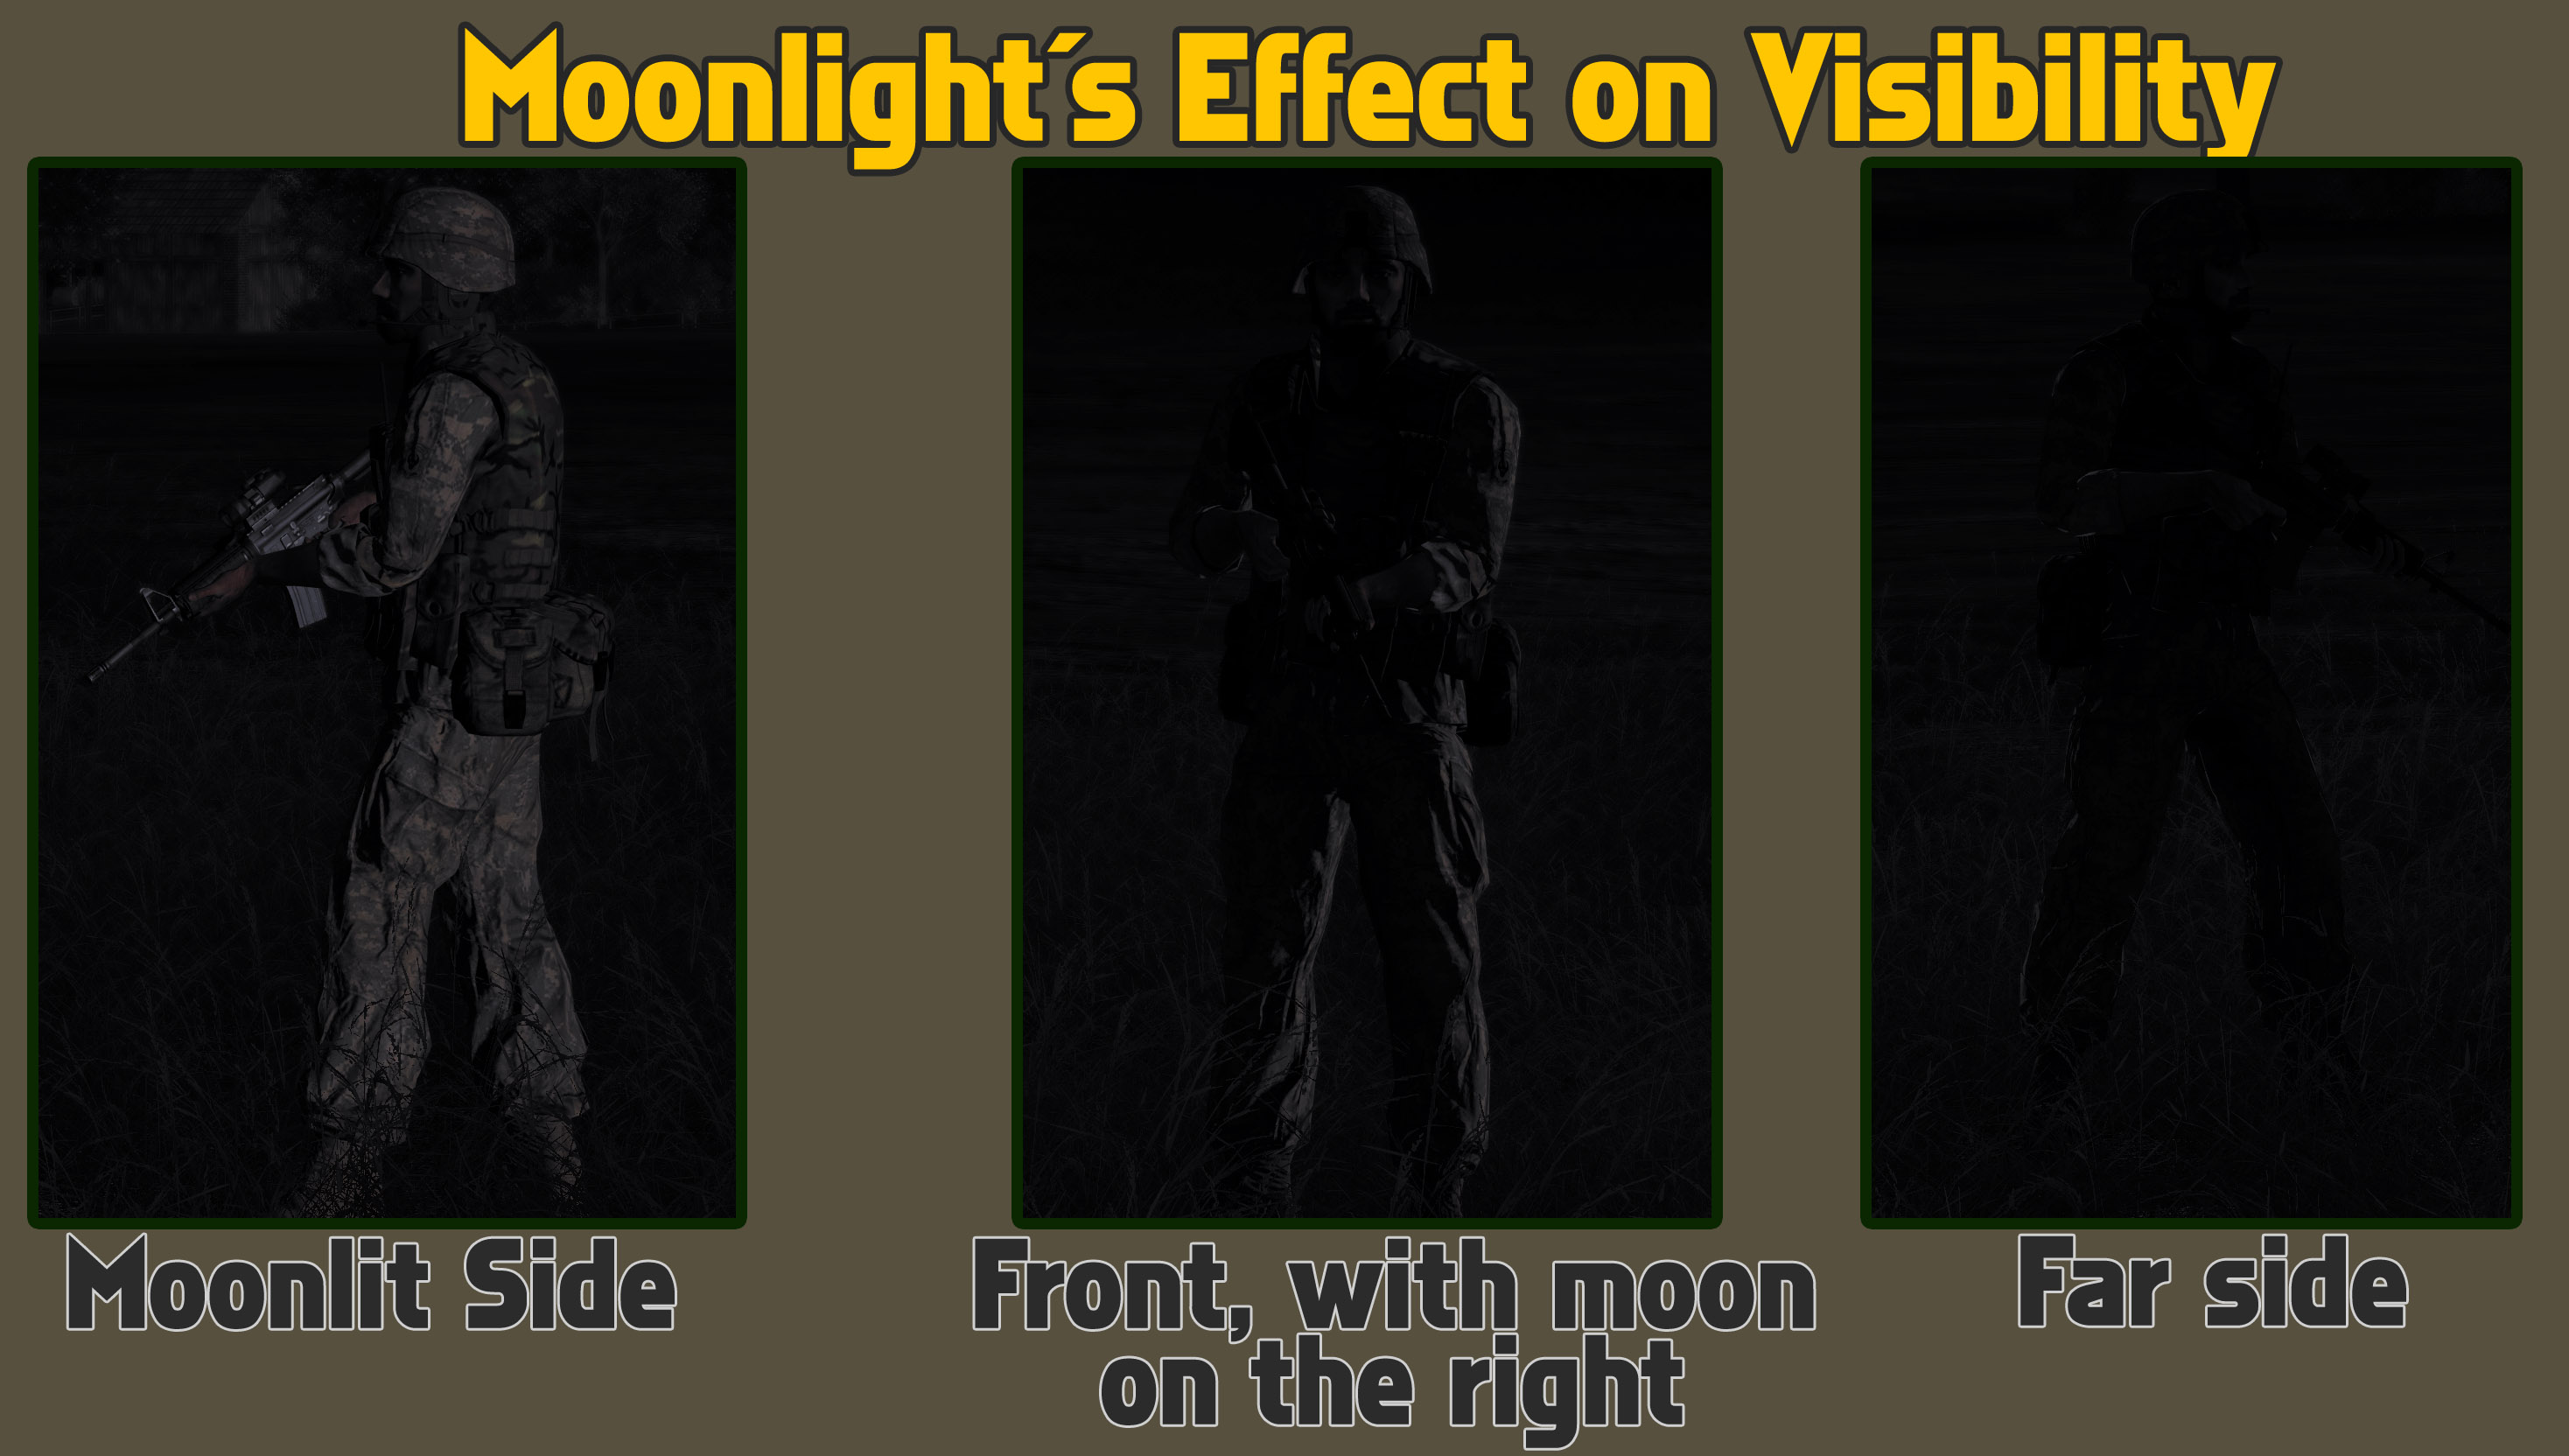
ArmA's day/night cycle happens in realtime and covers the full spectrum of day, dusk, night, and dawn. Shadows shift based upon the position of the sun (or, at night, the moon) in the sky as well. Towns and villages will also light up at night via streetlights, lighthouses, etc.
The tactical significance of this is that a mission can take place at any time, and the time will progress during the mission itself. Thus, a battle that starts at dusk can very well rage on into twilight and finally night.

Missions that take advantage of this element of the game can be quite interesting - for example, a mission that would take advantage of this would be one where a small team of special forces soldiers is trying to exfiltrate out of an enemy area in the last minutes before dawn. The enemy would be without nightvision devices and would have to rely on the light of the moon (and flares) until the sun breaks the horizon. The SF soldiers would have to try to put as much distance between themselves and the enemy before the light came, at which point the dynamics of the mission would change dramatically.

There are countless great mission concepts that can take advantage of the realtime (or accelerated, if desired) day/night cycle, not to mention the variety that comes from being able to set a mission to occur at any time during the day or night. You can even have this be a selectable option for the mission, so that the players can decide on the mission time before starting the mission, adding that much more replayability to it.
Cloud cover softens the environment's appearance. Shadows become muted or disappear completely, leaving the world less defined than with a normal amount of sunlight. Picking out targets can become a bit more difficult in overcast weather due to the lack of shadows and an increased ability for people to "blend in" to the visually subdued environment.

While it does rain in ArmA, the rain has little significance by itself. It does little to obscure vision, nothing to alter sound, and there are no movement modifiers based on whether the ground has been highly saturated or not. Still, in certain situations heavy rain combined with "rain fog" can reduce visibility a bit, and occasionally it can alter the conduct of a battle.
Lightning from storms can have an effect at night by causing brief periods of illumination. This can be helpful to any forces that are operating without nightvision goggles, and a hindrance to those that have NVGs and want to maintain stealth.
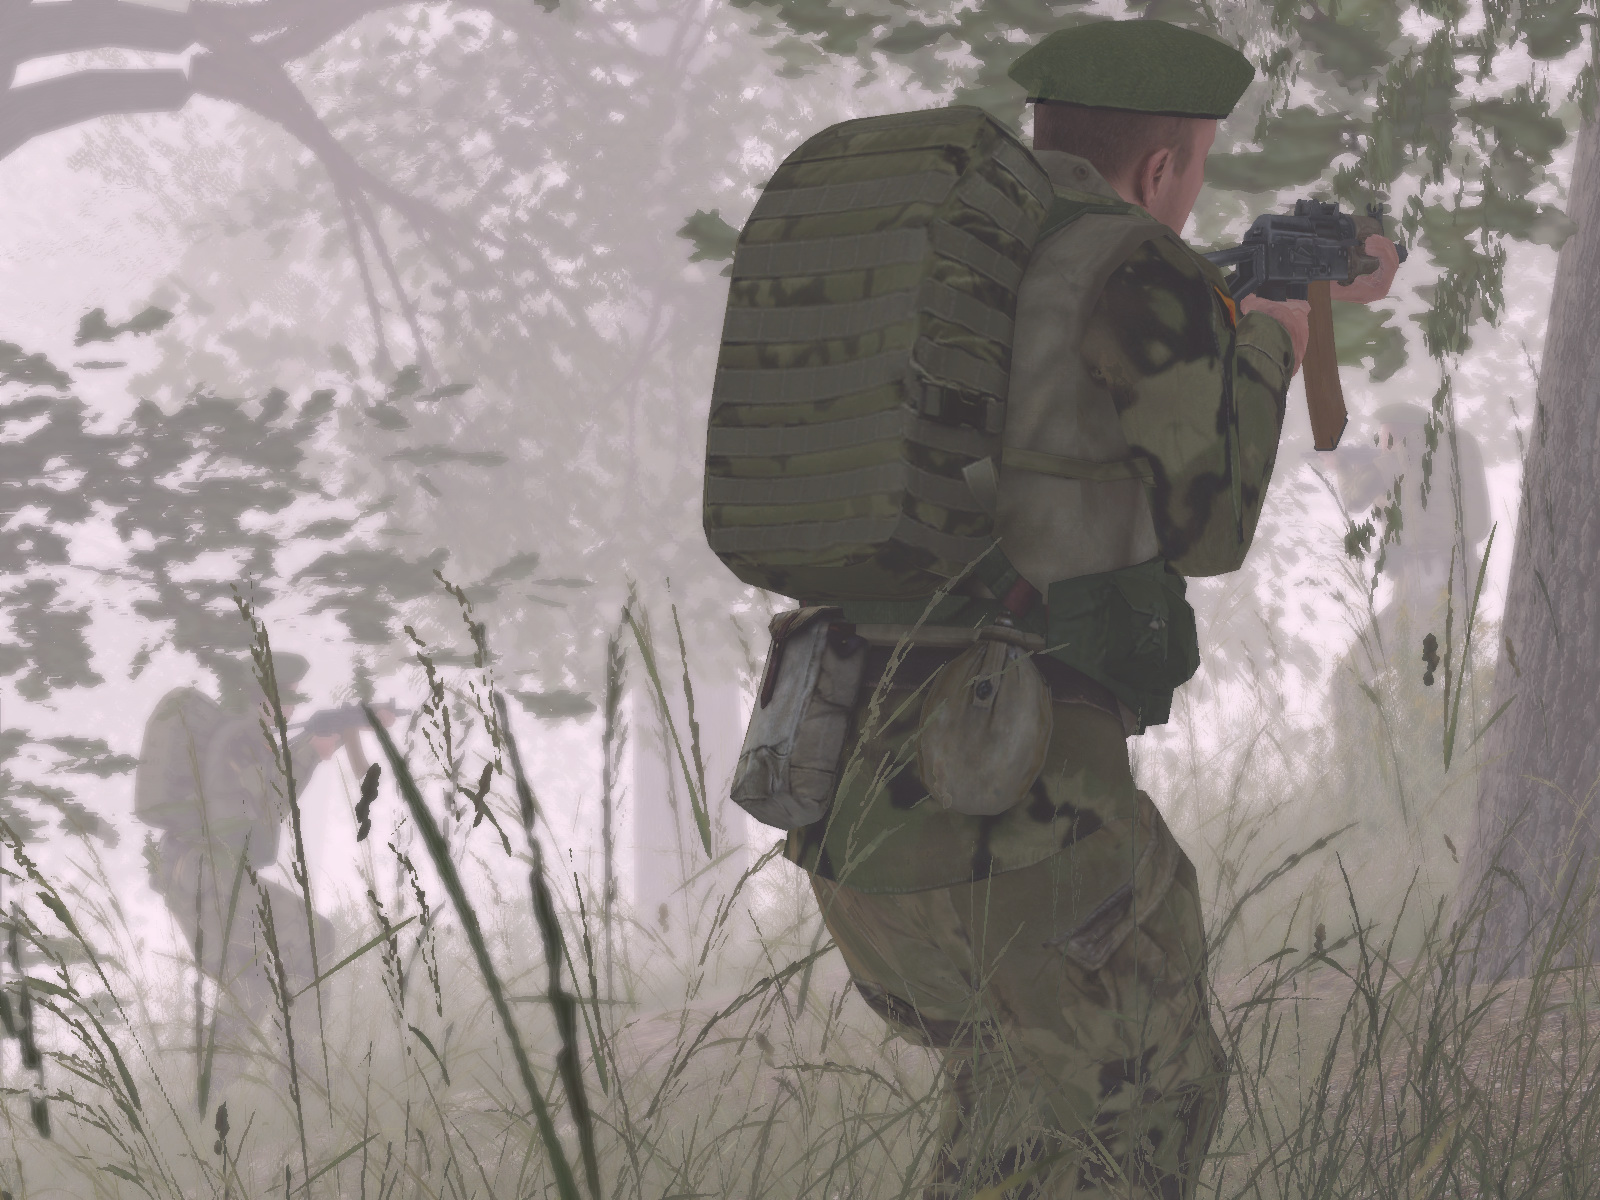
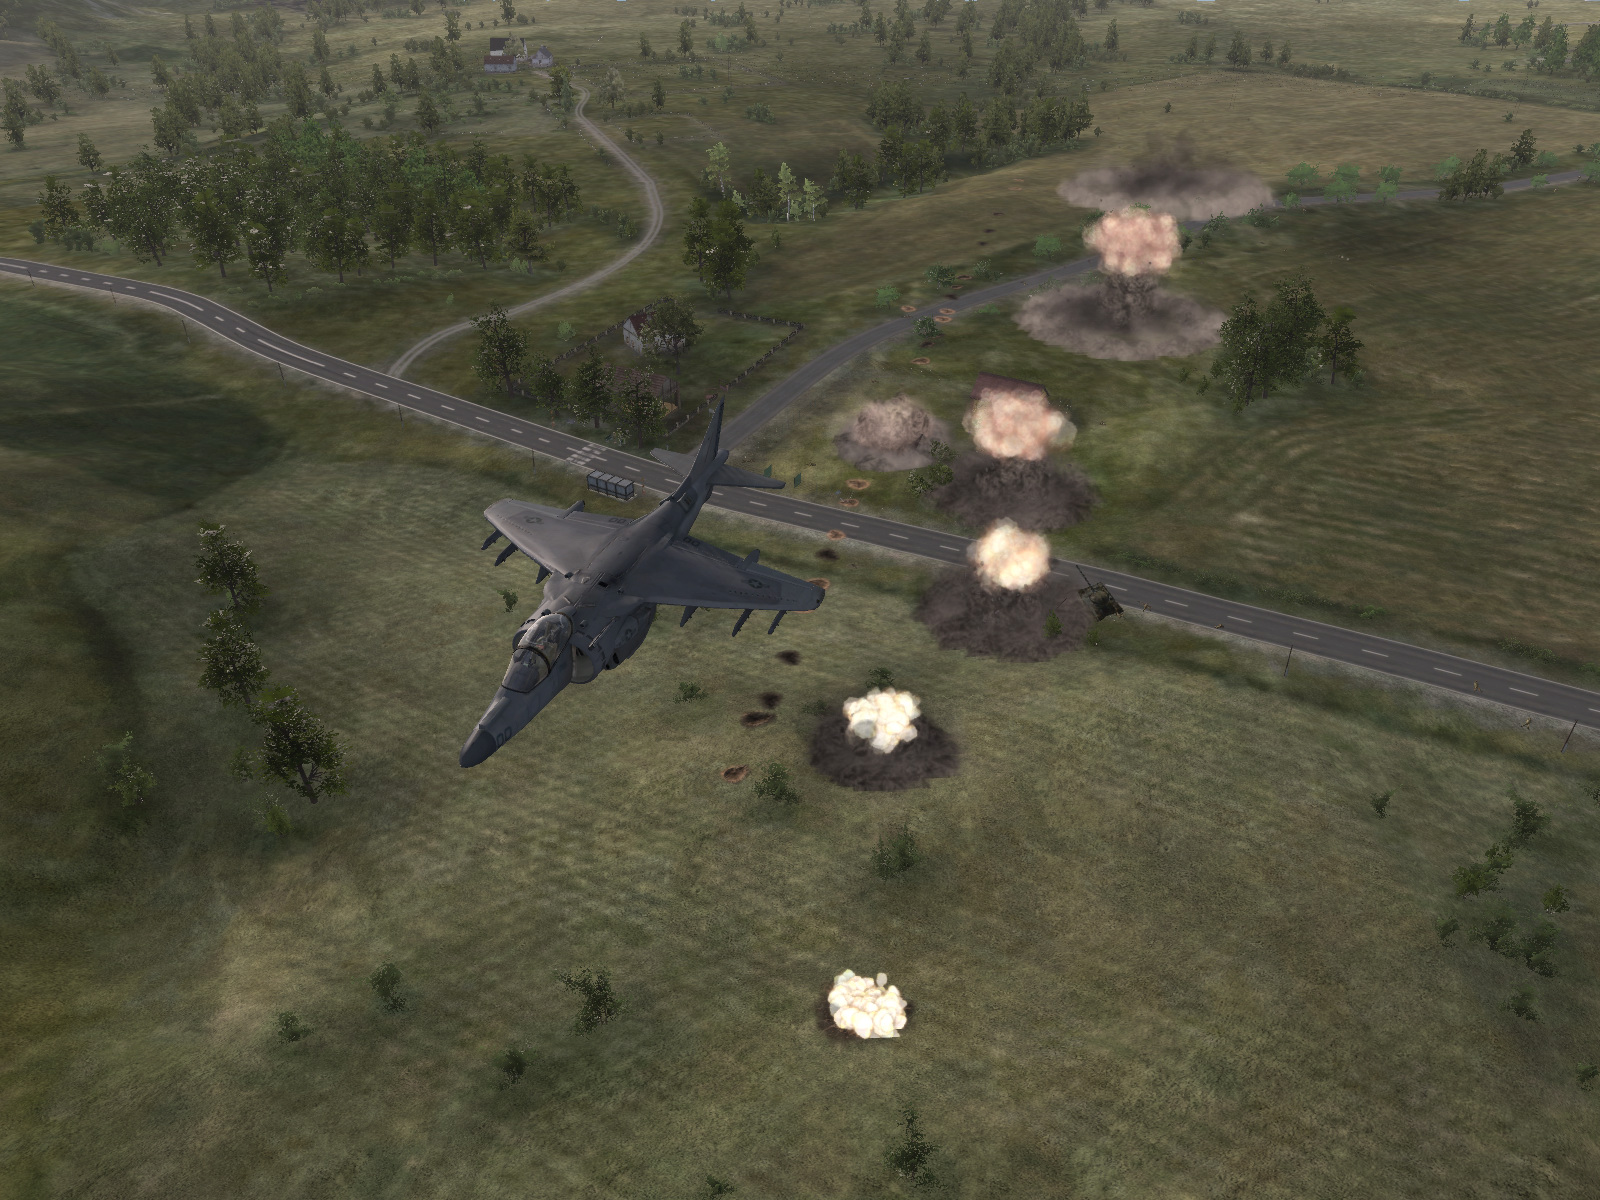
Fog's tactical significance comes in the form of how much it reduces the effective combat range of all units. Helicopters and planes are almost completely worthless in heavy fog, especially as CAS elements, and ground vehicles tend to suffer from dramatically reduced effectiveness as well. Infantry are forced to heighten their situational awareness and sharpen their vision, else they're likely to walk right into the enemy unawares. Fog also demands that all units maintain very good friend-or-foe identification to avoid fratricide (aka "friendly fire").
When all is said and done, heavy fog reduces combat to an exceptionally violent, close-range, and nerve-wracking affair. It hampers literally every facet of combat and is one of the most difficult conditions to fight in. Exceptional individual skill and team coordination is necessary to triumph in heavy fog.

| Index of "Intro to ShackTac as a Basic Rifleman" | ||
|---|---|---|
|
||
| Combat Buddy Teams
|
||
Every player is at heart a basic rifleman first and foremost. You may want to fly planes and helos or drive tanks, but ultimately you must be familiar with life as an infantryman before you will be effective at anything else. Since every vehicle in the game is concerned directly with infantry support, it is important that all vehicle crewmen are familiar with the infantryman's life if they hope to support him properly.
The first part of being a proficient basic rifleman is knowing what your responsibilities are.
The 'Fireteam' is the smallest unit that you will see ordered around as a cohesive team on the battlefield in our sessions. Each fireteam consists of three fireteam members and one fireteam leader, and each fireteam wields a well-rounded assortment of firepower.
As a new player, you will act as a fireteam member and will be under the charge of one of our more experienced players, who will act as your fireteam leader. He in turn will be under the command of a squad leader who commands all three fireteams in his squad, who will be under the command of the Platoon Commander who will be commanding the three squads that form our platoon. There is a comprehensive writeup of the Shack Tactical Platoon Structure coming up on the next page - for now, just concentrate on your basic responsibilities as a fireteam member.

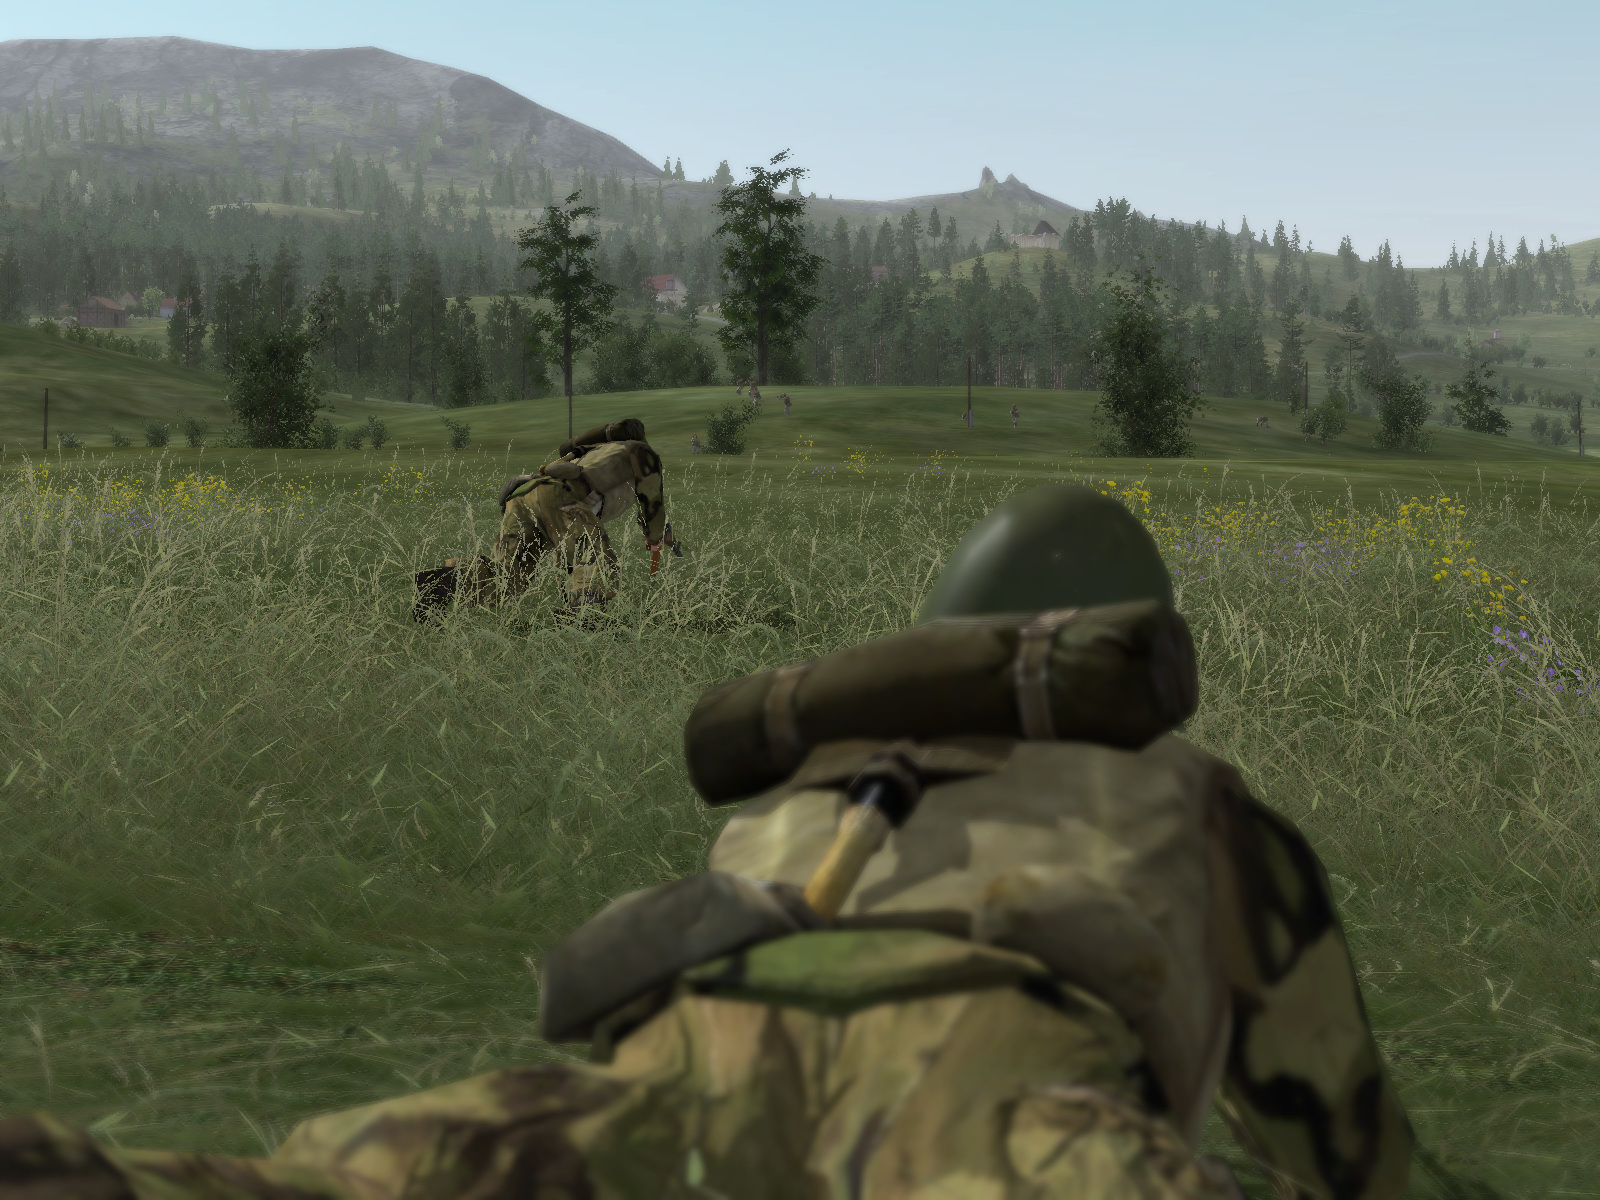
Every player should move with a buddy in-game whenever feasible. This most typically is done at the fireteam level, with the fireteam leader assigning buddies. The most common pairing up is the fireteam leader with the rifleman, and the assistant automatic rifleman with the automatic rifleman.
Buddy teams allow for more accountability to occur within a fireteam and also allows for very low-level teamwork to naturally and easily happen, which helps to boost the effectiveness of a fireteam. They allow for a fireteam leader to more rapidly command his team with fewer words as well - instead of constantly referring to each individual when giving orders, he can refer to the second buddy team and simply lead his own buddy team by his actions.
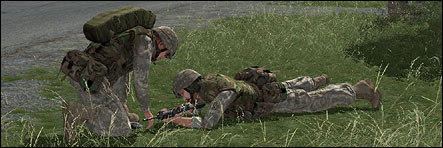
If your buddy goes down, it is your responsibility to get him out of the fight. A rapid assessment must be made as to whether he is dead or wounded, and whether the situation allows for you to safely pull him to cover. A dead teammate can wait, whereas a wounded one may need immediate attention from a medic and your action may be the deciding factor between life and death. If your buddy goes down, call out to the other fireteam buddy team and get them to cover you while you drag him to safety. Once you've made it to cover, call out to the squad medic and ensure that your buddy is treated. Depending on the situation you may want to stay to provide security to the medic or move back to the fireteam and continue fighting.
Interested in reading about what real-world Marines and soldiers are expected to know from the start? Check out these publications. You will find "Relevant Military Pub" sections at the end of several parts of this TTP - they're here as entirely optional reading for those who want to know more about the real-world warfighters.
| Download |
Combat Skills of the Soldier
US Army, FM 21-75 |
|---|---|
 |
This manual covers all sorts of topics that Army soldiers are expected to be proficient with. It is well-illustrated, and while it isn't as comprehensive as some manuals, it is a good base-of-knowledge to work with. |
| Download |
USMC Common Skills Handbook 1B US Marine Corps |
|---|---|
|
Basic USMC infantry information. This is a handbook that all Marines are expected to be familiar with. |
| Index of "Situational Awareness " | ||
|---|---|---|
What to stay aware of and look for
|
||
Other Situational Awareness Tips
|
||
Friend or Foe Identification
|
||
Situational awareness on the individual level is an important skill to posess. "Situational Awareness" is simply the act of being alert to what is happening around you, and using your knowledge of the battlefield's state to make tactical decisions and judgment calls.
Proper "SA" reduces the chances of being surprised, wounded, killed, or even of having a friendly-fire incident. It is an important skill to hone, and familiarity with what to look for can be a big help for the less-experienced players.
One of the major changes for situational awareness that ArmA brings is the introduction of native support for NaturalPoint's TrackIR head-tracking device. I won't waste too many words describing how it works - if you're interested, you can watch the video I've embedded here. It shows off the TrackIR4 used in ArmA - there's another video I made of helo flight with the TrackIR4 + TrackClip Pro that can be found here.
What I will say is that the TrackIR has the potential to vastly increase a player's situational awareness. Not only is it a godsend in aircraft, but it also has a very positive effect on ground vehicles and infantry. Being able to move in one direction while looking in another is something that we take for granted in reality, and in almost all games it is a very real limitation. Flashpoint allowed for us to look around via "freelook", but, alas, it was not as useful as it could have been due to there being no easy way to control it and your body at the same time.
ArmA's TrackIR support fixes all of that. It's one of the features I was most anticipating, and having played extensively with it by now, I have to say that it's well worth the investment.
If you're interested in picking one up, I have a promotional deal with them that will net you $30 off (for a standard TrackIR4) or $35 off (for a TrackIR4 + TrackClipPro). I highly recommend looking into these - they do amazing things for both immersion and situational awareness.

There are many things that a player must stay aware of and be on the lookout for during the course of a mission. I have broken these down into several groups.
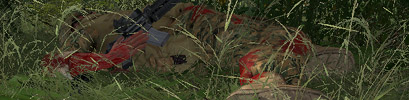
Check for any stray blood trails. If there isn't a body at either end of the blood trail, the odds are high that someone survived and snuck away. Stay on the alert in this case.
The map is used by our group to mark enemy contacts, and thanks to our platoon structure and how it is displayed in-game, the positions of friendly squads and fireteams can also be seen on the map. Ensure that you check it frequently to keep up-to-date on suspected enemy positions as well as friendly positions.
Note also that enemy infantry spotted within your group will show up on the map, but that other groups will not necessarily see them. If you spot an enemy and locate it on your map, ensure that you place an "ei" marker over it (in "Side" mode) so that the entire platoon can see the position.
In addition to everything else, remember that you must strive at all times not to fall into a state of "tunnel vision". This occurs when a player gets so fixated on a specific target or object/area that they neglect to stay aware of the "big picture". Remember that for every enemy you see, there are probably three or four (or more) others that you do not. Fixating on a single enemy at the expense of everything else is likely to get you flanked and killed. Stay alert and aware and you will greatly increase your odds of survival.
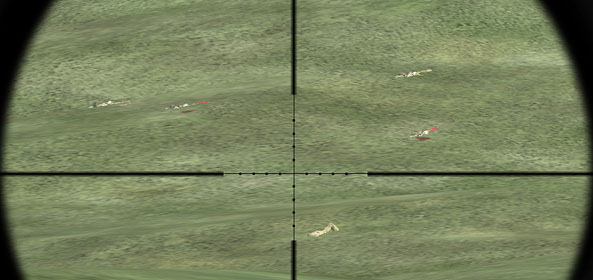
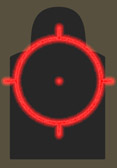
ArmA implements a system to try to simulate the fact that real people have a much wider field of view than you typically get in a game. To this end, BIS has implemented "Peripheral Vision Indicators" (or PVIs) that show up on the edge of the screen when units are in your peripheral vision but are not showing up in your rendered vision. The PVIs take the form of small, semi-transparent dots on the edge of the screen corresponding to the direction of the person/vehicle represented by said PVI. A red dot is an enemy, a green one is a friend, and a grey one is typically a neutral or empty vehicle.
PVIs will not show up when using anything that obscures your field of view, such as the nightvision goggles or magnified rifle scopes.
Being able to visually differentiate between friends and foes is a critical skill to have. Someone who cannot tell the difference is a danger to their entire team.
There are several guidelines that can be followed to help prevent friendly fire incidents.
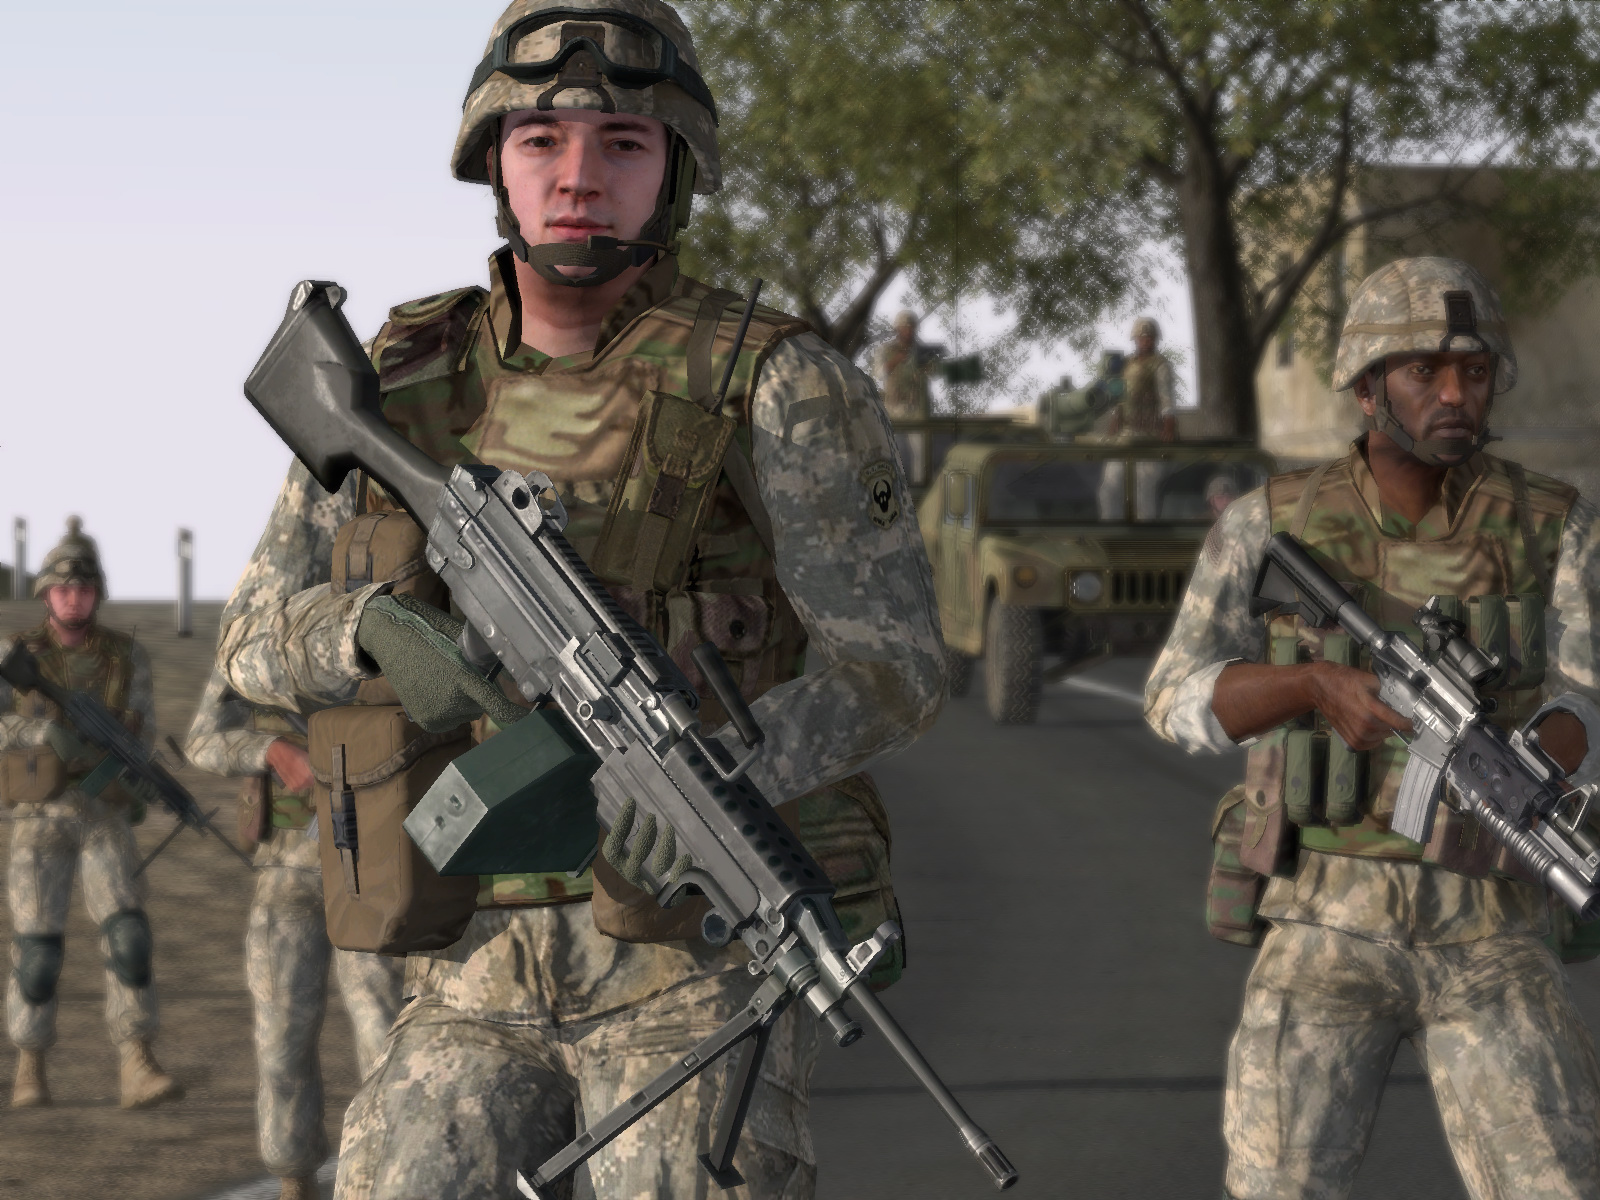
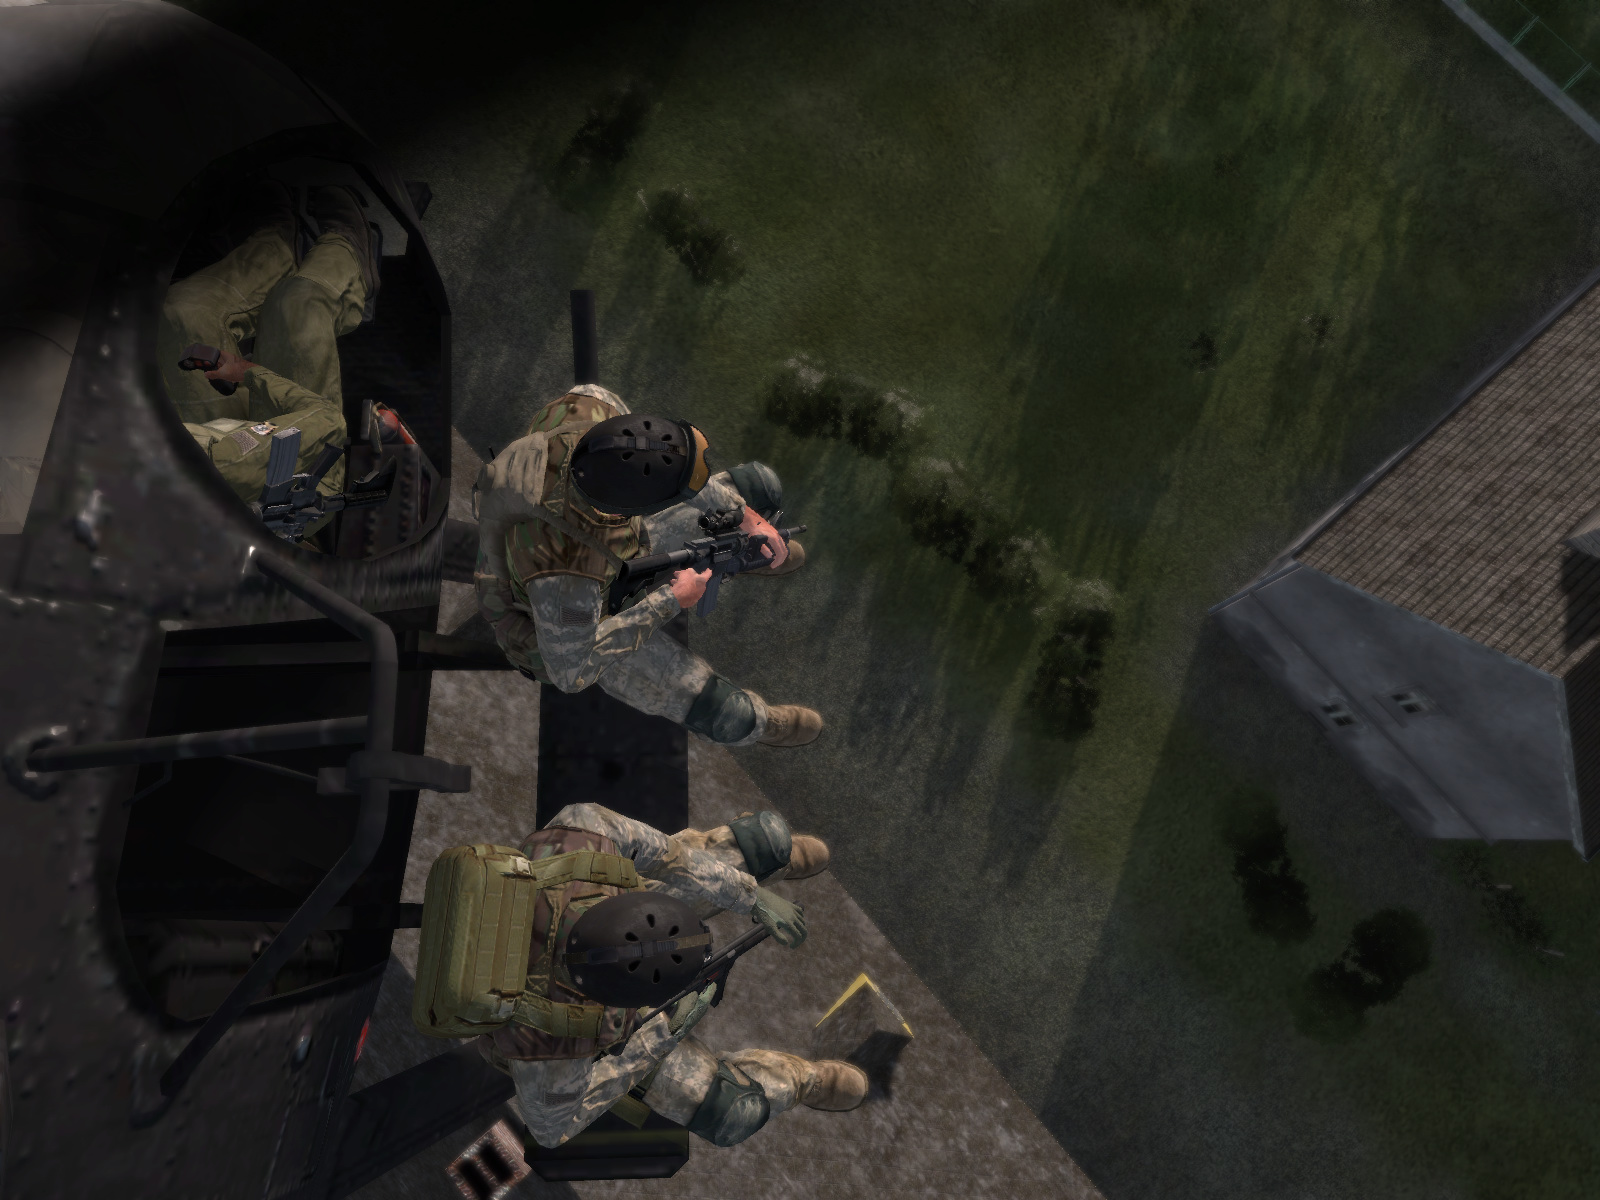
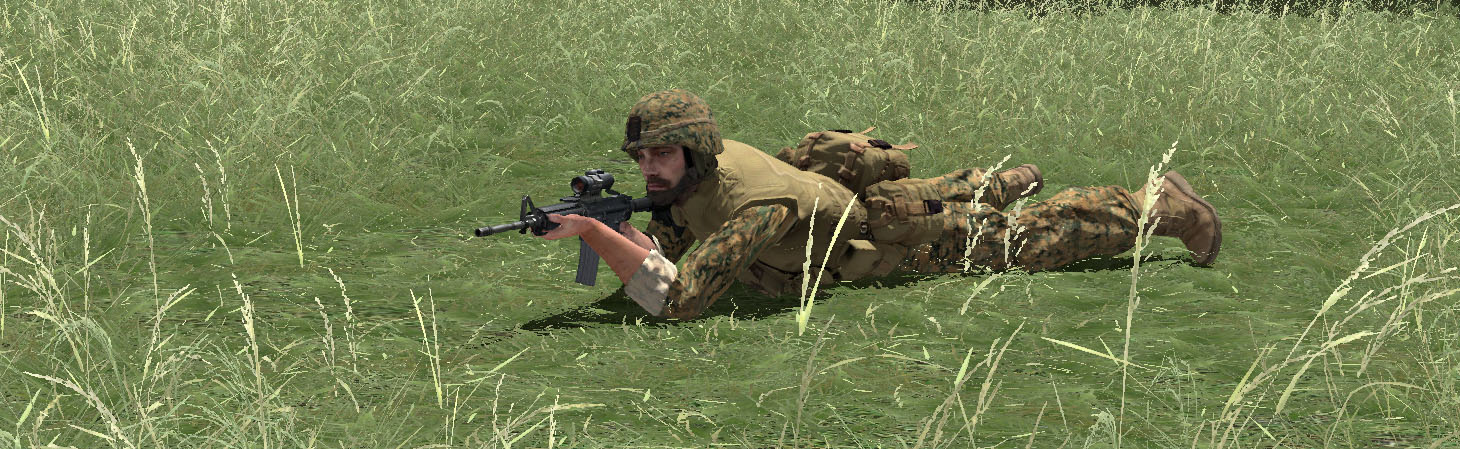
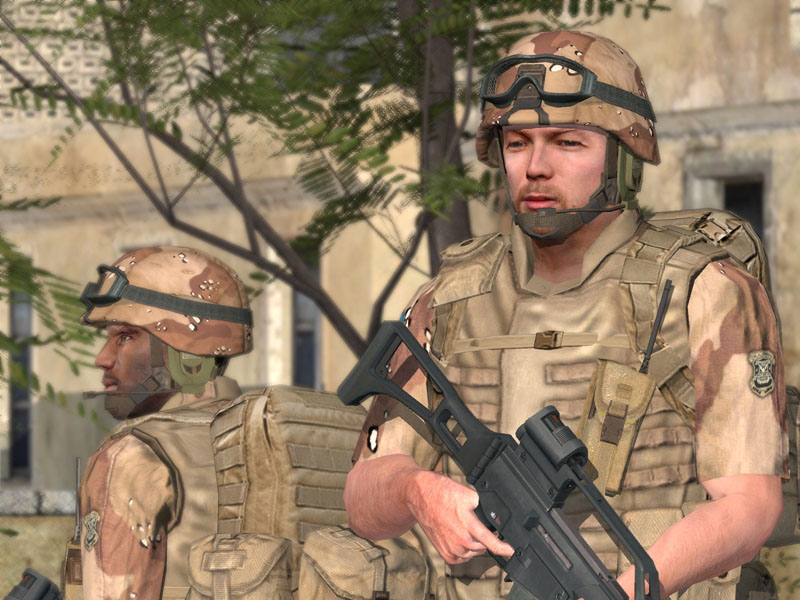
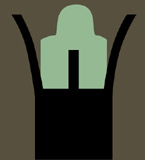
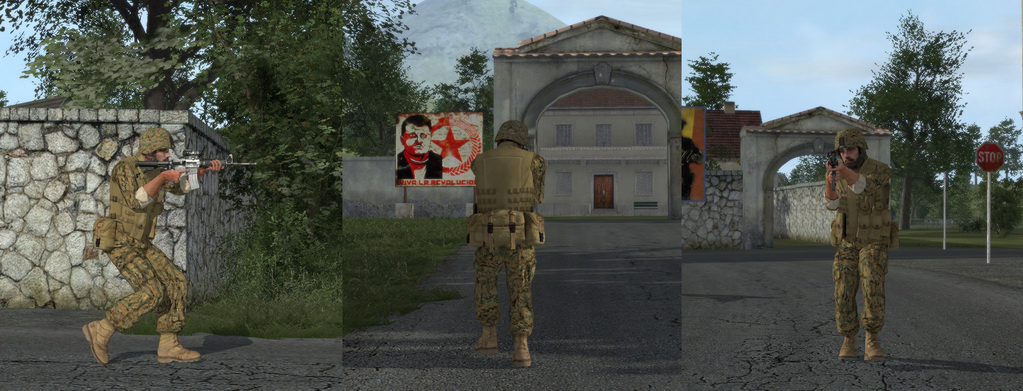
These illustrations should help for basic identification of US (top) and North Sahrani (bottom) personnel.

South Sahrani troops are decked out in desert camo and are pretty easy to distinguish from their US and North Sahrani counterparts.
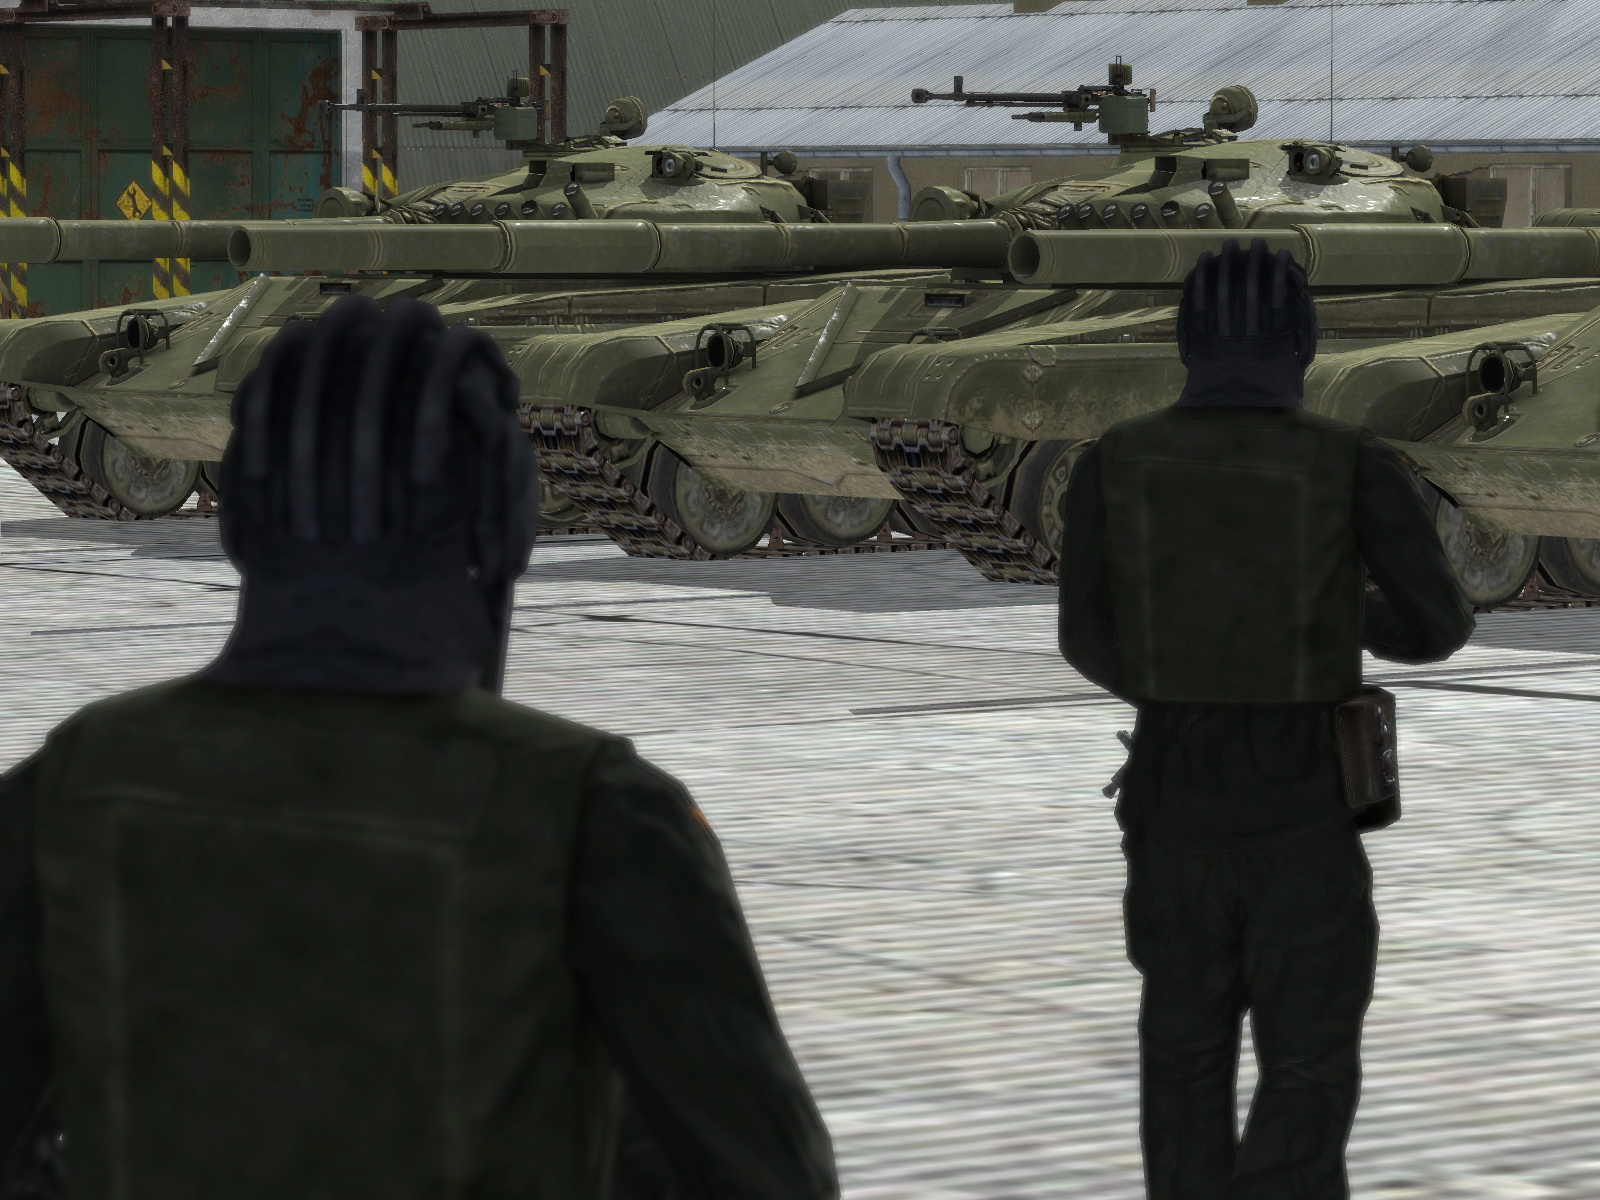
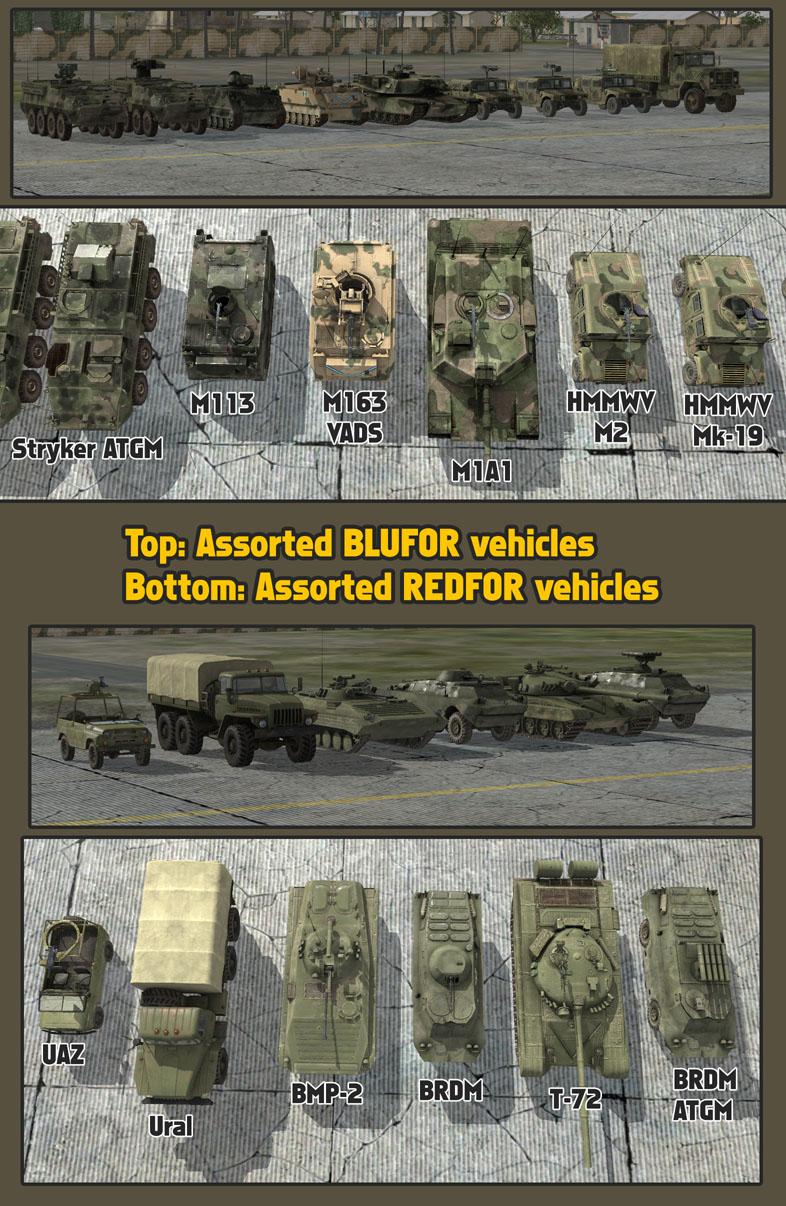
Here are some assorted US/South Sahrani (aka "BLUFOR") and North Sahrani (aka "REDFOR") vehicles.
| Index of "Wounds & What to Do " | ||
|---|---|---|
Wound Effects
|
||
| I'm hit! What do I do? | ||
You will be shot eventually. When that time comes, there are a few important things to remember, and the more knowledge you have, the more likely that you'll survive to fight on.
First I'll cover the symptoms of wounds in both 'vanilla' ArmA and ACE.
In un-modded ArmA, being wounded has two side-effects, depending on the severity and location of the wound. You will almost always find your aim to be very jittery and unstable, with the amount varying somewhat based upon how badly you've been hit. In addition to that, if you're hit in the legs, you will find yourself unable to move while standing, instead being forced to crawl or briefly job before being forced back to the ground. This is relatively easy to deal with, since there's no risk of progressively declining health. In this situation, simply call for a medic when possible and get yourself patched up. Medical attention will cause both of the wound effects to go away.
The fun begins when you play a mod like Advanced Combat Environment, which sports a much-improved player damage system. In ACE, you will notice several additional effects:
As you can see, being wounded in ACE can be a much more serious and urgent affair. Since we will be primarily playing ACE, the 'reaction to being wounded' text will be based upon it.
Note that there will be several additional features in ACE that will concern how wounds work, how they must be treated, et cetera. Since ACE is not yet out, it's impossible to write definitely on such topics, so I'll leave those for the future. All future additions will be tracked on the "Revisions" page at the end of this article, so feel free to come back and check it every few weeks for further content.
It is important that players are familiar with what is required of them if they get wounded. Being shot and confused as to what happens next can easily lead to you being shot again, bleeding to death, or generally meeting some kind of unpleasant fate. These guidelines generally apply to ACE (like the bleeding, blacking out, etc), but can be used in 'vanilla' ArmA where appropriate.
Example voice call: "This is Dslyecxi, I'm hit bad, pulling back for a medic... marking as "dsl medic" on map... (brief pause)... marked."
This is a placeholder section that I anticipate adding in the future once we have had time to familiarize ourselves with the Advanced Combat Environment mod for Arma. This section will cover our standard procedures for dealing with a casualty. This will not be a major gameplay element until ACE, so for now it will stay empty. Check the "Revisions & Additions" section in the future, once ACE has been out for a bit, and you're sure to see an update about this.
For now, the only thing to remember is that if a person is killed, it needs to be reported to their element leader. Thus, if your buddy goes down and is KIA, let your fireteam leader know that they're dead.
More reading on Medics, their responsibilities, and how players should act to best help them can be found in Frenchie's Medic Guide for OFP's Wargames League mod.
| Index of "Shooting" | ||
|---|---|---|
Rifle Basics
|
||
Reloading
|
||
Types of Fire
|
||
Every ShackTac member is a basic rifleman first and foremost. You may plan to fly, or drive tanks, or act as a medic, but at the end of the day you need to know how to proficiently handle the most basic tool of the infantryman, the rifle, because there will come a time when it will be the only thing you have to save your virtual life or the virtual life of a teammate.
Tanks can get disabled. Helos can crash. Mortar teams can find themselves subject to close attack. Ditto with artillery crews. When it's down to the wire and every shot counts, don't be the one to let your teammates down with your shoddy marksmanship.

It is important that every player master the basic rifleman skills, and to that end, be sure that you understand how to compensate for bullet drop at long range, and that you know what a proper sight picture is. When it comes to sight pictures, you want your front sight tip to cut the target in half, and you always, always, always want to aim center-mass.
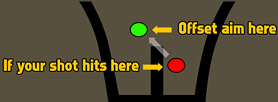
Center-mass 'holds' will allow you to reliably hit standing targets out to 300-400 meters. The smaller the target, the more likely that you'll have to apply offset aim techniques to get your rounds to hit. This is simply aiming over your target if you're shooting low, or to the side if the round is landing beside it.
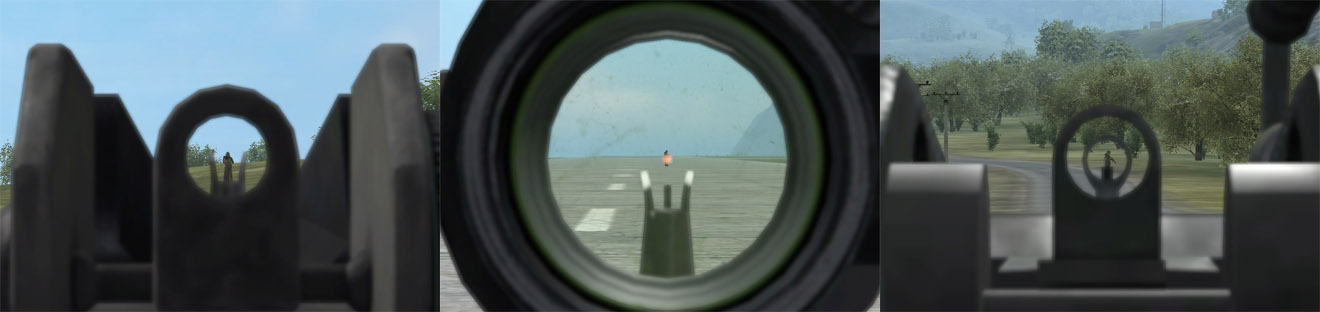
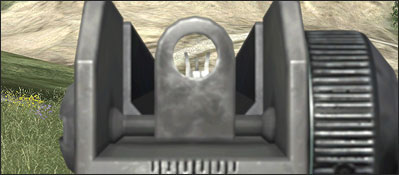
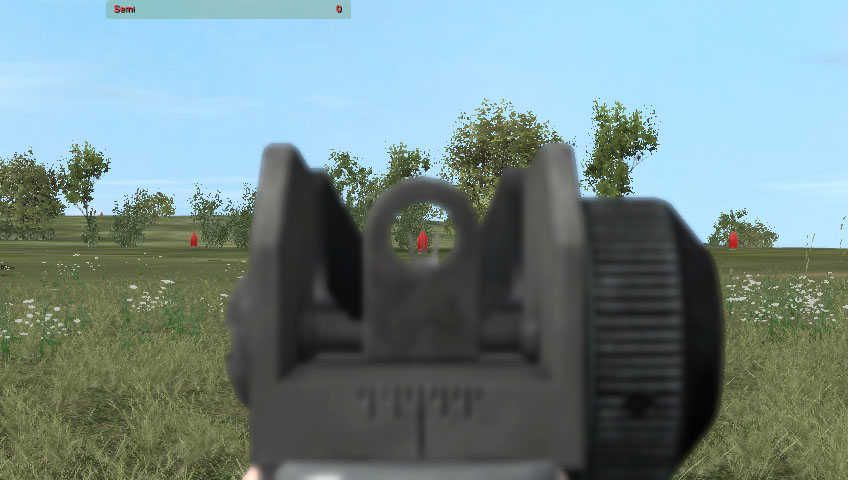
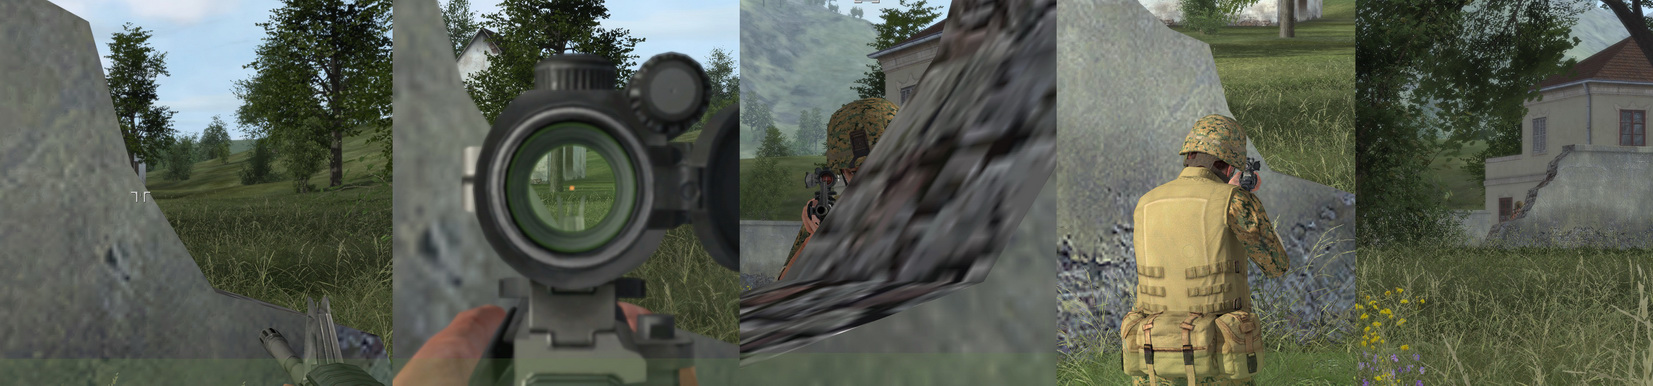
Ironsights - Ironsighted weapons are the most common you will encounter. The ironsights tend to obscure a portion of your view when aiming with them, which is their primary drawback. Remember that if your front sight tip is not centered in the rear sight aperture, the bullet impact will be off in the direction that the FST (front sight tip) is relative to the rear sight aperture.
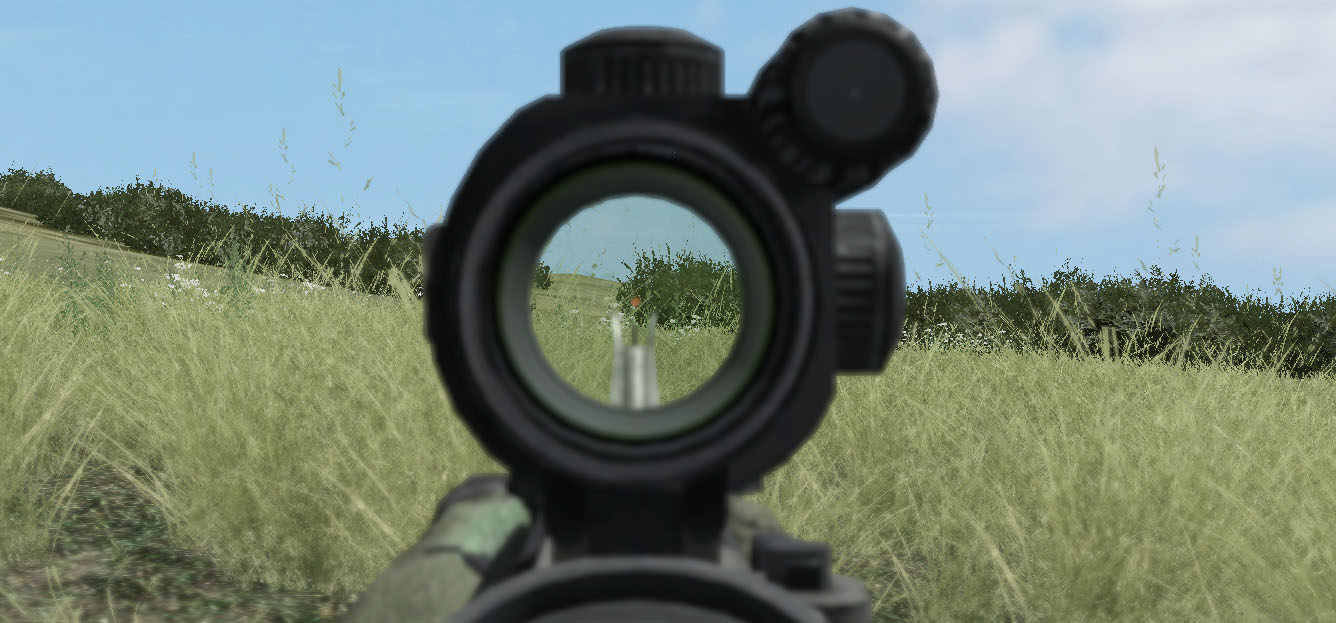
Reflex Sights (non-magnified) - Reflex optics like the Aimpoint CompM2 and EOTech HWS are designed to be faster and more accurate in your average combat engagement than the equivalent ironsight would be. While ArmA does not model all of the things that make this true in reality, it does model the increased visible area one receives when using a reflex optic. Thanks to there being no front/rear sight to obscure the area around the target, reflex sights can be quickly adjusted to account for the fall of the bullet (due to the impact being clearly visible through them). Reflex optics tend to be zeroed for around 300 meters, and one must simply place the dot or reticule over the target and fire. Reflex optics are superb for MOUT and CQB.
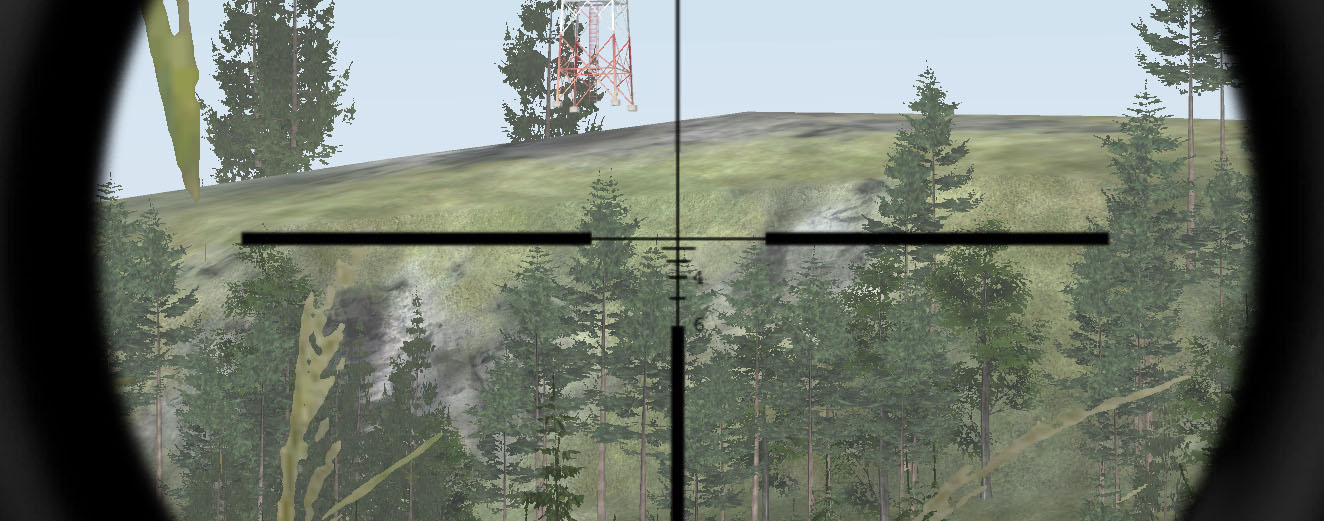
Scopes (Magnified Optics) - Scopes come in a variety of magnification powers. Some are high-powered, like those found on sniper rifles, whereas others like the ACOG provide a significant zoom but still allow for a nice field-of-view. Some have adjustable zoom (i.e. sniper rifles), others are fixed-zoom (i.e. ACOG). Scopes are great for mid- and long-range work but become more of a hindrance than a help once you get to closer ranges.
Leading a moving target is something that's going to take time and practice to get the hang of, but all effort invested in it will pay off in spades the first time you hit a distant, running target with your first shot. At ranges out to around 300 yards you typically only need to lead the target by a few body widths, depending on the speed they're moving relative to you. If a target is coming directly towards or away from you, no lead is required. If they're moving at an angle to you, less lead is required. If they're sprinting perpendicular to you, you'll need to use a great deal of lead at extended ranges, and will be best off with massing fire with other friendly units to take the enemy down.
When it comes to gunning in a vehicle (such as a helo door gunner), remember that you need to lead targets based upon the direction the vehicle is moving. If you have to to traverse your weapon to the left to continue to track a target, lead the target to the left. If you have to traverse right to track, lead to the right.
One other thing to remember is that the origin of the bullet will be from the actual weapon muzzle, and not the center of the screen as in some games. Because of this, you have to keep in mind that your weapon sights are a few inches above the rifle bore. If you do not take this into account, you will occasionally find instances where you're shooting into the ground (or an obstacle) even though your ironsights give you the impression that you have a clear line of fire.
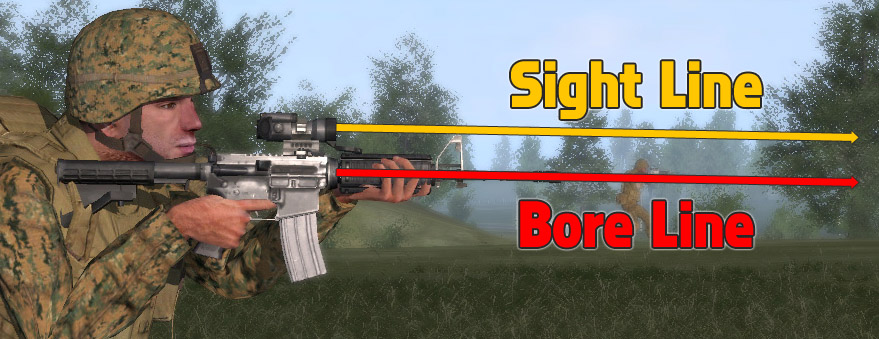
Note that the realistic ballistics of the weapon also mean that the bullet will fly a ballistic arc that crosses your point-of-aim at two distances - one is shortly after leaving the barrel (within the first 50 yards), the other is at the range that the weapon is zeroed for.
Weapons in ArmA by default are zeroed as follows:
| Weapon Type | Zeroed Range | ||
| Rifles | 300 meters | ||
| Submachineguns | 50 meters | ||
| Pistols | 50 meters | ||
| M107 .50cal Sniper Rifle | 500 meters | ||
| M24 Sniper Rifle | 300 meters | ||
| M4 Special Purpose Rifle | 120-400 meters, depending on zoom | ||
ArmA introduces the ability to hold your breath to help stabilize your aim for precision shooting. Ensure that you have this bound to a readily accessible key, as it will come in handy more than a few times during every mission. Holding your breath for too long will cause your stability to degrade, so make sure you only use this when you're 90% of the way ready to take your shot.
As silly as it sounds, keeping your finger "off the trigger" is a very wise thing to do in ArmA. The method I recommend is simply to keep your 'trigger finger' resting on the middle mouse button whenever you're not engaged in combat.
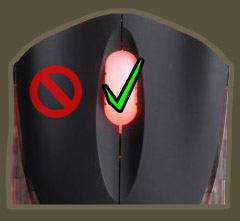
Not doing this in the past has cost squads the element of surprise and has resulted in some virtual casualties that never should have happened.
The more powerful the weapon, the more important it is that you heed this. Getting surprised and accidentally firing an AT4 into the ground at your feet is never a good thing.
An ArmA community member named Igor Drukov created an excellent weapons training facility for the game. This can be played solo (via hosting your own MP session) or as a team. The facility consists of unknown-distance shooting ranges for all of the game's small-arms as well as the anti-tank weapons. Each range has a dialog that can be used to set how many targets appear, how many shots it takes to drop them, the interval between them appearing, and so on and so forth. This facility helps to train general marksmanship as well as sector scanning, target acquisition, and rapid engagement of targets at varying ranges and levels of exposure.
I highly recommend that you download it from here.

To run it, simply extract the .pbo into your ArmA\MPMissions\ folder, then go to Multiplayer -> New -> Ok -> Sahrani -> Bootcamp, and hit OK.
The act of reloading is one that many people don't put a great deal of thought into initially. However, it can easily be the difference between combat effectiveness and outright death. I've assembled various tips and bits of information here in the hopes that the knowledge will help everyone to understand just what all needs to be kept in mind when it comes to reloading.
Tactical Reload (aka "Tac-load")
A tactical reload is a reload done during a lull in the action to replace a partially-full magazine with a fresh one. You should check your magazine before doing anything dangerous (ie CQB, assaulting an objective, etc) and do a tactical reload if you have less than approximately 90% of the magazine's ammo capacity remaining. The worst sound in combat is hearing a click when you want to hear a bang.

Dry Reload (aka "click")
The other form of reloading is known as a "dry reload". This is a reload that is done on an empty chamber - meaning, the magazine has been completely expended. Dry reloads are completely acceptable in a great many situations - i.e. when acting as a base-of-fire element in which you're sustaining a heavy rate of fire on a distant target. However, there are certain situations in which a dry reload is to be avoided - namely, close-quarters.
In the Advanced Combat Environment mod, reload speeds are based upon your stance and weapon. Reloading a rifle while standing will be fast, whereas doing it while prone will take a bit more time. Conversely, reloading a belt-fed automatic rifle or machinegun will be slowest when standing and fastest when prone. Thus, take a stance when reloading that is appropriate to the type of weapon you're using. 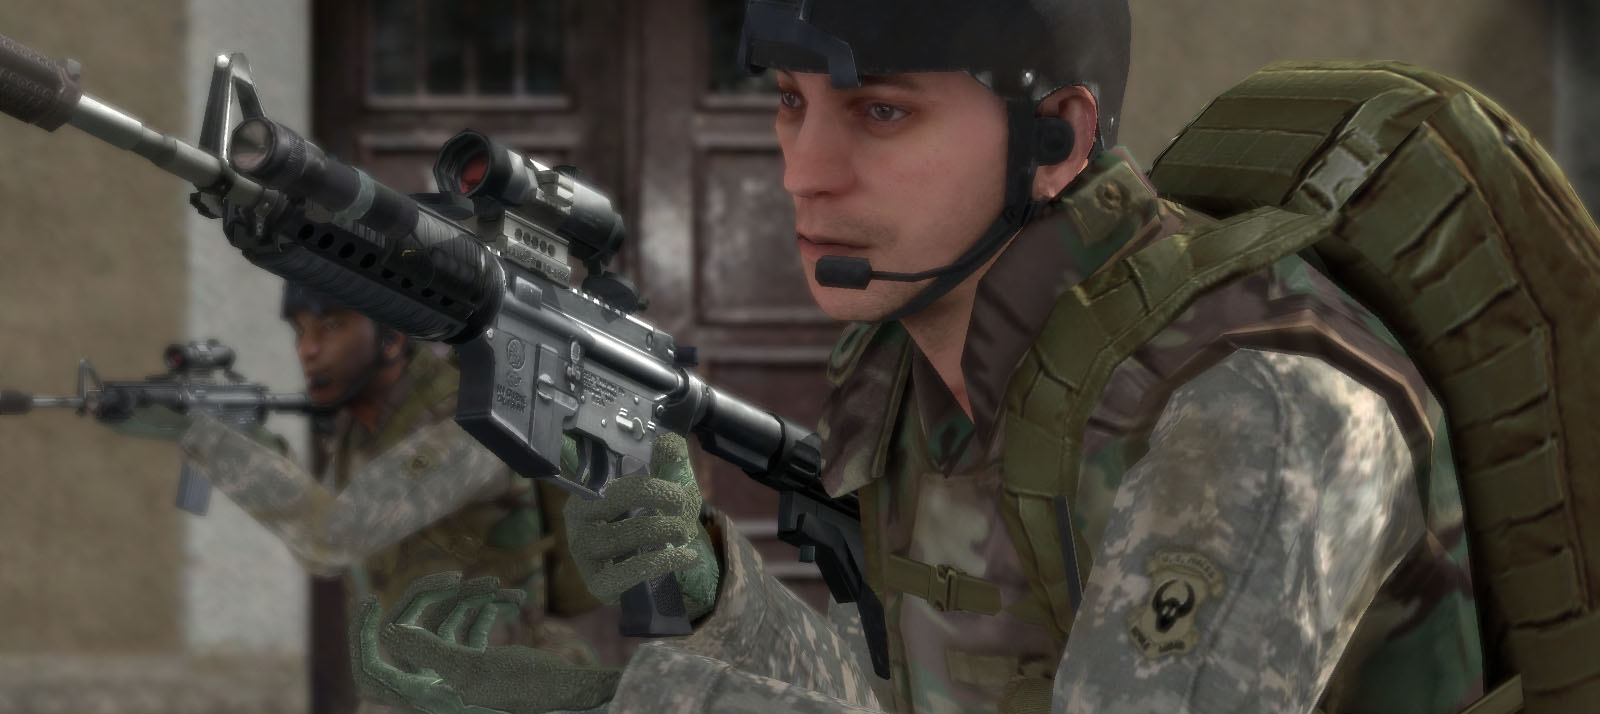
There are several distinct types of fire that can be utilized in ArmA. I'll cover most of them here so that everyone is familiar with the terminology and the principles behind them. The one that you will hear most frequently as an infantryman is "area fire", but the rest are also useful and good to know.
This is the most basic type of fire. In this, you see the enemy clearly enough to be able to aim at them directly and fire on them. The effectiveness of point fire depends on the sights, accuracy, and killing power of the weapon being used. Point fire is typically done at a deliberate pace, with each shot being aimed.
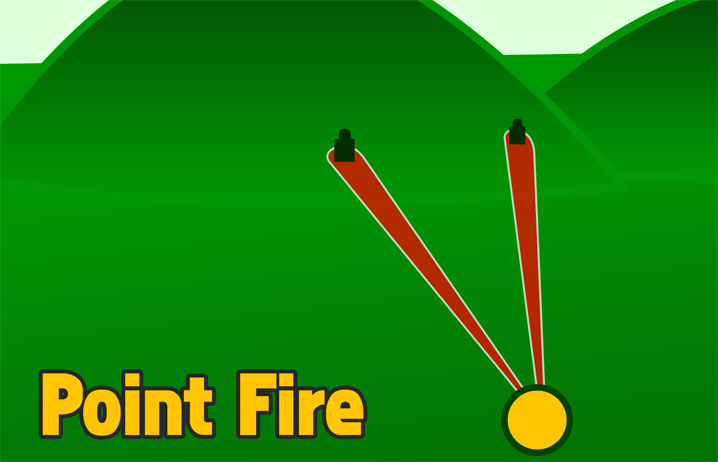
When an element is using point fire, it's typically done against a very visible target or group of targets that can be engaged with precision. An enemy squad ambushed in the open, for instance, would be an example of a situation where element-level point fire would be employed.
Point fire could also be used if a fireteam was trying to suppress and destroy one specific bunker/building/etc.
Point fire is the most common type of fire used in FPS games, and it almost never needs to be specifically called for by a leader.
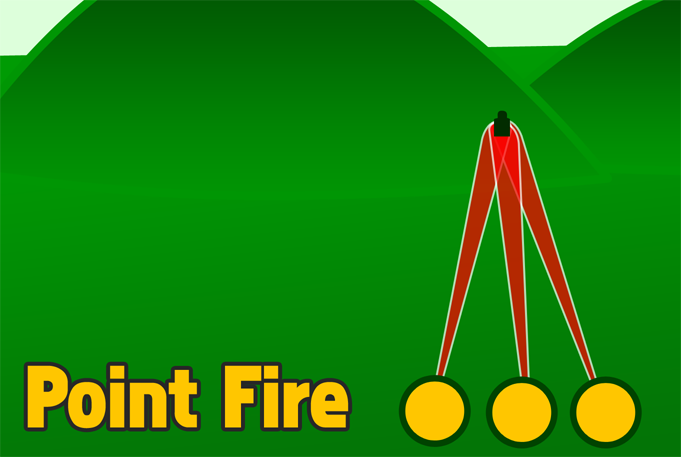
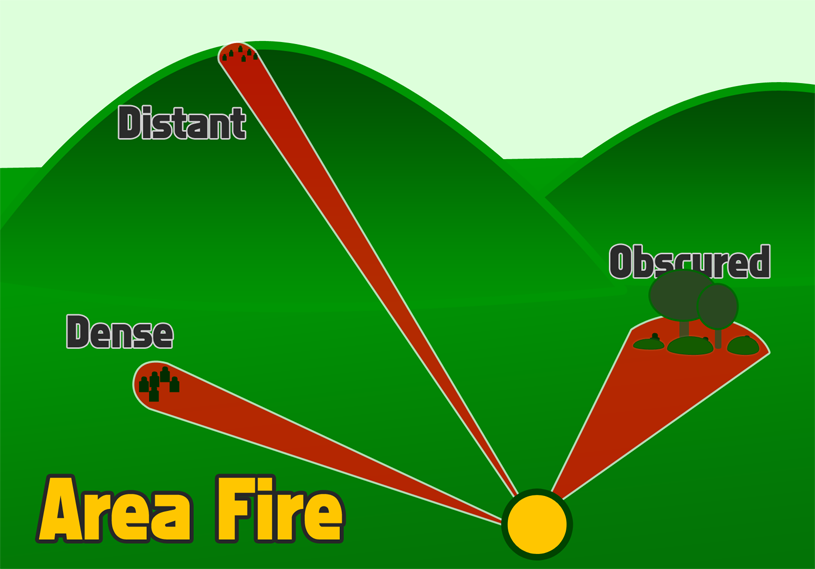
This technique places a volume of fire on a specific area instead of a specific individual target. It can be used to place fire on enemy units that are obscurred, massed, or at such a range that point fire becomes slow and ineffective to use.
When an element is laying down area fire, each individual shooter aims at known, likely, or suspected locations of enemy soldiers - or at clusters of the enemy, in the case of using it against massed or distant targets - and sprays them with fire. The emphasis is on a concentrated, heavy volume of fire. The more bullets sent towards the enemy, the greater the chance one will hit its mark, and the more likely the enemy will become suppressed by the volume of fire.
Area fire is typically done at a faster pace than point fire, but not quite as fast or high-volume as suppression.
Indirect fire is simply fire that is placed on a target or location that is out of direct view of the gunner. Indirect fire can be used to cover "dead space" that is out of view of any direct-fire assets (ie machineguns, rifles, etc). At the platoon level, indirect fire typically comes from grenade-launching weapons like the Mk-19 Grenade Machinegun or the M203 grenade launcher. Mortars and artillery are the 'big brothers' of the M203 and Mk19 when it comes to indirect fire. One great aspect of indirect fire is that the enemy has a much harder time returning fire - the source is more difficult to locate, and even after location the enemy cannot use direct-fire weapons and must rely either on indirect assets or movement towards the source of the fire.

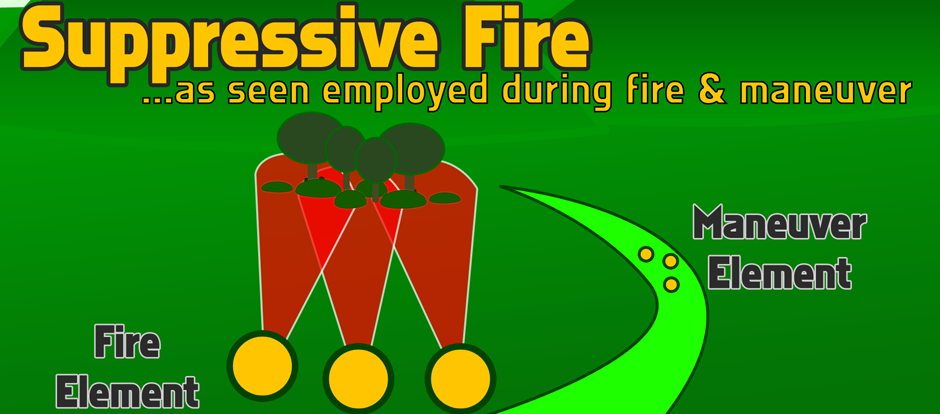
This is the act of putting a high volume of fire on an enemy position to prevent them from being able to return effective fire. Note that suppression is only effective if you can make the enemy believe that popping up to return fire is going to result in them getting hit or killed. You don't have to actually hit them, but you must make them think that you can and might if they don't take cover. Suppression can be used to "fix" an enemy force while another element moves around to their flank to catch them in their unprotected or otherwise vulnerable side.
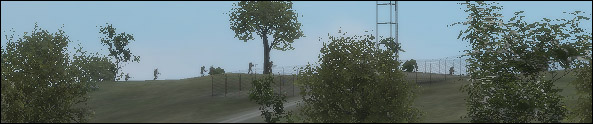
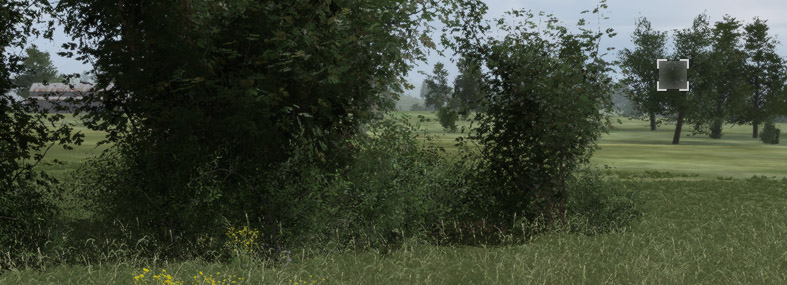
Simple enough, this is where shots are placed into an area to try to flush out the enemy or get them to begin firing and thereby give away their positions. This is used when stealth is no longer a concern, obviously. Firing into a wheat field that may be hiding enemy forces is one example of recon by fire.
This is the process of "chasing" a retreating enemy not by physically following them, but rather by firing at them as they withdraw. Pursuit by fire can be used after taking an objective - you want to maintain a hold on the newly-secured area, and thus you 'pursue' any retreating enemies with small-arms fire instead of physically following them.
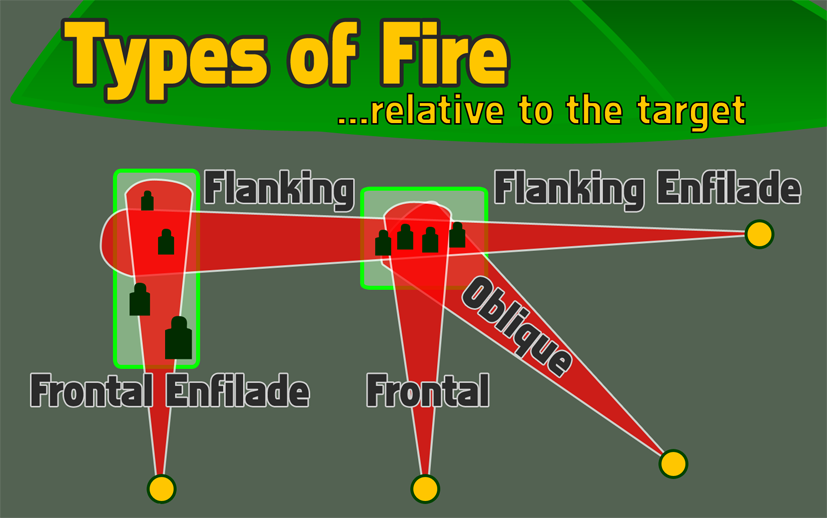
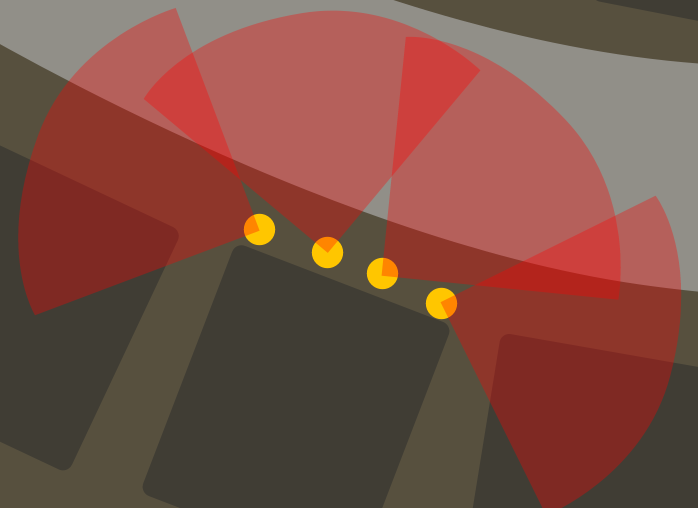
Hopefully this diagram says it all. "Enfilade" fire is simply fire that coincides with the long axis of the target. Flanking fire is hitting a target in the side. Oblique fire is hitting it from an angle, whereas frontal fire is hitting it - you guessed it - from the front. Flanking, oblique, and frontal fire can become enfilade fire simply based upon the orientation of the enemy formation relative to the shooter's position.
Enfilade fire is the most damaging sort - in it, the gunner only has to make small adjustments to his fire to engage multiple targets, and rounds that miss one enemy may very well hit another one further back in the formation.
Dead space is defined as "an area within the range of a weapon that cannot be covered by fire due to intervening obstacles, the contour of the ground, or the trajectory of the weapon" (CCMW).
The key thing to remember about dead space is that it needs to be covered in some capacity when defending - either by indirect fire (M203 grenadiers, mortars, artillery) or the defense must be situated such that it renders the benefit of the dead space null and void (ie by ensuring that machineguns are covering the exits of a draw).
When on the attack, "dead space" becomes "defilade" - meaning that it acts as protection from enemy direct fire and observation.

| Download |
Rifle Marksmanship US Marine Corps, MCRP 3-01A |
|---|---|
|
Basic Marine rifle marksmanship. This covers all sorts of things that relate to effectively engaging targets with a basic ironsighted rifle. |
There are a number of things to keep in mind when trying to not get shot yet still be effective against the enemy. Previously covered was "Situational Awareness", one of the most important factors in avoiding an untimely death. This section will deal with everything else that can help to keep you breathing for as long as humanly possible.
How an individual moves around the battlefield is the most important aspect of "Not Getting Shot". Proper movement will keep you alive, whereas sloppy movement tends to result in forcibly being ventilated by very small, very fast moving objects.


The first rule of "not being shot" is ensuring that the enemy either cannot see you or cannot hit you, or both.
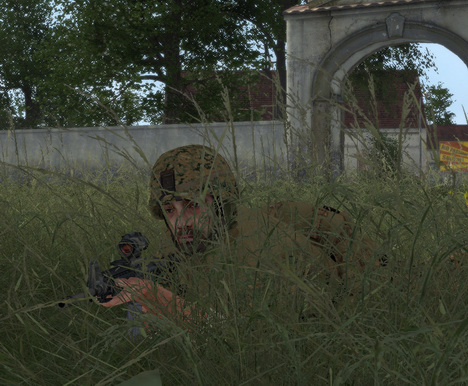
You will find that your primary goal on the battlefield is to find positions from which you have the most protection from enemy fire or observation yet also are able to put effective fires on the enemy . To do this, you will have to know the difference between 'cover' and 'concealment' and how to best take advantage of either.
You should strive to always be in cover or concealment when combat is ongoing. If the enemy cannot visually locate you, he will not be able to accurately shoot at you. Even if he does know where you are, hard cover can prevent him from effectively engaging you.
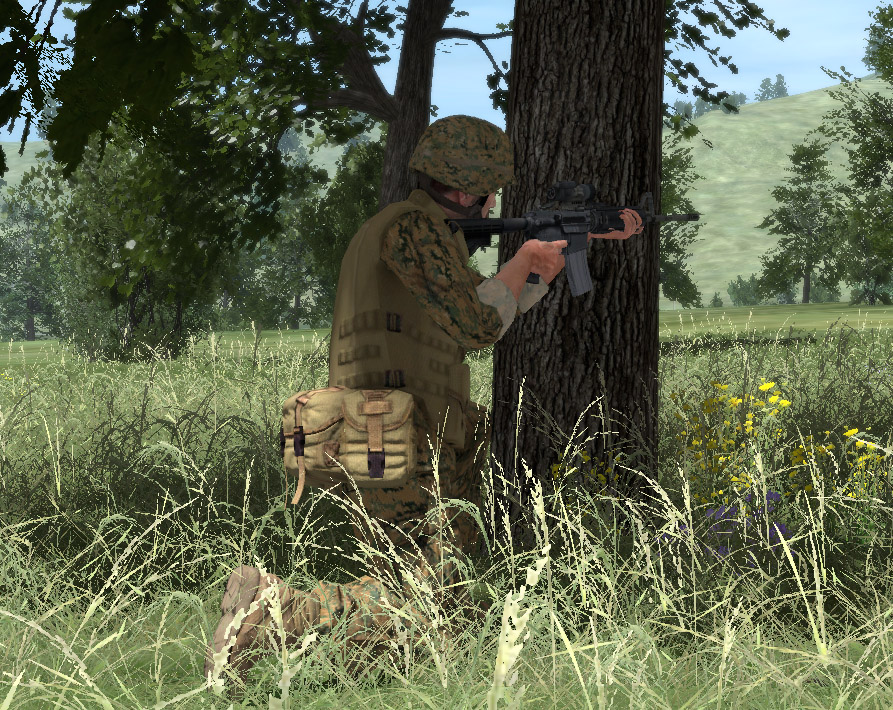
Concealment is anything that keeps the enemy from seeing you. Typically this comes in the form of brush, bushes, thin sheet metal or wood, and other materials that are easily penetrated by bullets.

Cover, on the other hand, is anything that keeps the enemy from hitting you with his fire. Anything solid enough to stop a bullet works - this includes tree trunks, brick walls, vehicle hulks, etc. Bear in mind that cover is only effective based upon what is being fired at you. While a brick wall might protect you from machinegun fire, an RPG or tank HEAT round will make a mess of you in short order.
When on the move, keep your eyes peeled for cover and concealment that's within easy reach. Try to move yourself (or your element) in such a way that you're concealed as much as possible, and whenever you're not, know how to get to concealment or cover at the first sign of enemy contact. Avoid crossing open areas devoid of cover or concealment whenever you can.
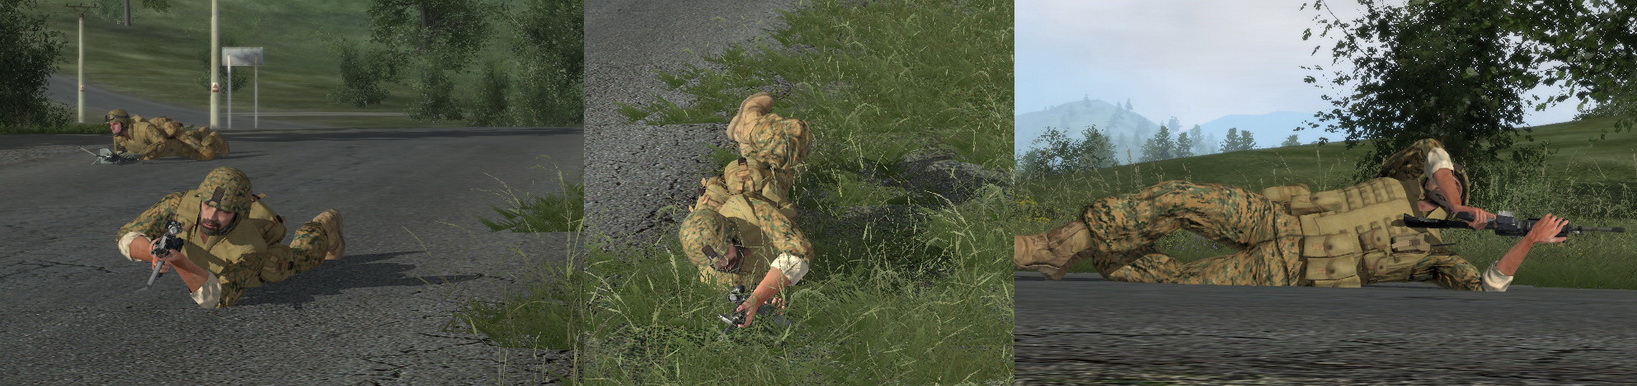
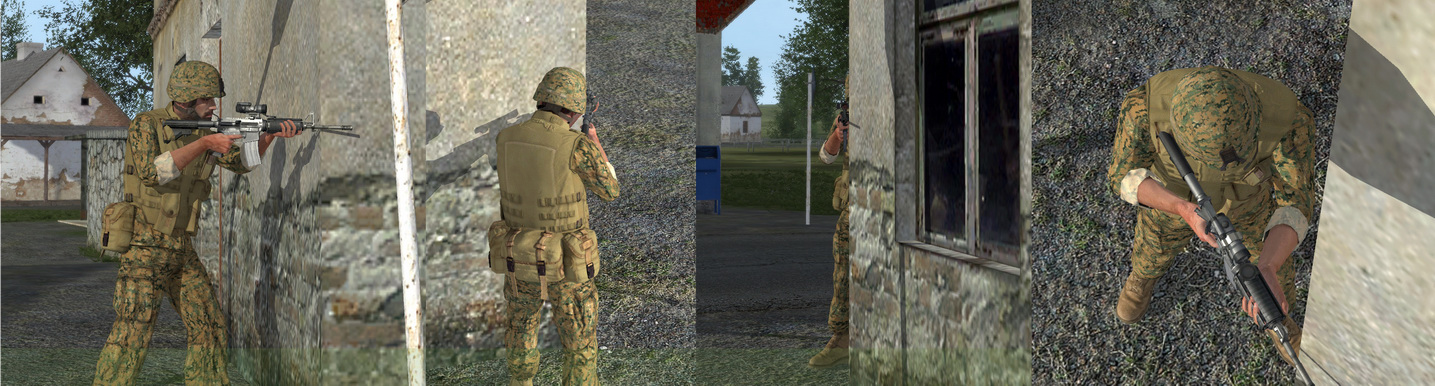
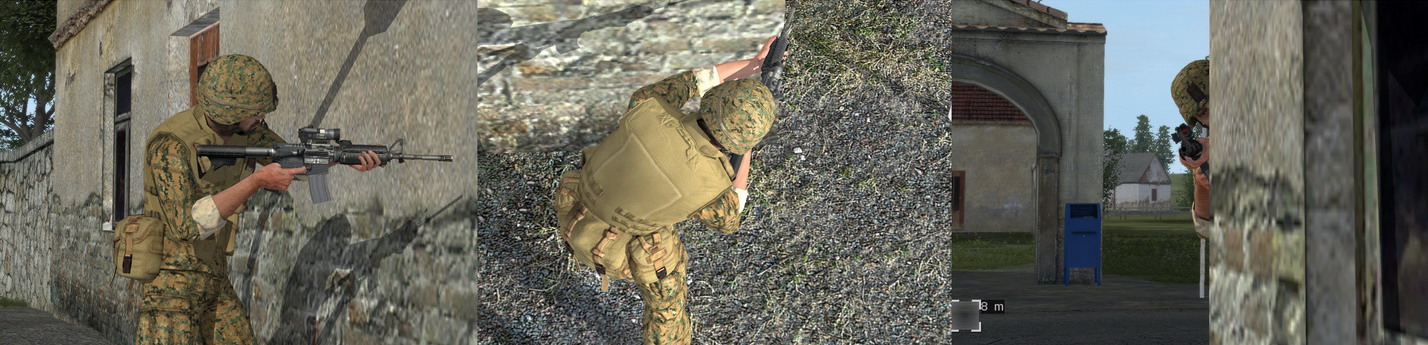
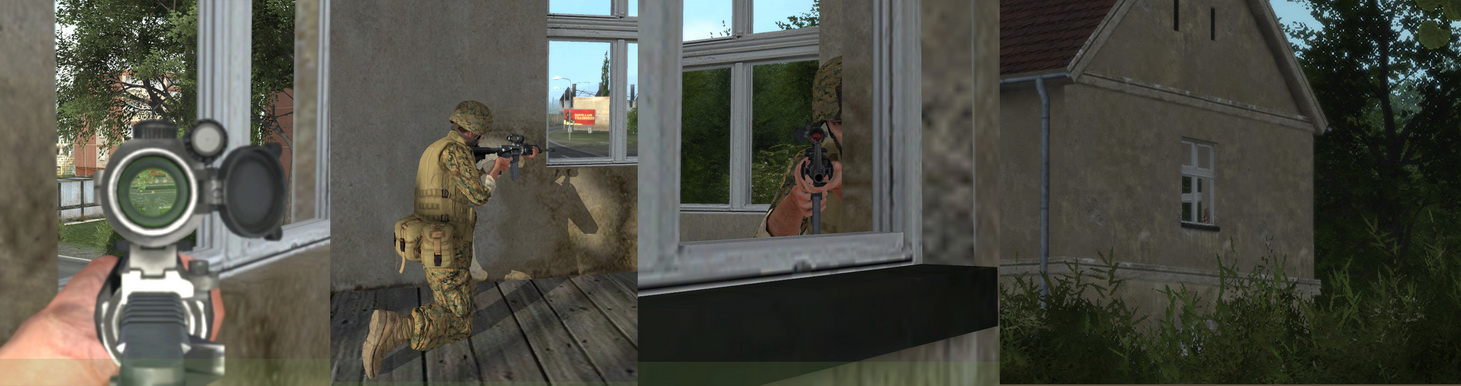
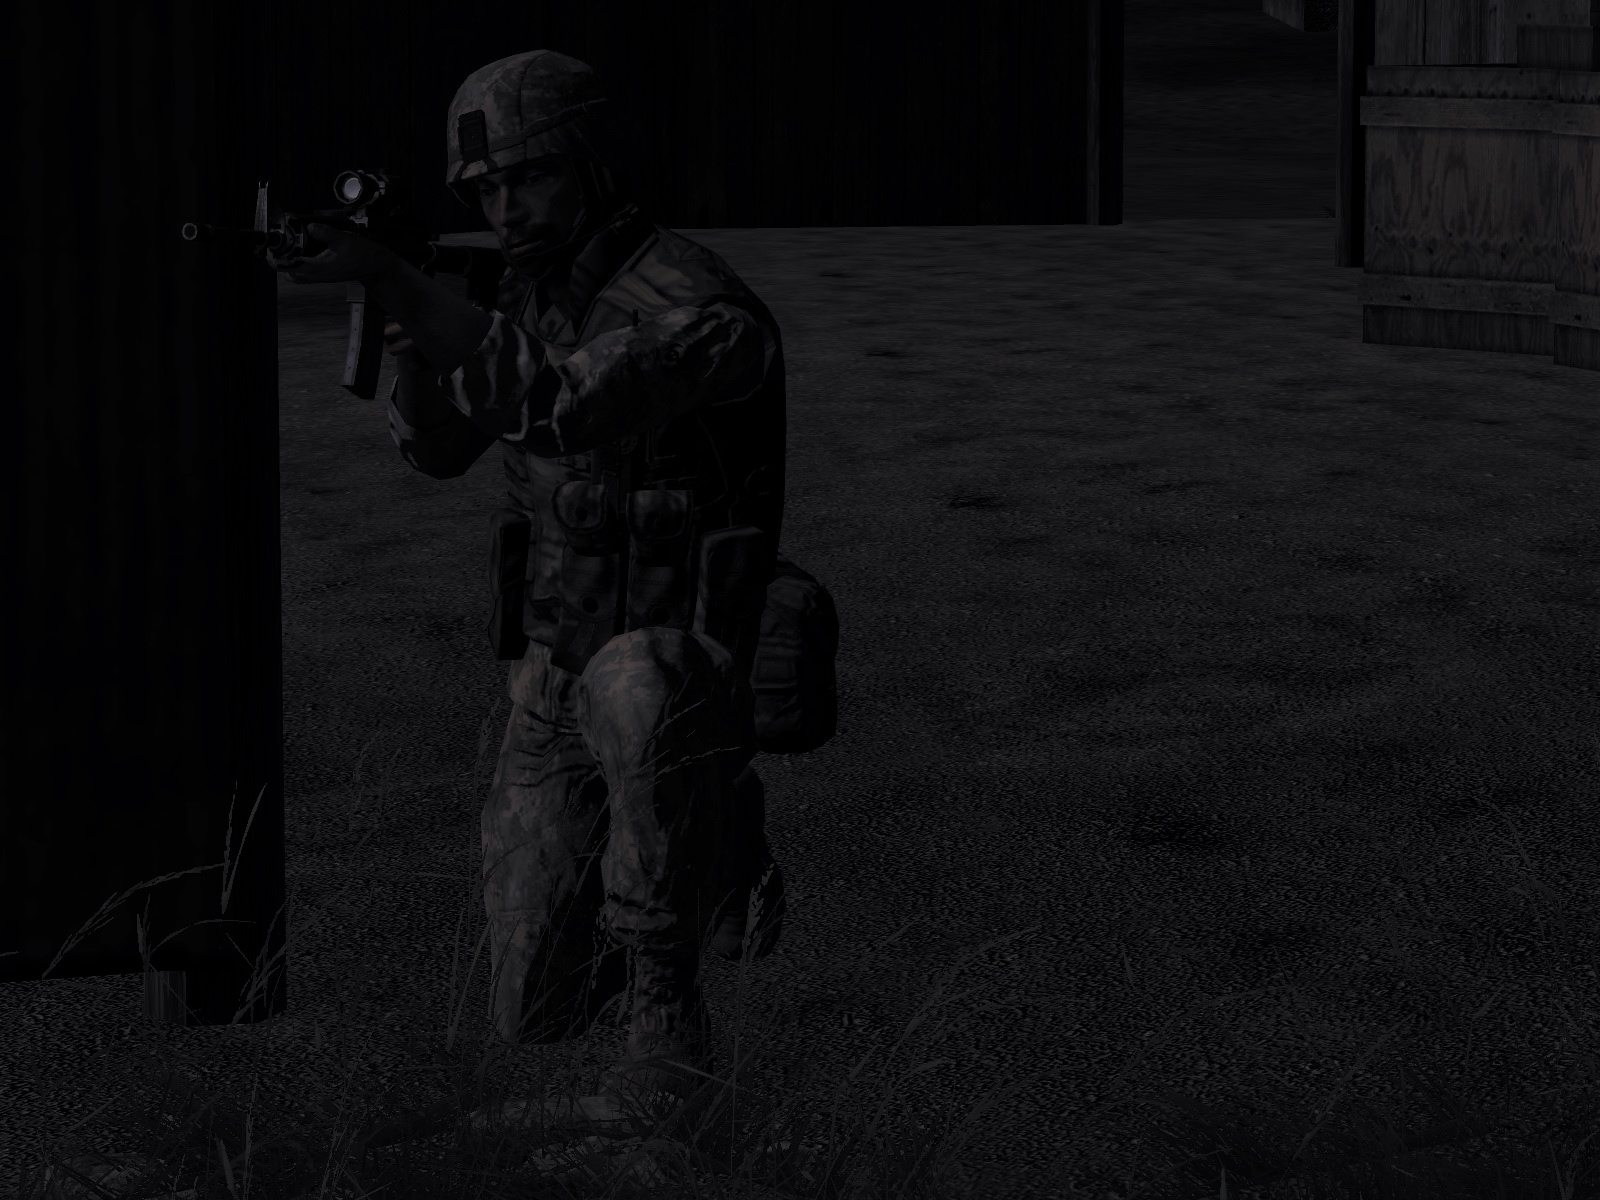
One critical thing to remember in ArmA is that, like in Flashpoint, the view you get from ironsight mode is offset down and to the right of your normal view. If you take this into consideration when utilizing cover, you can expose much less of your body.
The following illustrations show this off in various stances, using a building corner as cover. The same principle can be applied to any kind of cover - lamp posts, tree trunks, vehicles - and can significantly improve your odds of survival when used correctly.
Remember, if your ass is hanging out, it will get shot off.
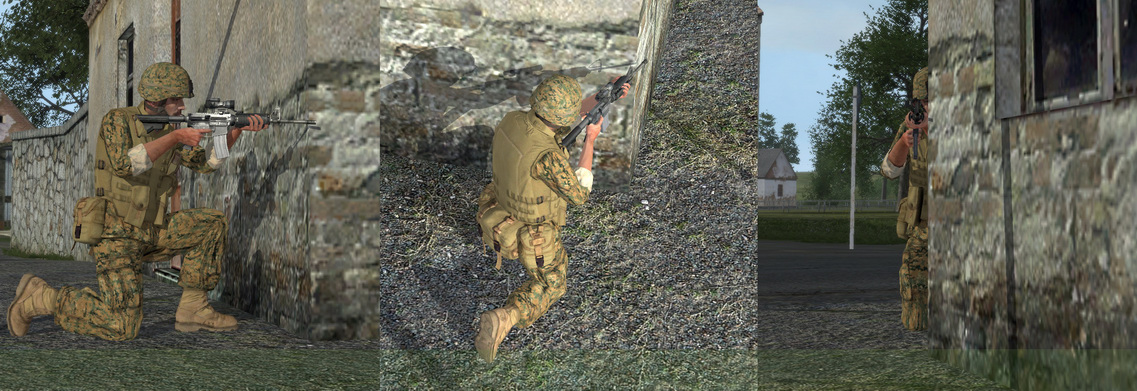
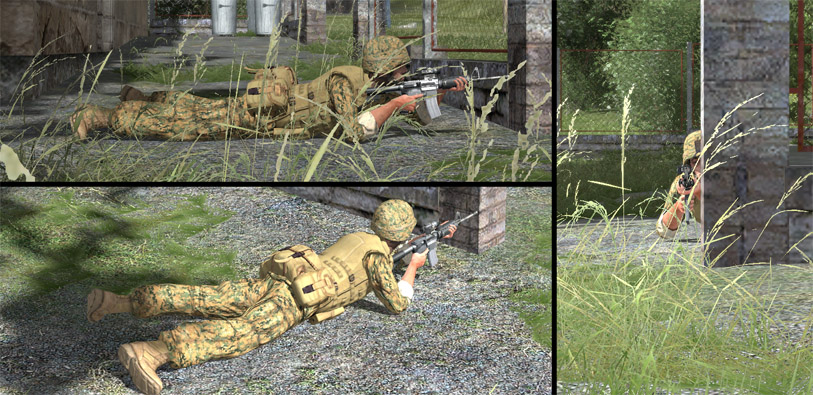
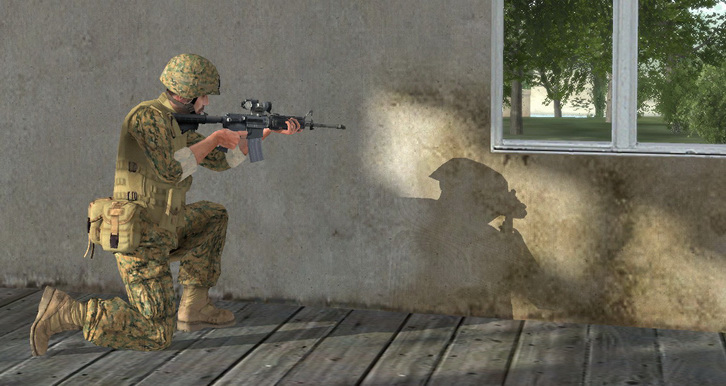
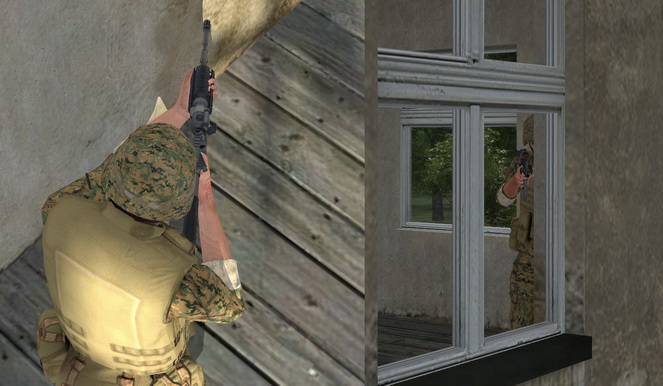
ArmA's default lean is set up as an upper-torso lean which allows you to shoot around cover while keeping an even larger amount of your body protected from fire. The fact that you can lean and move at the same time is quite useful, as it allows you to position yourself exactly how you'd like in the least amount of time possible.
The following illustrations show off how you can tuck in to cover and fire around it with minimal exposure to return fire. Note that, unlike with the non-lean versions, the legs and torso no longer are exposed as targets.
Remember that peeking in and out from cover will be less effective against human players - if you keep peeking out from the same position, with the same stance, the enemy may predict your pattern and have a bullet waiting for you next time you pop out. Try to alternate standing/crouching leans when possible, or find another position to fire from if you think they're starting to zero in on you.
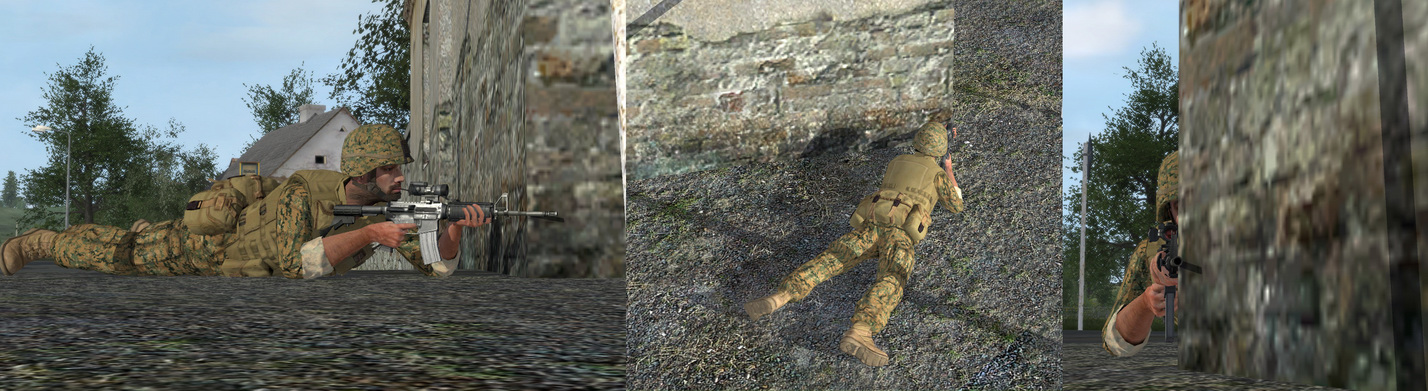
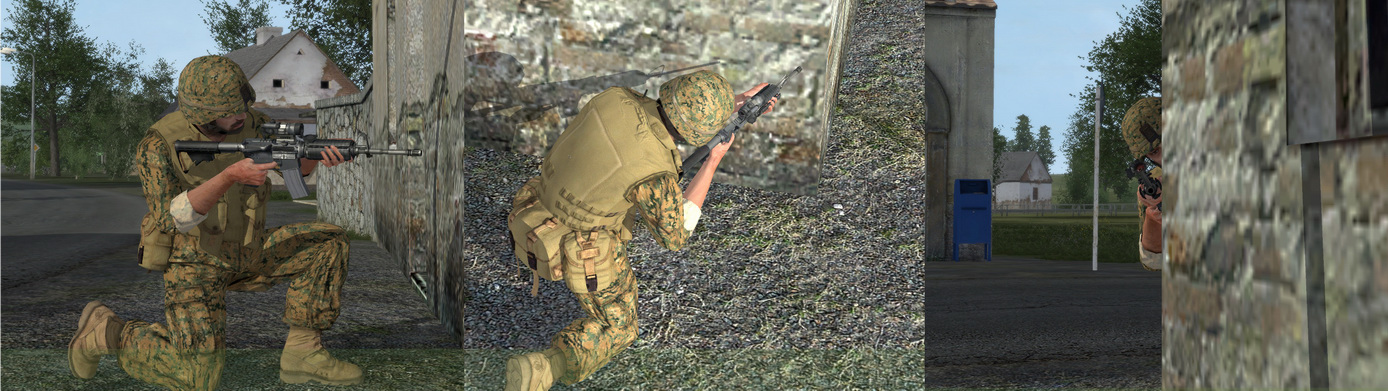
The level of accuracy that you are able to acheive with your weapon is based upon the stance you take. Standing is the least stable stance, with crouched being more stable, and prone being the most.
You should get in the habit of taking a knee whenever firing at medium or long ranges, and even closer ranges if the situation permits. The benefit of taking a knee is twofold - one, you increase your accuracy. Two, you decrease your profile. The smaller you make yourself, the harder it is for the enemy to hit you. Simple stuff.
When it comes to firing on the move, you can do it either when standing or crouched. Standing is the most stable in this case, whereas crouching and moving while trying to aim will tend to tire you out fast and increase your weapon waver due to the lowered stamina. Use the 'walk' feature to go into a "combat glide", in which you walk smoothly and are able to keep your weapon up and at the ready. The changes that have been made to how ArmA deals with weapon movement relative to the player's eyepoint make it much more practical to move with your weapon up and sighted than it was in Operation Flashpoint.

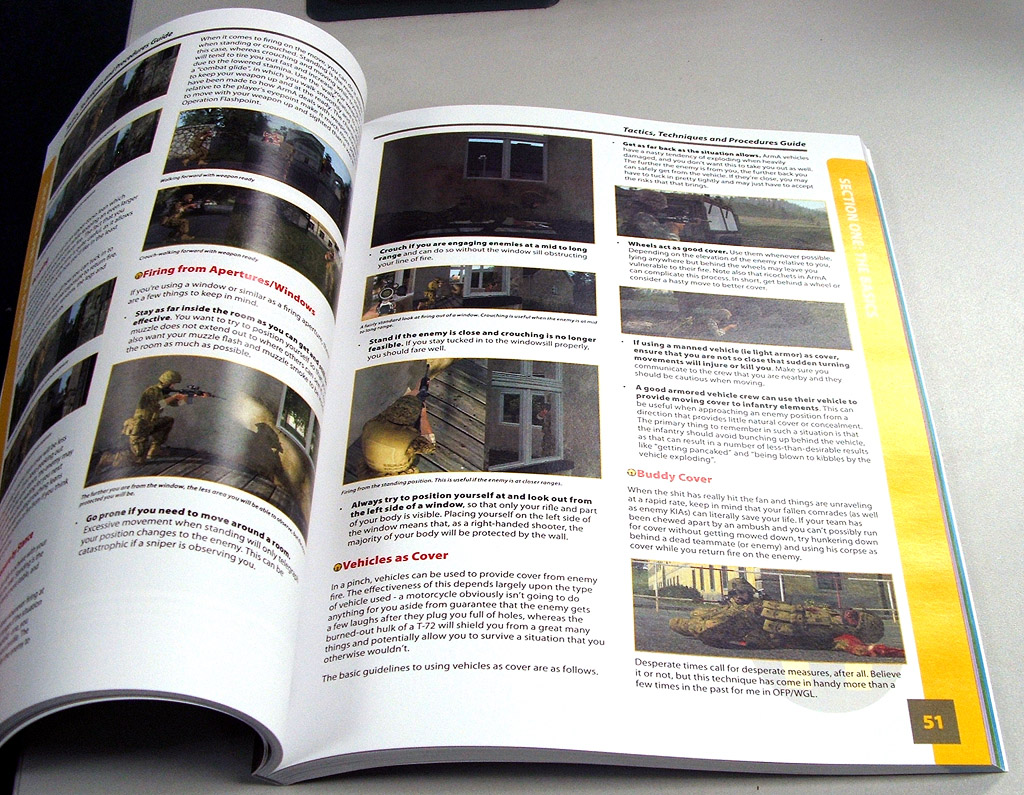
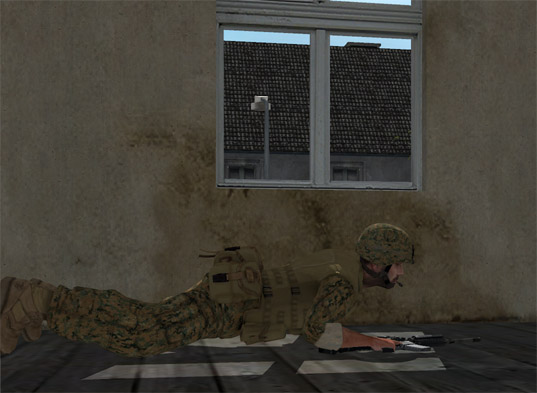
If you're using a window or similar as a firing aperture, there are a few things to keep in mind.
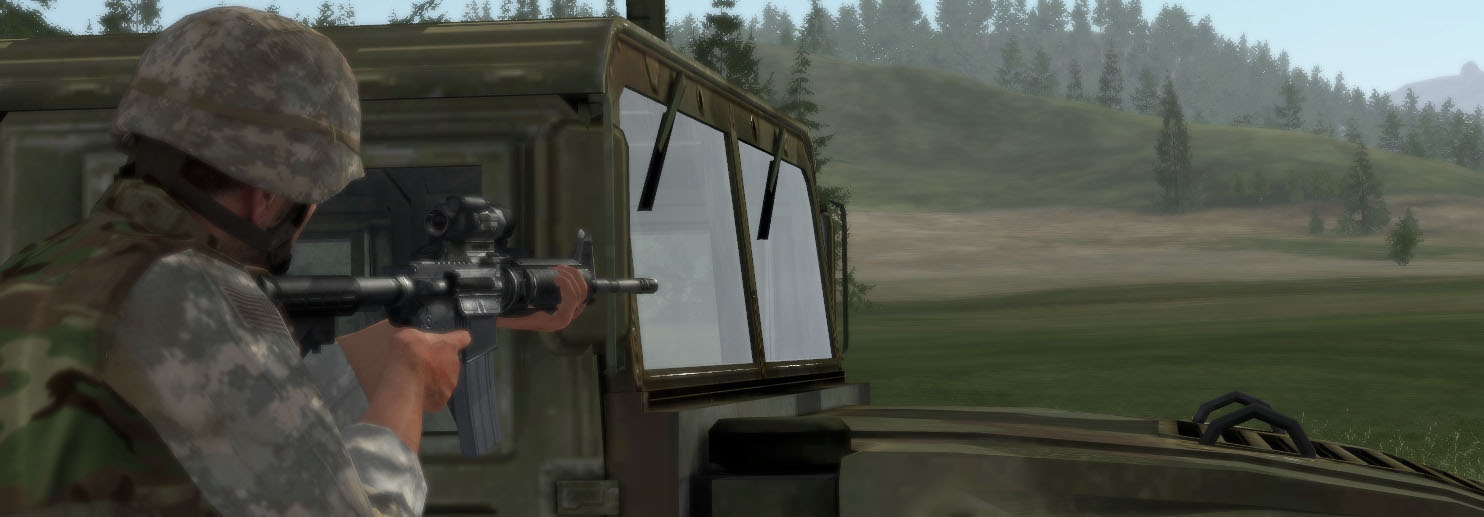
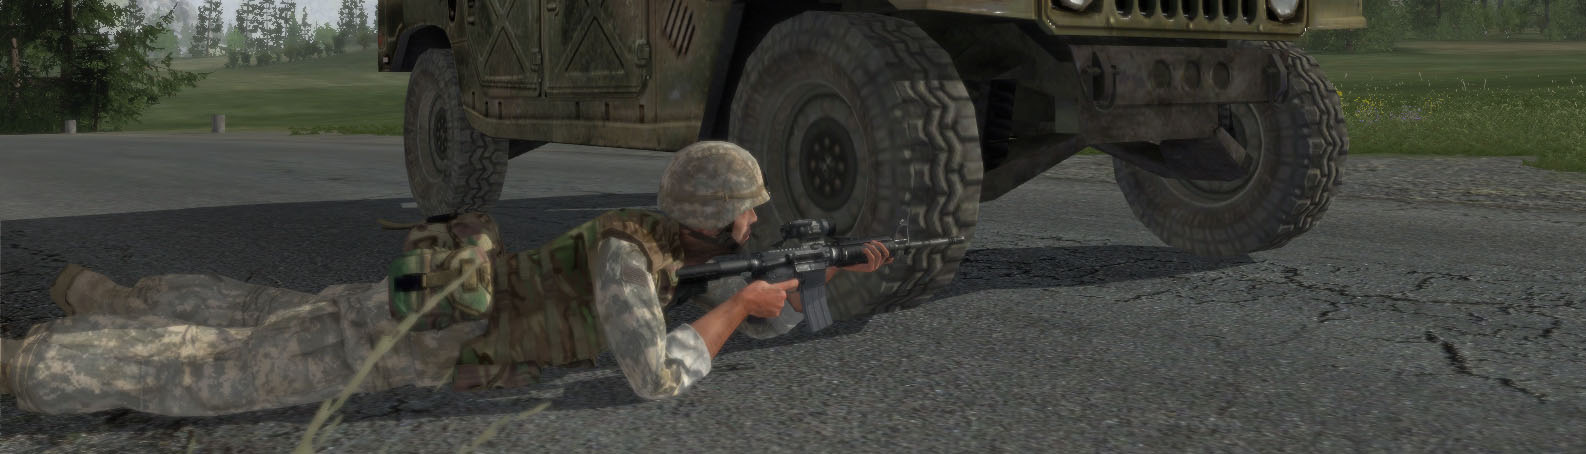
In a pinch, vehicles can be used to provide cover from enemy fire. The effectiveness of this depends largely upon the type of vehicle used - a motorcycle obviously isn't going to do anything for you aside from guarantee that the enemy gets a few laughs after they plug you full of holes, whereas the burned-out hulk of a T-72 will shield you from a great many things and potentially allow you to survive a situation that you otherwise wouldn't.
The basic guidelines to using vehicles as cover are as follows.
When the shit has really hit the fan and things are unraveling at a rapid rate, keep in mind that your fallen comrades (as well as enemy KIAs) can literally save your life. If your team has been chewed apart by an ambush and you can't possibly run for cover without getting mowed down, try hunkering down behind a dead teammate (or enemy) and using his corpse as cover while you return fire on the enemy.
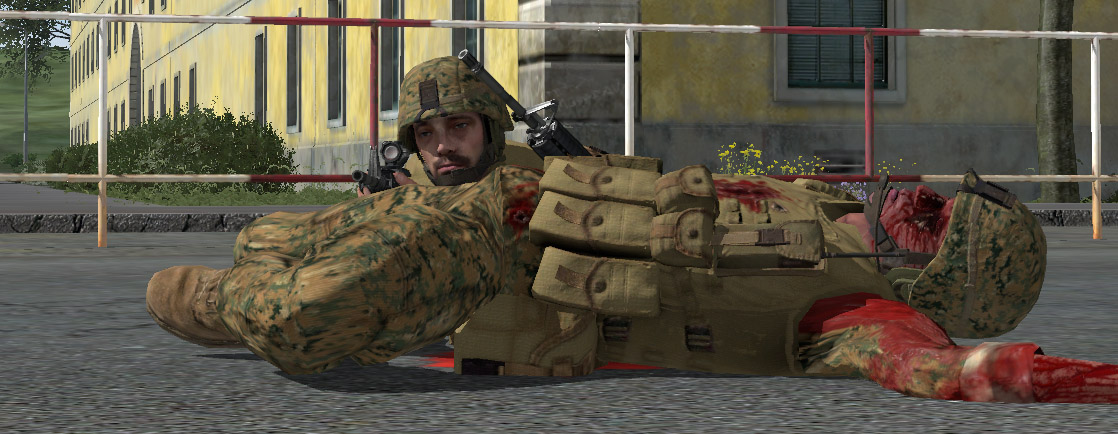
Desperate times call for desperate measures, after all. Believe it or not, but this technique has come in handy more than a few times in the past for me in OFP/WGL.
:: Home ::
The TrackIR is a 6DOF (six degrees of freedom) head-tracking device that allows you to control your in-game view via natural head movements, scaled up to requires as much or as little movement as you want. If you'd like to see a video demo of the TrackIR5 in ArmA2, check this out.
I highly recommend looking into getting one of these if you're interested in ArmA2 or flight sims and driving games in general.
You really won't find any other upgrades out that will improve gaming immersion as dramatically as this.


