The Arma3 Alpha
This piece is a companion to my Arma3 Alpha Movement & Shooting overview. Please note that this is a description based on the initial Alpha release – expect to see the Arma3 controls evolve to some extent as it moves closer to release. I will attempt to update this to reflect those changes going forward, and keep a note of when and what was changed.

Introduction
Please feel free to share this and the companion video around to anyone who might have thought that Arma2 was a clunky game to play – because it most certainly was, and Arma3 is very different in that regard. Bohemia has put a lot of effort into improving the movement mechanics, animation system, and mouse control of Arma3, and I think anyone who wasn’t happy with it before will be pleased to see these long-desired changes.
Here I’ll cover my personal preferences regarding control bindings. These are not the defaults, and I’m not saying they’re perfect, but they’re what I use, and I really like this setup. Try it and see, or just give the defaults a go – your choice.
There are a few things that everyone should have standardized. For one, if you’re coming from an Arma or DayZ background, you are probably familiar with the concept of freeaim. This is where your weapon moves independent of the screen until it reaches an invisible boundary, at which point your view turns with it. The short version is that freeaim in Arma3 is one of the worst control decisions you can possibly make. It’s off by default – leave it there. Freeaim is a feature for those who are nostalgic about a time when the ArmA controls were just plain bad – leave it there, it’s the past. Let’s move on.
Mouse acceleration – turn it off, unless you’re positive that you want it. If in doubt, just keep it off. Smoothing should be turned off as well. For even more responsive mouse controls, turn “VSync” off in the video options.
Next, let’s look at the actual control binds.
Stances
Default Stances
I use F and V for my stance up and stance down respectively. F is bound to a control called ‘Up’ – nice and cryptic. What this does is toggle between standing and crouched. You can basically think of it like a ‘toggle crouch’ bind that you’d see in other games. V is bound to a control called ‘Go prone’. Again, this is a kind of awkward name for it – it’s more like ‘toggle prone’. If you’re standing or crouched, and you press ‘toggle prone’, you’ll immediately go prone. Simple enough, right? The only thing to remember is that if you’re prone and you press prone again, you’ll stand up. If you’re prone and you press ‘up’, you’ll go to a crouched state.
Note that if you use the F and V binds I use, you’ll want to ensure that ‘Get out’ and ‘Eject’ are changed, as well as any other potentially conflicting binds. I use Ctrl-E, pressed twice, to toggle eject. This is a keybind you will not accidentally press. I don’t have ‘get out’ bound – and I don’t feel that I need it. Your mileage may vary.
Stance Adjust
Ok, so, those are the basic stances. What about stance adjust? (called Adjust in the menus). You need a key that’s easily accessible for your stance adjustment – this is the fine-tuning you can do; we’ll talk more about it later, but for now just consider what key you’d like to use for it. I recommend Tab, CAPSLOCK, left control, or left alt. Personally, I use left alt. It needs to be a key you can comfortably press while also accessing your forward and back keys – W and S by default.
Movement Speeds
Walking & Running
You also want to make sure you’re using a good walk/run method. I recommend binding Walk or run temporary to left shift. When you hold this, you’ll walk. There’s also a toggle for it, called walk or run toggle, but I personally don’t use that. I believe it’s bound to double-tap left shift – this can lead to accidentally toggling it, so I just leave it off. There’s a bind for W+S and S+W to toggle between walk and jog – unbind it; there’s a better method to use.
Tactical Pace
Next we have tactical pace – this is a new movement mode in which instead of jogging, you move slower but with your weapon ready. You could think of this like a urban combat movement speed. I recommend binding this to something intuitive – I use Left Shift + Left Alt. If you use that bind, make sure that you bind it both ways – Left Shift + Left Alt, as well as Left Alt + Left Shift – this means that it won’t matter which key you press first. My rationale for this is that Left Alt acts as a “tactical stance” adjuster, while left shift is my speed modifier. Tactical + speed == tactical pace.
Sprinting / “Turbo”
After that, here’s a cool trick I learned from Karel Moricky of BIS. I’ve been using this keybind for months now in Arma2 and I absolutely love it – it’s clever and streamlines things. The trick is to make it so that your ‘Turbo’ bind – which is another weird way of saying your run key – isn’t double-tap W as it is by default, but instead is the combination of your W and S keys. With this, while moving forward, you can simply roll your finger down to press S at the same time as W, instantly transitioning you into the sprinting state. Try it – it takes a little bit to get used to, but once you’ve got it down, it’s a fantastic method.
Mantle
My mantle key – stepping over an obstacle – is W+X. Like the sprinting bind, this is a clever combination that allows you to take a key that doesn’t conflict with the concept (for me, X is my ‘hold breath’ key) and give it a second purpose when combined with a movement key.
Grenades
Things to unbind
With that being said, there are a few things I recommend unbinding to address some potential latency issues with your controls. Make sure that your Q, W, and E keys do not have any double-tap binds on them. Q and E by default are your evasive keys, and they’ll have double-tap binds. Remove those. This will prevent you from accidentally ending up stuck leaning left or right when you don’t want to be. W by default has a double-tap bind for sprint – if you did what I recommended and used W+S for your keys, you don’t need that – remove it. Any key with a double-tap bind on it will have a slight response lag to it, as part of detecting double-taps. Look for double-tap keys like ejecting or leaving vehicles, toggling into different states, etc, and try to remove the ones that you won’t need.
Mouse Controls
Speaking of, the one last thing you should tweak is your mouse. By default, right clicking brings your irons up, and holding right mouse zooms you in. This is problematic – if you keep this bind, your right-mouse zoom will have about a half-second delay before it happens. I don’t know about you, but that bothers me. What I do to get around this, is remove my ironsights from right mouse, and instead use my Z key for them. I’ve been doing this since at least Arma1 and particularly thanks to the very fast zoom that Arma3 has, I couldn’t go back. Try it. If you like it, use it. If you don’t want to move your ironsight key off of right mouse, you could also try changing it so that zoom is on your Z key. That way you’d have an instantly-responsive zoom, while still retaining the right-mouse ironsights. It’s up to you.
Mousewheel Usage
There are two other binds I do with my mouse that I think are worth considering. I have a Logitech G9X mouse, so you may not have the same functionality – but if you do, it’s worth considering, and if you don’t, it’s worth considering getting a mouse that does.
The G9X has a scroll wheel that has side to side functionality. Press left on the mousewheel and you can trigger an event to happen, same with pressing it right. By default these are set to scroll left and right, but you can modify these buttons to do special keystrokes or act as generic buttons or whatever via the Logitech software.
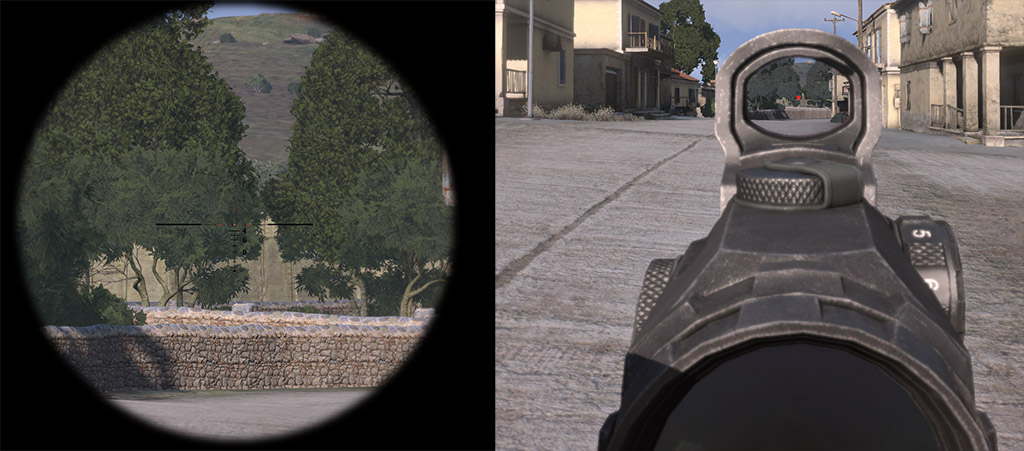
Arma3 has a number of weapons with magnified sights. Here we have a HAMR sight on the MX rifle.
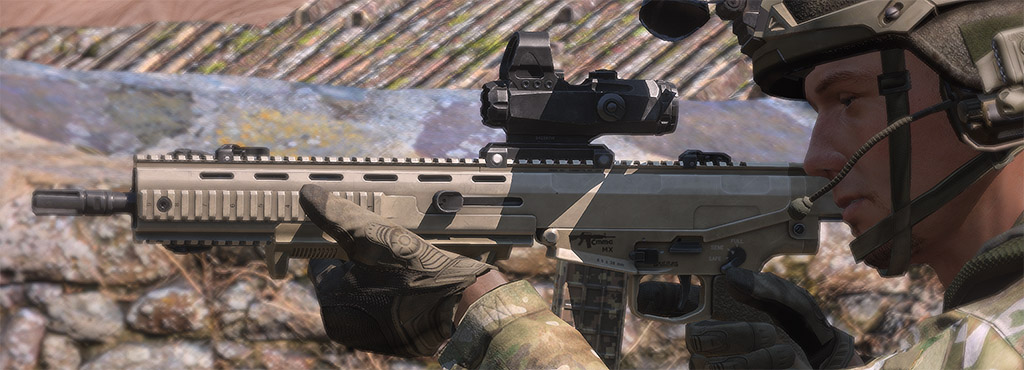
This is great for plinking people at a distance, but what if you want to get up close and personal? Well, Arma3, like Arrowhead, has multiple sights per weapon where appropriate. That little red dot on the top of the scope – that’s an unmagnified optic intended to be used at closer ranges where the magnification is unnecessary or a hindrance. The problem with this is that you need a bind to switch to it, and you want something pretty accessible. If you’re like me, your other keys – the easy-access ones – are full of other important stuff. I can’t really make room on my keyboard because of that. So instead, I use my G9’s middle mouse scroll right ability to toggle between magnified and non-magnified sights. It’s a very intuitive bind and makes good use of the middle mouse button functionality.
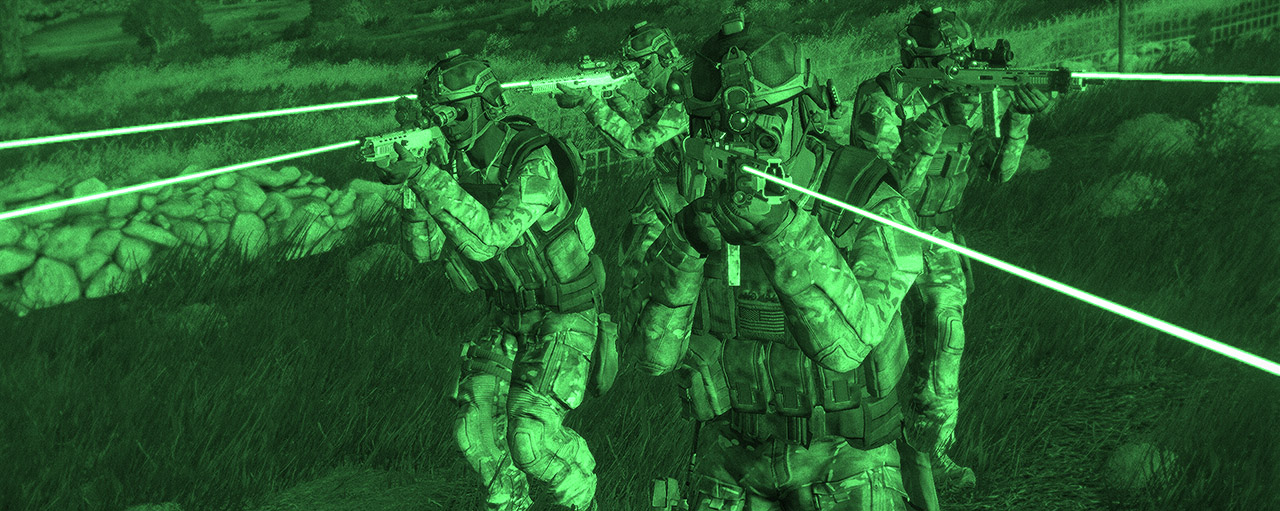
Along those lines, I use my left scroll to toggle the infrared laser attachment, or the flashlight attachment. In reality you don’t necessarily want one of those turned on all the time – having it on left scroll allows me to toggle it on when I need it, then quickly toggle it off. You can find this listed as ‘Lights’ in the keybinds. While it’s significant to use this functionality for the IR laser – having many lasers on at once can be confusing – being able to turn your flashlight on and off quickly is even more important. Any idiot can see a flashlight in the dark, they don’t need nightvision like with the lasers. If you need to illuminate, turn on your light, sweep what you need to see quickly, then turn it off and move. This is how you avoid death in the real world when employing tactical lights, and it’s not too much of a surprise that the same principles apply to Arma.
So, those are some basic controls to get you sorted out for infantry gameplay. If you’d like to see more on how it all comes together, check out my Arma 3 Movement & Shooting tutorial.
Final Thoughts
Arma3 is a great opportunity to reevaluate keybinds, consolidate them, and integrate new possibilities. The default keybinds aren’t bad, but it’s something worth looking at to see if it works for you. For me, these changes have helped me significantly in my gameplay. I am continuing to evaluate the possibilities with A3, and there are a few things I can anticipate experimenting with in the future as they’re introduced to the Alpha.
Best of luck to you in your adventures in Arma3-alpha-land.